SERVICE (Cont.)

AC MOTOR AND GRIND CHAMBER (cont.)


18

1

19

17


20

7

6

4

5


11

10

9

8

3


14


2

1


16


13


15

7


12


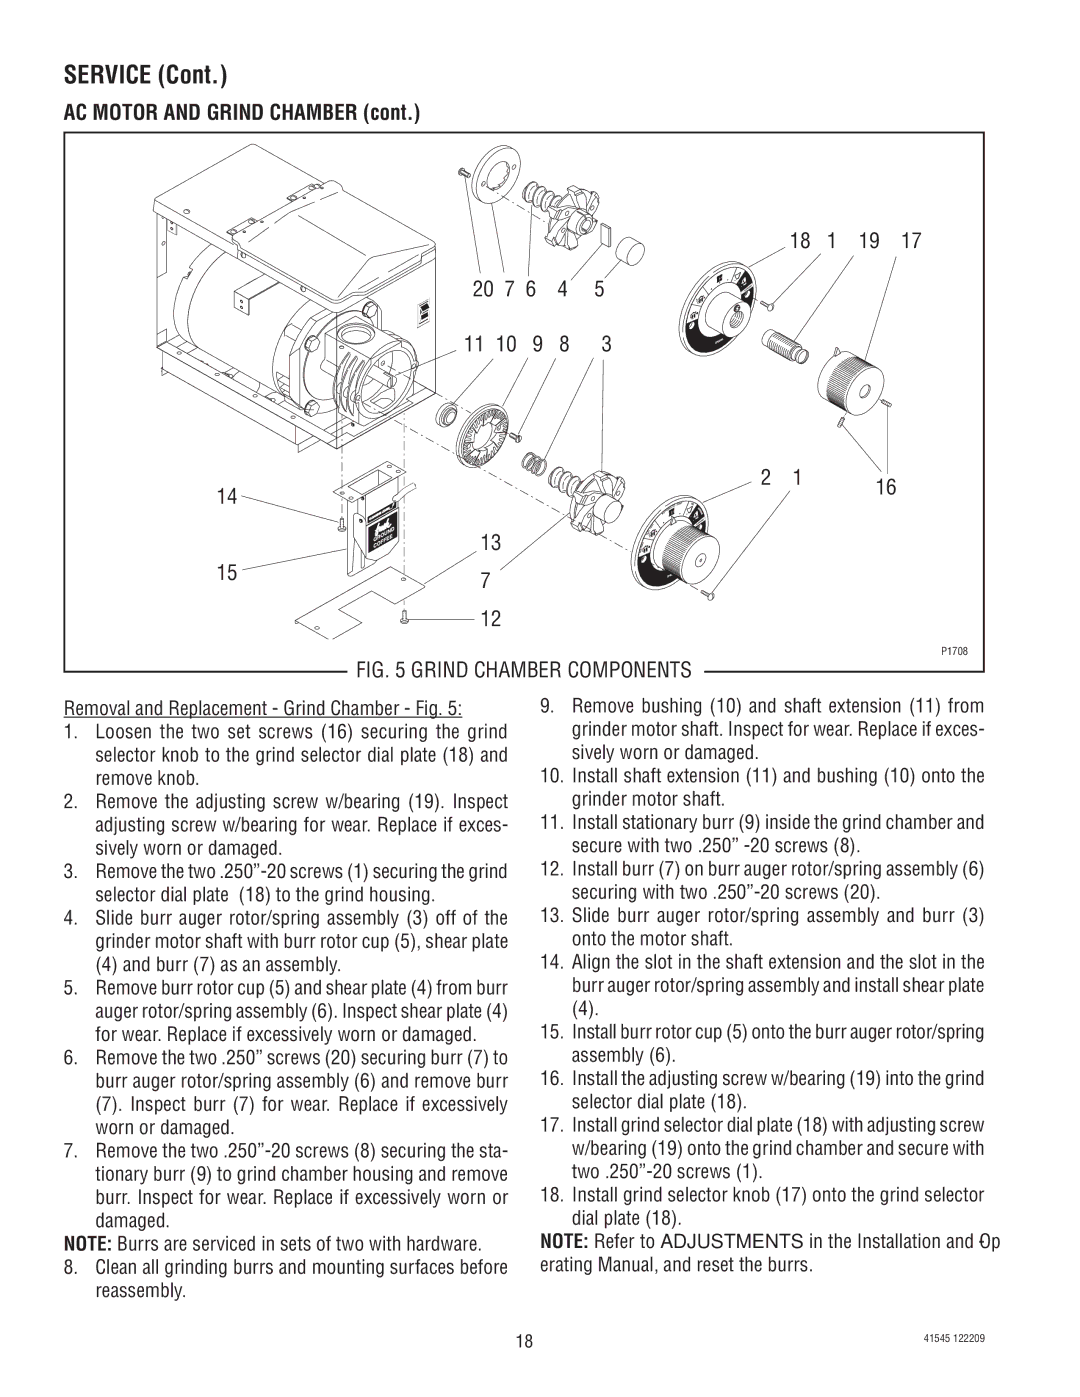
FIG. 5 GRIND CHAMBER COMPONENTS


P1708


Removal and Replacement - Grind Chamber - Fig. 5:

1.Loosen the two set screws (16) securing the grind selector knob to the grind selector dial plate (18) and remove knob.

2.Remove the adjusting screw w/bearing (19). Inspect adjusting screw w/bearing for wear. Replace if exces- sively worn or damaged.

3.Remove the two .250”-20 screws (1) securing the grind selector dial plate (18) to the grind housing.

4.Slide burr auger rotor/spring assembly (3) off of the grinder motor shaft with burr rotor cup (5), shear plate

(4)and burr (7) as an assembly.

5.Remove burr rotor cup (5) and shear plate (4) from burr auger rotor/spring assembly (6). Inspect shear plate (4) for wear. Replace if excessively worn or damaged.

6.Remove the two .250” screws (20) securing burr (7) to burr auger rotor/spring assembly (6) and remove burr

(7).Inspect burr (7) for wear. Replace if excessively worn or damaged.

7.Remove the two .250”-20 screws (8) securing the sta- tionary burr (9) to grind chamber housing and remove burr. Inspect for wear. Replace if excessively worn or damaged.

NOTE: Burrs are serviced in sets of two with hardware.

8.Clean all grinding burrs and mounting surfaces before reassembly.

9.Remove bushing (10) and shaft extension (11) from grinder motor shaft. Inspect for wear. Replace if exces- sively worn or damaged.

10.Install shaft extension (11) and bushing (10) onto the grinder motor shaft.

11.Install stationary burr (9) inside the grind chamber and secure with two .250” -20 screws (8).

12.Install burr (7) on burr auger rotor/spring assembly (6) securing with two .250”-20 screws (20).

13.Slide burr auger rotor/spring assembly and burr (3) onto the motor shaft.

14.Align the slot in the shaft extension and the slot in the burr auger rotor/spring assembly and install shear plate

(4).

15.Install burr rotor cup (5) onto the burr auger rotor/spring assembly (6).

16.Install the adjusting screw w/bearing (19) into the grind selector dial plate (18).

17.Install grind selector dial plate (18) with adjusting screw w/bearing (19) onto the grind chamber and secure with two .250”-20 screws (1).

18.Install grind selector knob (17) onto the grind selector

dial plate (18).

NOTE: Refer to ADJUSTMENTS in the Installation and Op- erating Manual, and reset the burrs.

18

41545 122209


Page 18
Image 18
Bunn LPG-2, G9WD, G2 TRIFECTA, G9-2T DBC, FPG-2 service manual Grind Chamber Components

FPG-2, G9-2T DBC, G9-2, G2 TRIFECTA, G9 specifications

Bunn has established itself as a leader in the coffee and beverage equipment industry, providing advanced solutions that cater to a variety of needs. Among its notable products are the Bunn LPG-2, G9, FPG-2, G9-2, and G9WD, which showcase the company’s commitment to innovation, quality, and efficiency.

The Bunn LPG-2 is an ideal solution for high-volume coffee production. This model features a two-watt heating element that ensures rapid brew cycles and consistent temperature control. With a sleek design and user-friendly interface, the LPG-2 simplifies the brewing process while delivering exceptional coffee quality. Its large capacity enables institutions to serve multiple customers simultaneously, making it suitable for restaurants, cafes, and hotels.

The G9 series, particularly the G9 and G9-2, are known for their versatility and robust performance. Both models come equipped with a stainless steel hot water faucet, allowing users to draw hot water for various applications such as tea or soup preparation. The G9 model is designed for single-brew operation, while the G9-2 accommodates dual brewing, making it an efficient choice for those needing to meet demand quickly. Additionally, both G9 models have advanced brewing technology to ensure optimal flavor extraction.

The FPG-2 model stands out for its precision and control over brewing parameters. It features a touchscreen interface that allows users to customize brew strength and temperature, ensuring that each cup meets individual preferences. The FPG-2 is also remarkably user-friendly, which is essential in a busy environment. Its dual-brew functionality allows it to serve two different coffee options simultaneously, enhancing service efficiency.

The G9WD is designed for those who require the ultimate convenience. Featuring a built-in water line connection, the G9WD minimizes the need for manual refilling, ensuring a continuous supply of fresh coffee. This model is equipped with a programmable timer, allowing users to set brew cycles in advance, which can be a significant time-saver during peak hours.

In summary, the Bunn LPG-2, G9, FPG-2, G9-2, and G9WD offer a range of features that cater to various coffee brewing needs. With advanced technologies, efficient designs, and user-centric interfaces, these models are engineered to deliver consistent, high-quality beverages, making them essential tools for any coffee-focused establishment. Whether for high-volume brewing or versatile beverage options, Bunn's offerings stand out in the competitive landscape of beverage equipment.