User’s Guide
QA7-0884-V01
Conventions
Using the Printer Safely
Always push the plug completely into the power outlet
Never use flammable sprays near the printer
Never attempt to disassemble or modify the printer
Never place the printer on a thick carpet or rug
Always grasp the plug when you unplug the power cord
Never use an extension cord
BJ Print Head and ink tanks
Table of Contents
Adjusting color Printout is unclear, faded
Specifications Canon Technical Support
Quick Start Guide
About your guides
User’s Guide on CD-ROM
Reference Guides on CD-ROM
On-line Help
Is everything ready?
Have you completed setting up the printer?
Is the printer switched on?
Is the printer ready to print?
Printing photographs
Summary of printing photographs
Make sure that the printer is switched on
Printing a photograph in Windows 98, Windows
Printing
Click the Properties button
Click the OK button to start the print job
Make sure the printer is switched on
Printing a photograph with the Macintosh
Select the Media Type for your print job
Click the Photo icon for the Print Mode Printing
Click the Print button
Using the Scanner Cartridge
What you need
Summary of the scanning procedures
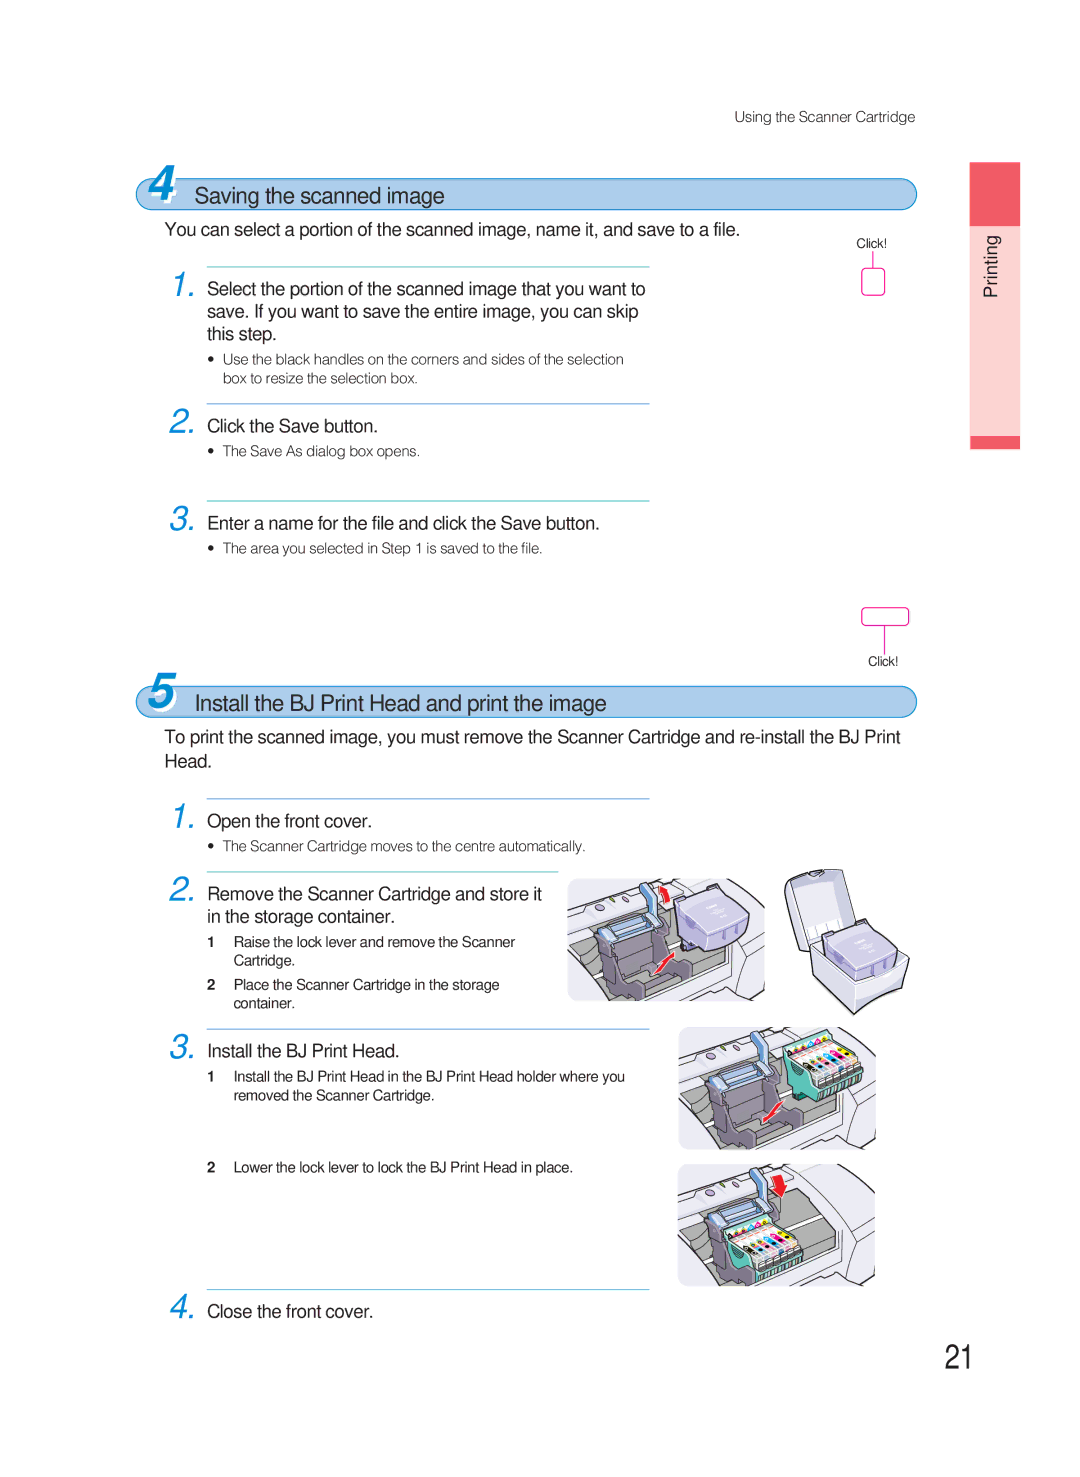
Switch on the printer and open the front cover
Install the Color Image Scanner Cartridge IS-52
Close the front cover
Perform white level calibration
Set the white level calibration sheet
Click the OK button
Scan the original photograph
Click the Scan button
Install the BJ Print Head and print the image
Saving the scanned image
Start the print job
Click the Cancel button
Insert the white calibration sheet in the printer
Click the OK button Set the original in the scanning holder
Enter a file name and click the Save button
Click the Close box to close is Scan
Close the front cover Set the media in the printer
Close the software application
Printing a photograph from a digital camera
Summary of the procedure for printing a digital photograph
Now let’s print a digital photograph
Set the media in the printer
Perform the printer driver settings
Save to a file the photograph taken with the digital camera
Starting the print job
Click the Photo icon for the Print Mode selection
Make sure that the Print dialog is for the BJC-8200
Using the Printer Driver
Operation Flow
Using the Printer Driver
Opening the printer driver
Main tab
Maintenance tab
Selecting the printer driver options
Layout tab
Selecting a media type
Choosing a print mode
Using the Printer
Driver
Changing the page size
Open the Paper Setting dialog box
Open the Utilities dialog box
Print dialog box
Setup dialog box
Printer Utility dialog box
Photo
Selecting a print mode
Graphic
Manual
Changing the paper size
Loading Paper
Canon media for quality image printing
Paper or media you should never load in the printer
Paper thickness
Load limit and Paper Thickness Lever position
Raise the paper thickness lever to Mark
Setting media correctly
Loading Photo Paper Pro PR
With the glossy side facing up, place the sheet of Photo
Is aligned
Loading plain paper or High Resolution Paper HR
Tray
Slide the paper guide to the left edge of the stack
Photo Film with the right side of the sheet feeder
Loading High Gloss Photo Film HG
Tray Slide the paper guide completely to the left
Insert the sheet into the printer until it stops
Loading Glossy Photo Paper GP
Loading Glossy Photo Cards FM
Loading Envelopes
Slide the paper guide to left edge of the stack
Shirt Transfer TR-201
Other media for creative printing
Transparencies CF-102
Banner Paper BP-101
Here is an overview of what is described in this chapter
Troubleshooting
Other software applications are running in the background
Cannot install the printer
Make sure the driver was installed correctly
Confirm that the CD-ROM is operating normally
Printer prints meaningless characters and symbols
Cancelling a print job
During printing, rapidly press the Power button twice
Setting thick paper for printing
Printing on thick paper
Paper Jams
Follow the procedure below to clear a paper jam
Paper or media jammed during auto feed
Paper jammed during manual feed
Possible
Low ink alert
Open the BJ Print Monitor to confirm the low ink alert
Printer beeps and it does not print
Beeps
Error message appears
BJ Status Monitor and BJ Print Monitor Error Messages
Operating System Errors
Adjusting the print mode settings
Using the recommended paper or special media
Changing the printer driver settings
Printing quality is unsatisfactory
Improving print quality with the Photo Optimizer
Adjusting the Detailed Setting
Open the Print dialog box, click
Aligning the print head
Head Alignment icon
Properties Click the Maintenance tab then click Print
Read the message and click the OK button
Read the message and click the OK button to continue
Click the Send button
Reading the print head alignment pattern
Horizontal Alignment
Adjusting color
Summary of correcting the problem
Printout is unclear, faded
Printing a nozzle check pattern
Click the down-arrow to select Test Print
Software application from the File menu, select Page Setup
Click the Nozzle Check Pattern icon
Cleaning the print head
Software application, from the File menu, select Setup
Deep cleaning the print head
Click Print head deep cleaning icon
Replacing an ink tank
Remove the empty ink tank
Check the position of the ink tanks in the BJ Print Head
After cleaning the print head, print a nozzle check pattern
Color is strange
Check the positions of the ink tanks in the BJ Print Head
Is the scanner driver installed correctly?
When connected via USB
Scanner Cartridge does not operate correctly
Replacing the BJ Print Head
Replace the BJ Print Head
Replacing an ink tank P.74
Specifications
Appendices
Recommended printing area width x height
Canon Technical Support
About the operating environment
Canon INC