Playing a Demo Tune
Pressing the DEMO button starts demo tune play, which plays the 100
❚ NOTES ❚
•Pressing [+] (forward) or
•You can change the tone setting of the keyboard (page
•MIDI, Layer, and Split are disabled while a demo tune is play- ing.
|
|
| • For input of |
Number |
|
| numbers to change |
buttons |
|
| a displayed |
|
| number or setting. | |
|
|
| |
|
|
| • Negative values |
|
|
| cannot be input |
|
| using the number | |
|
| buttons. Use [+] | |
buttons |
|
| (increase) and |
|
|
| (decrease) instead. |
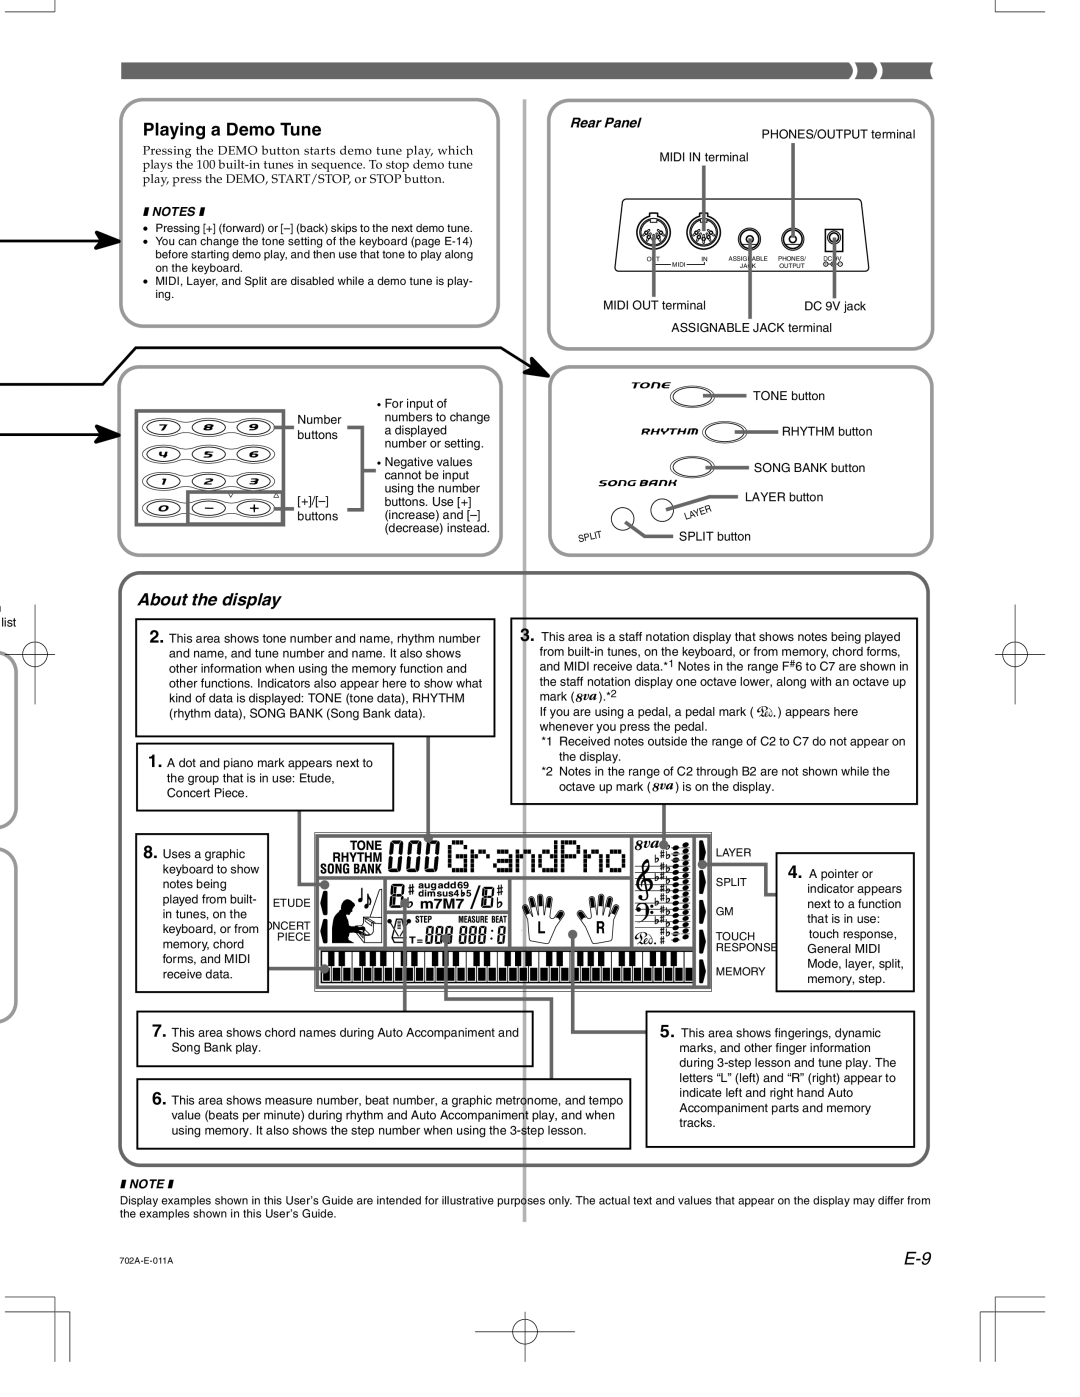
Rear Panel
PHONES/OUTPUT terminal
MIDI IN terminal
OUT | IN | ASSIGNABLE | PHONES/ | DC 9V |
MIDI |
| JACK | OUTPUT |
|
MIDI OUT terminal | DC 9V jack |
ASSIGNABLE JACK terminal
TONE button
RHYTHM button
SONG BANK button
LAYER button
| LAYER |
SPLIT | SPLIT button |
About the display
list
2.This area shows tone number and name, rhythm number 3. This area is a staff notation display that shows notes being played
and name, and tune number and name. It also shows | from | ||||
other information when using the memory function and | and MIDI receive data.*1 Notes in the range F#6 to C7 are shown in | ||||
other functions. Indicators also appear here to show what | the staff notation display one octave lower, along with an octave up | ||||
kind of data is displayed: TONE (tone data), RHYTHM | mark ( | ).*2 |
|
| |
(rhythm data), SONG BANK (Song Bank data). | If you are using a pedal, a pedal mark ( | ) appears here | |||
|
| whenever you press the pedal. |
| ||
|
| *1 Received notes outside the range of C2 to C7 do not appear on | |||
1. A dot and piano mark appears next to |
| the display. |
|
| |
| *2 Notes in the range of C2 through B2 are not shown while the | ||||
the group that is in use: Etude, |
| ||||
| octave up mark ( | ) is on the display. |
| ||
Concert Piece. |
|
| |||
|
|
|
|
| |
|
|
|
|
|
|
8. Uses a graphic |
| LAYER | 4. A pointer or | |
keyboard to show |
| SPLIT | ||
notes being |
| indicator appears | ||
played from built- |
|
| ||
ETUDE | GM | next to a function | ||
in tunes, on the | ||||
| that is in use: | |||
CONCERT |
| |||
keyboard, or from | PIECE | TOUCH | touch response, | |
memory, chord | ||||
| RESPONSE | General MIDI | ||
forms, and MIDI |
| |||
| MEMORY | Mode, layer, split, | ||
receive data. |
| |||
| memory, step. | |||
|
|
| ||
7. This area shows chord names during Auto Accompaniment and | 5. This area shows fingerings, dynamic | |||
Song Bank play. |
| marks, and other finger information | ||
|
| during | ||
|
| letters “L” (left) and “R” (right) appear to | ||
6. This area shows measure number, beat number, a graphic metronome, and tempo | indicate left and right hand Auto | |||
Accompaniment parts and memory | ||||
value (beats per minute) during rhythm and Auto Accompaniment play, and when | ||||
tracks. |
| |||
using memory. It also shows the step number when using the |
| |||
|
| |||
❚ NOTE ❚
Display examples shown in this User’s Guide are intended for illustrative purposes only. The actual text and values that appear on the display may differ from the examples shown in this User’s Guide.