Appendix D Configuring the Switch with the CLI-Based Setup Program

Entering the Initial Configuration Information

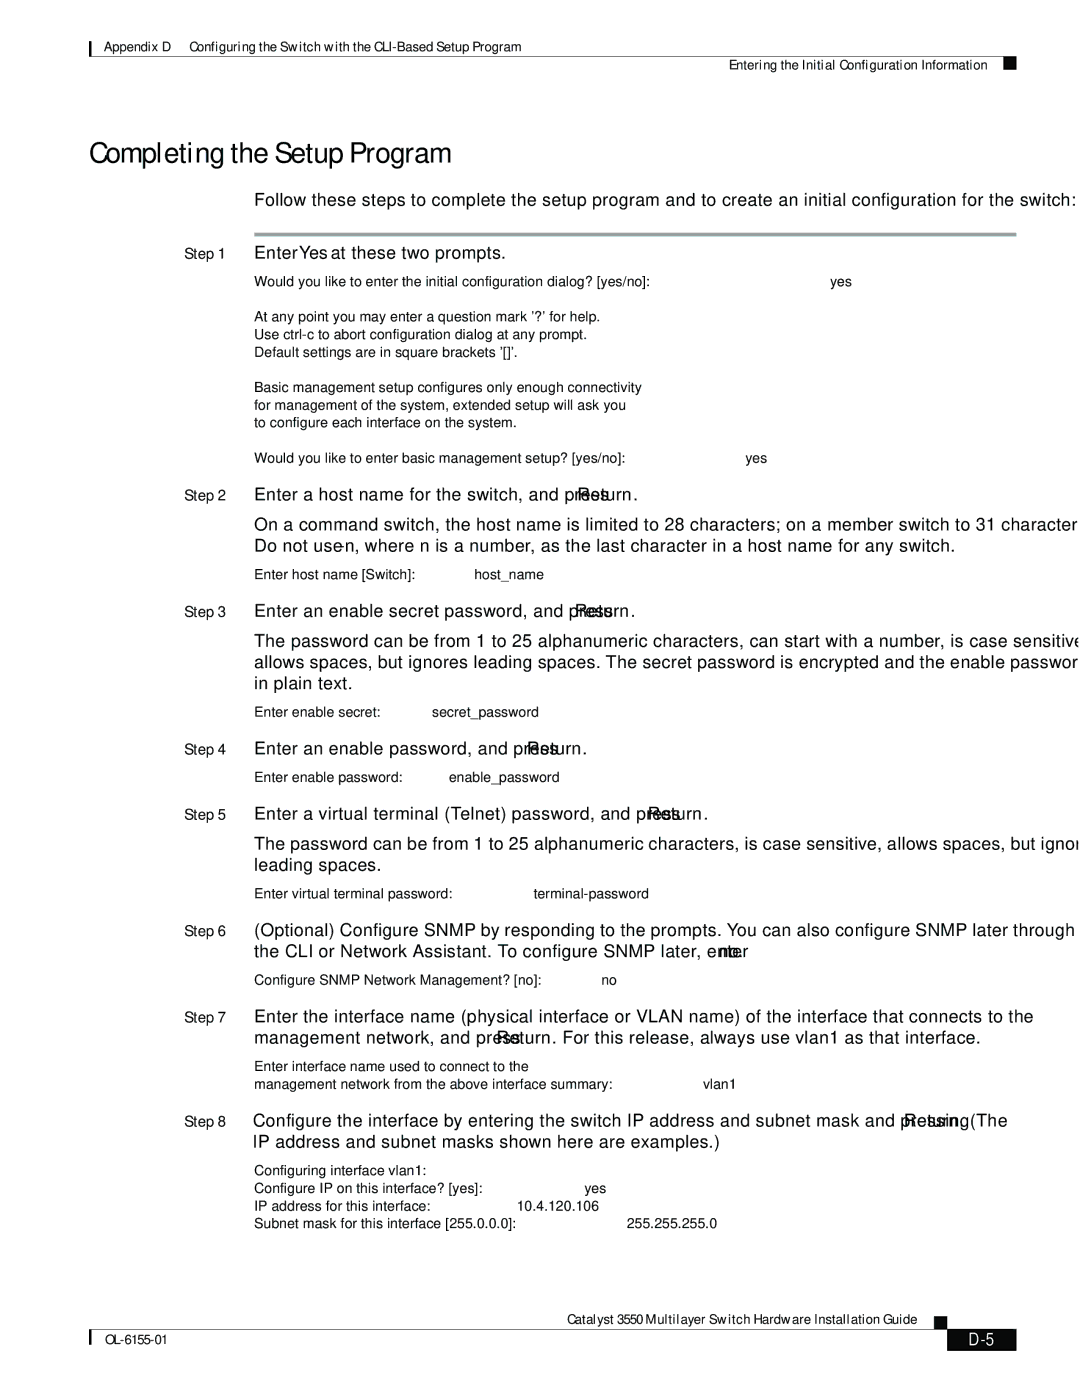
Completing the Setup Program


Follow these steps to complete the setup program and to create an initial configuration for the switch:


Step 1

Enter Yes at these two prompts.


Would you like to enter the initial configuration dialog? [yes/no]: yes


At any point you may enter a question mark '?' for help.


Use ctrl-c to abort configuration dialog at any prompt.


Default settings are in square brackets '[]'.


Basic management setup configures only enough connectivity


for management of the system, extended setup will ask you


to configure each interface on the system.


Would you like to enter basic management setup? [yes/no]: yes


Step 2

Enter a host name for the switch, and press Return.


On a command switch, the host name is limited to 28 characters; on a member switch to 31 characters.


Do not use -n, where n is a number, as the last character in a host name for any switch.


Enter host name [Switch]: host_name


Step 3

Enter an enable secret password, and press Return.


The password can be from 1 to 25 alphanumeric characters, can start with a number, is case sensitive,


allows spaces, but ignores leading spaces. The secret password is encrypted and the enable password is


in plain text.


Enter enable secret: secret_password


Step 4

Enter an enable password, and press Return.


Enter enable password: enable_password


Step 5

Enter a virtual terminal (Telnet) password, and press Return.


The password can be from 1 to 25 alphanumeric characters, is case sensitive, allows spaces, but ignores


leading spaces.


Enter virtual terminal password: terminal-password


Step 6

(Optional) Configure SNMP by responding to the prompts. You can also configure SNMP later through


the CLI or Network Assistant. To configure SNMP later, enter no.


Configure SNMP Network Management? [no]: no


Step 7

Enter the interface name (physical interface or VLAN name) of the interface that connects to the


management network, and press Return. For this release, always use vlan1 as that interface.


Enter interface name used to connect to the


management network from the above interface summary: vlan1


Step 8

Configure the interface by entering the switch IP address and subnet mask and pressing Return. (The


IP address and subnet masks shown here are examples.)


Configuring interface vlan1:


Configure IP on this interface? [yes]: yes


IP address for this interface: 10.4.120.106


Subnet mask for this interface [255.0.0.0]: 255.255.255.0


Catalyst 3550 Multilayer Switch Hardware Installation Guide


OL-6155-01


D-5


Page 77
Image 77
Cisco Systems 3550 manual Completing the Setup Program, Enter Yes at these two prompts

3550 specifications

Cisco Systems 3550 is a series of enterprise-class multilayer switches that have gained popularity in both enterprise and service provider networks. Introduced in the early 2000s, the 3550 series was designed to meet the increasing demand for advanced networking capabilities, including Layer 2 and Layer 3 switching, making it suitable for various network environments.

A standout feature of the Cisco 3550 is its support for advanced Layer 3 switching capabilities. This means it can perform routing functions similar to traditional routers while maintaining the speed and efficiency of a switch. The 3550 facilitates IP routing, enabling enhanced communication among different subnets without the need for additional routing devices.

The Cisco 3550 series is equipped with a range of ports, typically providing up to 48 Ethernet 10/100 ports and optional Gigabit Ethernet ports, ensuring scalability and flexibility in various network designs. The switches support Power over Ethernet (PoE), allowing the delivery of electrical power through Ethernet cables to connected devices, such as IP phones and wireless access points, streamlining installations and reducing cable management complexity.

Quality of Service (QoS) is another essential feature of the Cisco 3550. The switch supports advanced QoS mechanisms, which provide the ability to prioritize traffic. This is crucial in environments where bandwidth is limited, as it ensures that time-sensitive applications, like VoIP and video conferencing, receive sufficient bandwidth to function optimally.

In terms of security, the Cisco 3550 includes features such as access control lists (ACLs), port security, and VLANs (Virtual Local Area Networks). These features help in segmenting network traffic and preventing unauthorized access to sensitive information, thereby enhancing network security.

The Cisco 3550 is highly regarded for its robustness and reliability, making it a suitable choice for various organizations looking to maintain high availability in their networking environments. Its management capabilities include support for Cisco's IOS software, which offers a command-line interface for configuration, as well as options for SNMP and web-based management tools.

Overall, the Cisco Systems 3550 series is well-regarded for its multilayer switching capabilities, comprehensive feature set, and versatility in meeting the diverse needs of modern networking, making it a favored solution for businesses aiming to build efficient and secure network infrastructures.