800 553-NETS Fax 408
Cisco MDS 9200 Series Hardware Installation Guide
October
Cisco Systems, Inc 170 West Tasman Drive San Jose, CA
Turn the television or radio antenna until the interference stops
Cisco MDS 9200 Series Hardware Installation Guide
C O N T E N T S
Installation and Configuration Note
Command-Line Interface
Cisco MDS Fibre Channel Bladeswitch for IBM Blade Center
Installing the Cisco MDS 9200 Series
Switching Module Features
Services Modules
18/4-Port Multiservice Module
Removing and Installing Cables into SFP Transceivers
Grounding the Chassis Starting Up the Switch
Removing and Installing Components
Connecting to a Fibre Channel Port
Module Specifications
Cabinet and Rack Installation
Before Installing the Shelf Brackets
Switch Specifications
Cable and Port Specifications
Connecting the COM1 Port to a Modem C-4
Supported Power Cords and Plugs C-7 Power Cords C-7
Jumper Power Cord
A P P E N D I X D
Site Preparation Checklist
Chassis and Module Information D-4
Contact and Site Information
Product Overview
Specifications”
Multiservice Module”
New and Changed Information
Overview” section on
Multiservice Federal
Switching Module”
The “Product
section on page B-1
Services Module”
The “12-Port 4-Gbps
and the “Technical
OL-17468-02
Connecting the
Installing the Cisco
Describes how to install the Cisco MDS 9200 Series, and how to
install modules, power supplies, and fan assemblies
Conventions
Warnung Dieses Warnsymbol bedeutet Gefahr. Sie befinden sich in einer Situation, die zu einer Körperverletzung führen könnte. Bevor Sie mit der Arbeit an irgendeinem Gerät beginnen, seien Sie sich der mit elektrischen Stromkreisen verbundenen Gefahren und der Standardpraktiken zur Vermeidung von Unfällen bewußt. Übersetzungen der in dieser Veröffentlichung enthaltenen Warnhinweise finden Sie im Dokument Regulatory Compliance and Safety Information Informationen zu behördlichen Vorschriften und Sicherheit, das zusammen mit diesem Gerät geliefert wurde
xiii
Cisco MDS 9124 Multilayer Fabric Switch Quick Start Guide
Regulatory Compliance and Safety Information
Hardware Installation
Cisco MDS Storage Services Module Interoperability Support Matrix
Installation and Configuration Note
Command-Line Interface
Intelligent Storage Networking Services Configuration Guides
Troubleshooting and Reference
OL-17468-02
C H A P T E R
Product Overview
Chassis, page
Cisco MDS Fibre Channel Bladeswitch for IBM Blade Center, page
Switching Modules, page Services Modules, page Fan Module, page
Chassis
Fan module
Cisco MDS 9216A Chassis
Figure 1-2 Cisco MDS 9216i Chassis
Cisco MDS 9216A Integrated Supervisor Module, page
Integrated Supervisor Modules
Cisco MDS 9222i Integrated Supervisor Module, page
Cisco MDS 9216i Integrated Supervisor Module, page
Cisco MDS 9216i Integrated Supervisor Module
Cisco MDS 9222i Integrated Supervisor Module
Cisco MDS 9216A Integrated Supervisor Module
Page
LEDs for the Cisco MDS 9200 Series Integrated Supervisor Modules
LEDs on the Cisco MDS 9200 Series Integrated Supervisor Modules
1-10
Interface Modules
LEDs on the Cisco MDS 9200 Series Interface Module
LEDs on the Interface Module
1-11
24-Port 4-Gbps Fibre Channel Switching Module
Switching Modules
4/44-Port 8-Gbps Host-Optimized Fibre Channel Switching Module
48-Port 4-Gbps Fibre Channel Switching Module
16-Port 2-Gbps Fibre Channel Switching Module
4/44-Port 8-Gbps Host-Optimized Fibre Channel Switching Module
48-Port 4-Gbps Fibre Channel Switching Module
32-Port 2-Gbps Fibre Channel Switching Module
1-14
24-Port 4-Gbps Fibre Channel Switching Module
Status LED
Fibre Channel ports
Figure 1-12 12-Port 4-Gbps Fibre Channel Switching Module
12-Port 4-Gbps Fibre Channel Switching Module
1-15
Figure 1-11 24-Port 4-Gbps Fibre Channel Switching Module
Figure 1-13 4-Port 10-Gbps Fibre Channel Switching Module
4-Port 10-Gbps Fibre Channel Switching Module
1-16
1-17
LEDs on the Generation 2 Switching Modules
32-Port 2-Gbps Fibre Channel Switching Module
Figure 1-15 Cisco MDS 9000 Family 16-Port 2-Gbps Switching Module
16-Port 2-Gbps Fibre Channel Switching Module
1-18
1-19
Switching Module Features
1-20
LEDs on the Generation 1 Switching Module
14/2-Port Multiprotocol Services Module IP Storage Services Modules
Services Modules
18/4-Port Multiservice Module
1 8/4-Port Multiservice Module
Cisco MDS 9000 Family 18/4-Port Multiservice Module
1-22
1-23
14/2-Port Multiprotocol Services Module
LEDs on the 18/4-Port Multiservice Module
Figure 1-17 Cisco MDS 9000 Family MPS-14/2 Module
1-24
1-25
IP Storage Services Modules
LEDs on the 14/2-Port Multiprotocol Services Module
LINK
1-26
Figure 1-18 Cisco MDS 9000 Family IPS-8 Module
Figure 1-19 Cisco MDS 9000 Family IPS-4 Module
1-27
32-Port Fibre Channel Storage Services Module
LEDs on IP Storage Services Module
StorageModule
1-28
Figure 1-20 Cisco MDS 9000 Family SSM
1-29
32-Port Fibre Channel Advanced Services Module
LEDs on the Storage Services Module
Figure 1-21 Cisco MDS 9000 Family ASM
1-30
1-31
Caching Services Module
LEDs on the Fibre Channel Advanced Services Module
Figure 1-22 Cisco MDS 9000 Family CSM
1-32
STATUS BATTERY
Cashing Services Module
94038
1-33
Figure 1-23 Cisco MDS 9000 Family CSM Internal View
LEDs for the Cisco MDS 9000 Family CSM
LEDs on the Caching Services Module
1-34
LEDs for the Cisco MDS 9200 Series Power Supplies
Power Supplies
1-35
Figure 1-24 Cisco MDS 9200 Series with 845-W Dual Power Supplies
1-36
Fan Module
Supported Transceivers
1-37
X2 Fibre Channel Transceivers
Fibre Channel SFP Transceivers
Combination Fibre Channel/Gigabit Ethernet SFP Transceivers
1-38
Gigabit Ethernet SFP Transceivers
DWDM Fibre Channel SFP Transceivers
CWDM Combination Fibre Channel/Gigabit Ethernet SFP Transceivers
Starting Up the Switch, page Removing and Installing Components, page
Installing the Cisco MDS 9200 Series
Preinstallation, page
Installing the Chassis in a Cabinet or Rack, page
Required Equipment, page Unpacking and Inspecting the Switch, page
Preinstallation
Installation Options
Installation Options, page Installation Guidelines, page
Installation Guidelines
Required Equipment
Unpacking and Inspecting the Switch
Part Description
Installing the Chassis in a Cabinet or Rack
Quantity
C brackets
Figure 2-2 Installing C Brackets onto the Cisco MDS 9200 Series
94297
Figure 2-3 C Brackets for the Cisco MDS 9200 Series Close-Up View
Figure 2-4 Installing the Cisco MDS 9200 Series in the Rack
99001
2-10
Figure 2-5 Inserting and Installing Slider Rails Back View
Installing the Switch in a Cabinet with Insufficient Front Clearance
2-11
Installing the Switch in a Cabinet with Insufficient Front Clearance
Screws, M4
2-12
Chapter 2 Installing the Cisco MDS 9200 Series
Installing the Switch in a Cabinet with Insufficient Front Clearance
Figure 2-8 Installing C Brackets onto the Cisco MDS 9200 Series
2-13
Figure 2-9 C Brackets for the Cisco MDS 9200 Series Close-Up View
2-14
9216i
2-15
Figure 2-11 Installing C Brackets onto the Cisco MDS 9200 Series
Figure 2-12 C Brackets for the Cisco MDS 9200 Series Close-Up View
Installing the Cisco MDS 9200 Series Rear-Facing into Cabinet
2-16
Front cabinet mounting rails
2-17
Rear cabinet mounting rails
Figure 2-14 Inserting and Installing Slider Rails Front View
2-18
2-19
System Grounding
Proper Grounding Practices
Grounding Recommendations
2-20
Environment
Level
2-21
Preventing Electrostatic Discharge Damage
ESD ground strap
2-22
2-23
Establishing the System Ground
Required Tools and Equipment
2-24
Grounding the Chassis
ESD socket on switch
2-25
2-26
Starting Up the Switch
Step 4 Connect the other end of the power cables to an AC power source
2-27
Maintaining a Caching Services Module, page
Removing and Installing Components
Removing and Installing Switching and Services Modules
Removing and Installing Switching and Services Modules, page
2-29
Removing a Caching Services Module, page
Removing Other Switching or Services Modules, page
Verifying Installation of a Switching or Services Module, page
between slot guides
2-30
Figure 2-18 Positioning the Module in the Chassis
Insert module
Figure 2-19 Clearing the EMI Gasket
Removing a Caching Services Module
2-31
2-32
Removing Other Switching or Services Modules
The following warning applies only to the Caching Services Module
2-33
2-34
Verifying Installation of a Switching or Services Module
Maintaining the Batteries on the Caching Services Module, page
Maintaining a Caching Services Module
Maintaining the Batteries on the Caching Services Module
Maintaining the Disk Drives on the Caching Services Module
Removing a Power Supply, page Installing a Power Supply, page
Removing and Installing Power Supplies
Removing a Power Supply
Installing a Power Supply
Figure 2-22 Handling an 845-W AC Power Supply
2-37
Figure 2-21 845-W AC Power Supply Front Panel
2-38
Removing and Installing the Fan Module
Removing a Fan Module, page Installing a Fan Module, page
2-39
Installing a Fan Module
Removing a Fan Module
2-40
Removing the Cisco MDS 9200 Series
Connecting to the MGMT 10/100 Ethernet Port, page
Connecting the Cisco MDS 9200 Series
Connecting to the Console Port, page
Connecting to the COM1 Port, page
Preparing for Network Connections
Connecting to the Console Port
To connect the console port to a computer terminal, follow these steps
Connecting to the COM1 Port
Connecting to the MGMT 10/100 Ethernet Port
Removing and Installing SFP Transceivers, page
Connecting to a Fibre Channel Port
Removing and Installing X2 Transceivers
Removing and Installing X2 Transceivers, page
Transmit optical bore
Removing an X2 Transceiver
Removing and Installing SFP Transceivers
Installing an X2 Transceiver
Figure 3-6 SFP Transceiver with Bale-Clasp Latch
Installing an SFP Transceiver
Figure 3-5 SFP Transceiver with Mylar Tab Latch
3-10
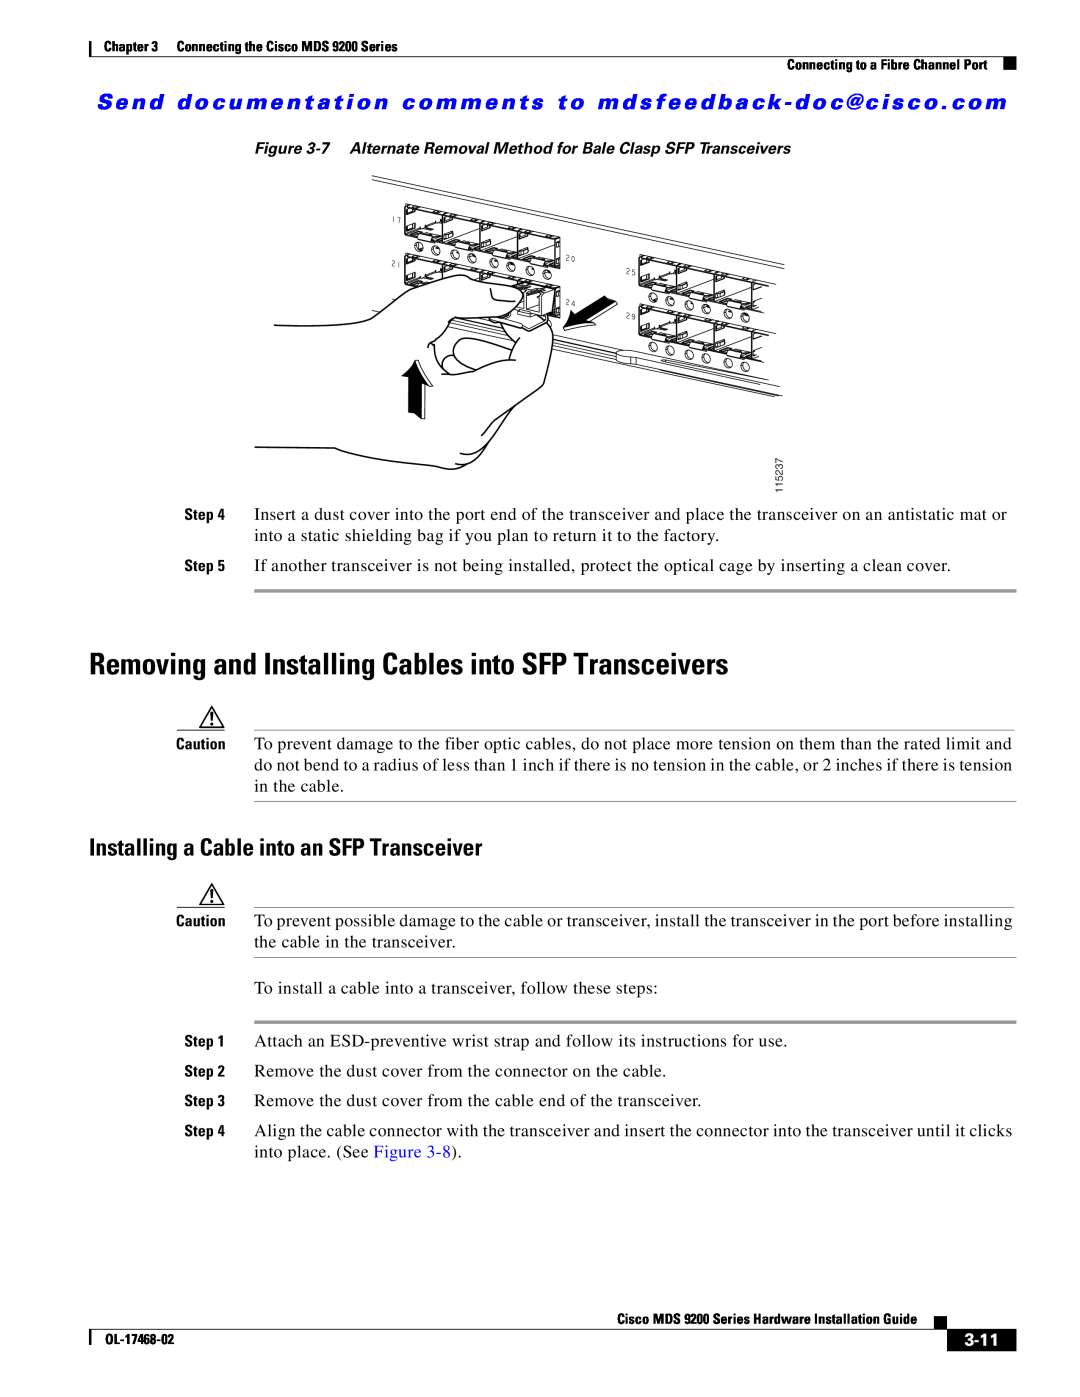
Removing an SFP Transceiver
3-11
Removing and Installing Cables into SFP Transceivers
Installing a Cable into an SFP Transceiver
Figure 3-8 Connecting the LC-Type Cable to a Fibre Channel Port
Removing a Cable from an SFP Transceiver
3-12
3-13
Maintaining SFP Transceivers and Fiber-Optic Cables
3-14
A P P E N D I X A
Cabinet and Rack Installation
Cabinet and Rack Requirements
General Requirements for Cabinets and Racks
Rittal Corporation
Requirements Specific to Perforated Cabinets
Requirements Specific to telco Racks
Requirements Specific to Solid-Walled Cabinets
Requirements Specific to Standard Open Racks
Installing the Switch on the Shelf Brackets, page A-8
Before Installing the Shelf Brackets, page A-5
Installing the Shelf Bracket Kit into a Two-Post telco Rack, page A-6
Installing the Shelf Bracket Kit into a Four-Post EIA Rack, page A-7
Required Equipment
Before Installing the Shelf Brackets
Installing the Shelf Bracket Kit into a Two-Post telco Rack
Installing the Shelf Bracket Kit into a Four-Post EIA Rack
Installing the Switch on the Shelf Brackets
Removing the Shelf Bracket Kit Optional
A-10
Power Specifications, page B-4
Technical Specifications
Switch Specifications
Switch Specifications, page B-1 Module Specifications, page B-2
Module Specifications
Weight of Modules
Specifications for the Cisco MDS 9200 Series Power Supplies, page B-4
Power Specifications
Specifications for the Cisco MDS 9200 Series Power Supplies
Component Power Requirements and Heat Dissipation Specifications
Page
Cisco 10-Gbps Fibre Channel X2 Transceivers
X2 Transceiver Specifications
General Specification for Cisco 10-Gbps Fibre Channel X2 Transceivers
Description
Cisco 10-Gbps Ethernet X2 Transceivers
Transceiver Module
Product Number
Cisco 10-Gbps Ethernet DWDM X2 Transceiver
General Specification for Cisco 10-Gbps Ethernet X2 Transceivers
Cisco Fibre Channel/Gigabit Ethernet Transceivers, page B-15
SFP and SFP+ Transceiver Specifications
Cisco Fibre Channel SFP and SFP+ Transceivers
Cisco Fibre Channel SFP and SFP+ Transceivers, page B-10
B-11
B-12
and Safety Information for the Cisco MDS 9000 Family
B-13
B-14
B-15
Cisco Fibre Channel/Gigabit Ethernet Transceivers
B-16
B-17
Cisco CWDM SFP Transceivers
Cisco 4-Gbps CWDM SFP Transceivers
B-18
Optical Specification for Cisco 2-Gbps CWDM SFP Transceivers
Table B-32
B-19
Table B-36
B-20
Optical Specification for Cisco 4-Gbps CWDM SFP Transceivers
B-21
General Specifications for Cisco Gigabit Ethernet Transceivers
Cisco Gigabit Ethernet Transceivers
B-22
DWDM SFP Transceivers
A P P E N D I X C
Cable and Port Specifications
Supported Power Cords and Plugs, page C-7
Cables and Adapters Provided
Console Port Pinouts
Connecting the Console Port to a Computer Using the DB-25 Adapter
Console Port
COM1 Port Pinouts
Connecting the Console Port to a Computer Using the DB-9 Adapter
COM1 Port
MGMT 10/100/1000 Ethernet Port
Connecting the COM1 Port to a Modem
10/100/1000BASE-T Management Port Cable Pinout MDI
Figure C-2 Twisted-Pair 10/100/1000BASE-T Cable Schematic
Table C-6
MGMT 10/100 Ethernet Port
Power Cords
Supported Power Cords and Plugs
Page
Figure C-6 Additional Power Supply Plug Supported for 1900-W Only
C-10
Supported Plugs for the 4000-W AC Power Supply
C-11
Jumper Power Cord
C-12
A P P E N D I X D
Site Planning and Maintenance Records
Site Preparation Checklist
Site Preparation Checklist, page D-1
Time
Task No
Planning Activity
Verified By
3. EMI = electromagnetic interference
Contact and Site Information
Table D-2 Contact and Site Information
Contact and Site Information
Table D-4 Module Information
Chassis and Module Information
Contract Number Chassis Serial Number Product Number
Table D-3 Network-Related Information
IN-1
Numerics
I N D E
IN-2
IN-3
IN-4
1-38, B-17
IN-5
2-33
3-11
IN-6