3.CONTROLS / LES COMMANDES / CONTROLES / ![]()
![]()
![]()
■Control unit / Module de commande / Unidad de control /![]()
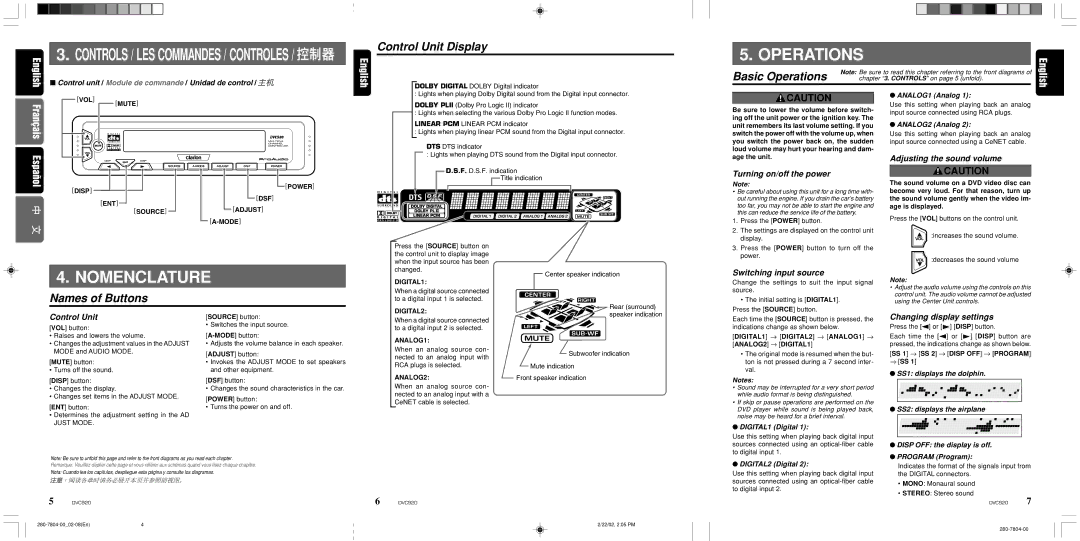
Control Unit Display
DOLBY DIGITAL DOLBY Digital indicator
5. OPERATIONS
Basic Operations | Note: Be sure to read this chapter referring to the front diagrams of |
chapter “3. CONTROLS” on page 5 (unfold). |
[VOL] [MUTE]
: Lights when playing Dolby Digital sound from the Digital input connector.
DOLBY PLII (Dolby Pro Logic II) indicator
![]() : Lights when selecting the various Dolby Pro Logic II function modes.
: Lights when selecting the various Dolby Pro Logic II function modes.
LINEAR PCM LINEAR PCM indicator
: Lights when playing linear PCM sound from the Digital input connector.
DTS DTS indicator
: Lights when playing DTS sound from the Digital input connector.
![]() CAUTION
CAUTION
Be sure to lower the volume before switch- ing off the unit power or the ignition key. The unit remembers its last volume setting. If you switch the power off with the volume up, when you switch the power back on, the sudden loud volume may hurt your hearing and dam- age the unit.
●ANALOG1 (Analog 1):
Use this setting when playing back an analog input source connected using RCA plugs.
●ANALOG2 (Analog 2):
Use this setting when playing back an analog input source connected using a CeNET cable.
Adjusting the sound volume
[DISP]
[ENT] ![]()
SOURCE
|
|
|
|
|
|
|
|
|
|
| [POWER] |
|
|
|
|
|
|
|
|
|
|
| |
|
|
|
|
|
|
|
|
| [DSF] | ||
|
|
|
|
|
|
|
|
| |||
[SOURCE] |
|
|
|
|
| [ADJUST] | |||||
|
|
| |||||||||
|
|
|
|
| |||||||
|
|
|
|
| |||||||
|
|
|
|
| |||||||
D.S.F. D.S.F. indication
![]() Title indication
Title indication
Turning on/off the power
Note:
•Be careful about using this unit for a long time with- out running the engine. If you drain the car’s battery too far, you may not be able to start the engine and this can reduce the service life of the battery.
1. | Press the [POWER] button. |
2. | The settings are displayed on the control unit |
| display. |
![]() CAUTION
CAUTION
The sound volume on a DVD video disc can become very loud. For that reason, turn up the sound volume gently when the video im- age is displayed.
Press the [VOL] buttons on the control unit.
:increases the sound volume.
4. NOMENCLATURE
Press the [SOURCE] button on the control unit to display image when the input source has been changed.
Center speaker indication
DIGITAL1:
3. Press the [POWER] button to turn off the |
power. |
Switching input source
Change the settings to suit the input signal
:decreases the sound volume
Note:
Names of Buttons
When a digital source connected to a digital input 1 is selected.
DIGITAL2:
Rear (surround)
source.
•The initial setting is [DIGITAL1]. Press the [SOURCE] button.
•Adjust the audio volume using the controls on this control unit. The audio volume cannot be adjusted using the Center Unit controls.
Control Unit
[VOL] button:
•Raises and lowers the volume.
•Changes the adjustment values in the ADJUST MODE and AUDIO MODE.
[MUTE] button:
• Turns off the sound.
[DISP] button:
•Changes the display.
•Changes set items in the ADJUST MODE.
[ENT] button:
• Determines the adjustment setting in the AD |
JUST MODE. |
[SOURCE] button:
• Switches the input source.
• Adjusts the volume balance in each speaker.
[ADJUST] button:
•Invokes the ADJUST MODE to set speakers and other equipment.
[DSF] button:
• Changes the sound characteristics in the car.
[POWER] button:
• Turns the power on and off.
When a digital source connected to a digital input 2 is selected.
ANALOG1:
When an analog source con- nected to an analog input with RCA plugs is selected.
ANALOG2:
When an analog source con- nected to an analog input with a CeNET cable is selected.
speaker indication
Subwoofer indication
Mute indication
Front speaker indication
Each time the [SOURCE] button is pressed, the indications change as shown below.
[DIGITAL1] → [DIGITAL2] → [ANALOG1] → [ANALOG2] → [DIGITAL1]
•The original mode is resumed when the but- ton is not pressed during a 7 second inter- val.
Notes:
•Sound may be interrupted for a very short period while audio format is being distinguished.
•If skip or pause operations are performed on the DVD player while sound is being played back, noise may be heard for a brief interval.
Changing display settings
Press the [![]() ] or [
] or [![]() ] [DISP] button.
] [DISP] button.
Each time the [![]() ] or [
] or [![]() ] [DISP] button are pressed, the indications change as shown below.
] [DISP] button are pressed, the indications change as shown below.
[SS 1] → [SS 2] → [DISP OFF] → [PROGRAM]
→[SS 1]
●SS1: displays the dolphin.
●SS2: displays the airplane
●DIGITAL1 (Digital 1):
Use this setting when playing back digital input sources connected using an
● DISP OFF: the display is off. |
● |
Note: Be sure to unfold this page and refer to the front diagrams as you read each chapter.
Remarque: Veuillez déplier cette page et vous référer aux schémas quand vous lisez chaque chapitre.
Nota: Cuando lea los capítulos, despliegue esta página y consulte los diagramas.
5 DVC920
6 DVC920
2/22/02, 2:05 PM
●DIGITAL2 (Digital 2):
Use this setting when playing back digital input sources connected using an
PROGRAM (Program): |
Indicates the format of the signals input from the DIGITAL connectors.
•MONO: Monaural sound
•STEREO: Stereo sound
DVC920 7