Engine Maintenance items

CHECK ENGINE OIL LEVEL

Service Interval: Before each use, and every 8 hours.

1.Turn the engine off, and set the parking brake to PARK.

2.Clean the area around the dip stick (C, Figure 25).

3.Remove the dip stick (C) and clean it with a paper towel.

4.Insert the dip stick back into the engine, but do not thread the cap back onto the tube (D).

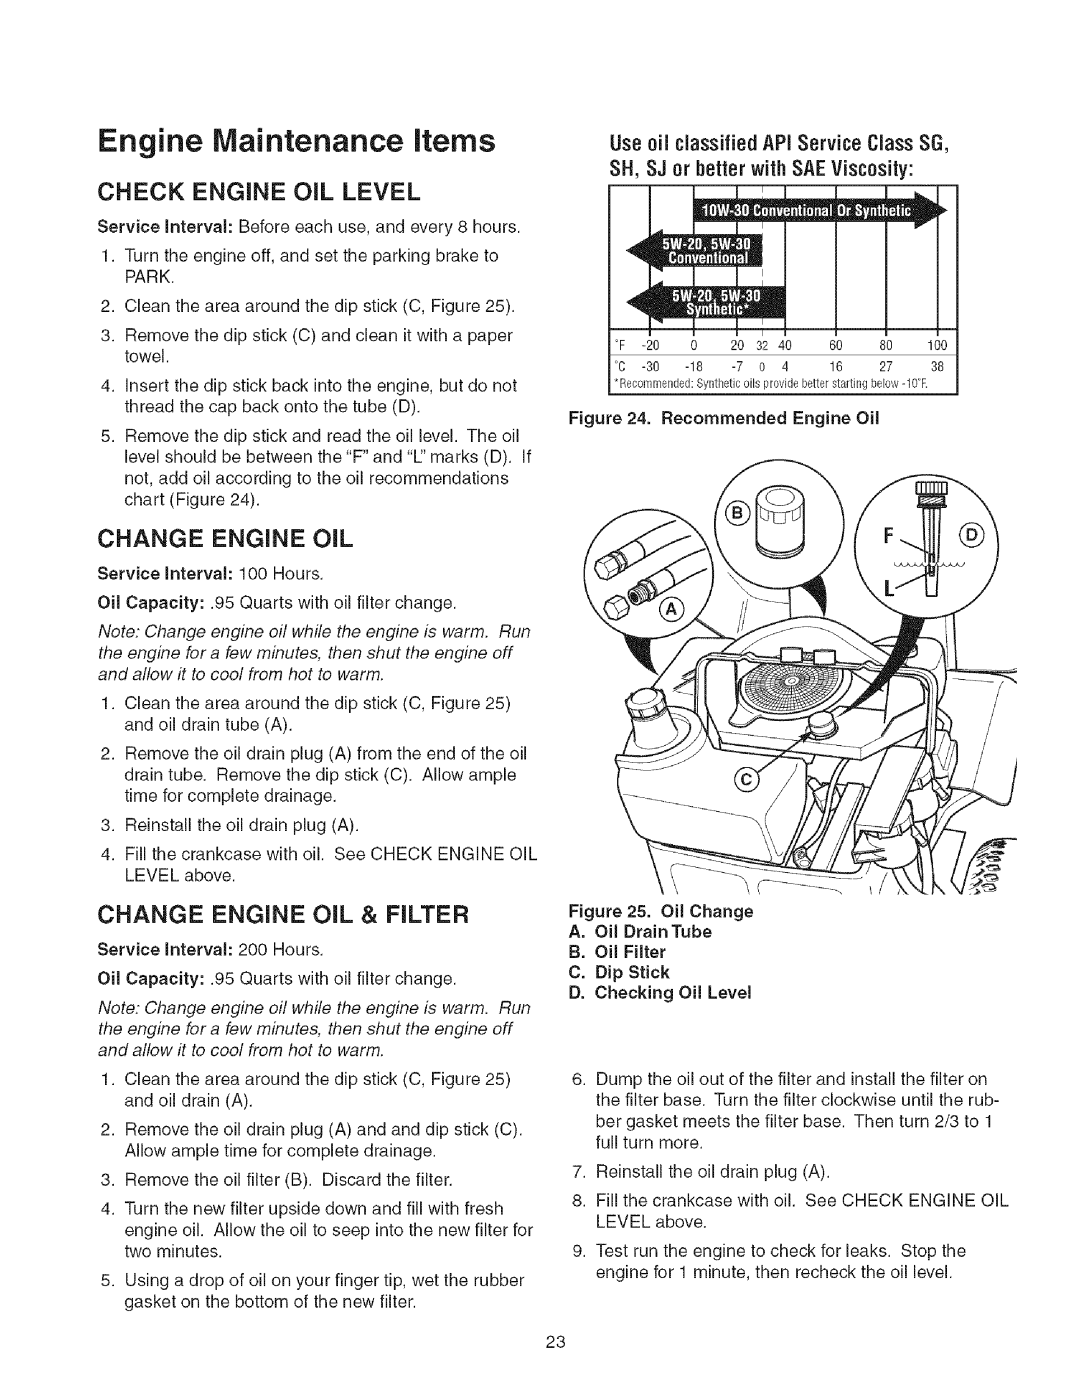
5.Remove the dip stick and read the oil level. The oil level should be between the "F" and "L" marks (D). If not, add oil according to the oil recommendations chart (Figure 24).

Useoil classifiedAPI Service Class SG,

SH, SJ or betterwith SAEViscosity:

°F

i _,

0

20

,

/

60

u

100

-20

3_2 40

80

°C

-30

-18

-7

O

4

16

27

38

*Recommended: Syntbatic oils provide better starting below -10°E

Figure 24. Recommended Engine Oil

CHANGE ENGINE OIL

Service Interval: 100 Hours.

Oil Capacity: .95 Quarts with oil filter change.

Note: Change engine oil while the engine is warm. Run

the engine for a few minutes, then shut the engine off and allow it to cool from hot to warm.

1.Clean the area around the dip stick (C, Figure 25) and oil drain tube (A).

2.Remove the oil drain plug (A) from the end of the oil drain tube. Remove the dip stick (C). Allow ample time for complete drainage.

3.Reinstall the oil drain plug (A).

4.Fill the crankcase with oil. See CHECK ENGINE OIL LEVEL above.

CHANGE ENGINE OIL & FILTER

Service Interval: 200 Hours.

Oil Capacity: .95 Quarts with oil filter change.

Note: Change engine oil while the engine is warm. Run the engine for a few minutes, then shut the engine off and allow it to cool from hot to warm.

1.Clean the area around the dip stick (C, Figure 25) and oil drain (A).

2.Remove the oil drain plug (A) and and dip stick (C). Allow ample time for complete drainage.

3.Remove the oil filter (B). Discard the filter.

4.Turn the new filter upside down and fill with fresh engine oil. Allow the oil to seep into the new filter for two minutes.

5.Using a drop of oil on your finger tip, wet the rubber gasket on the bottom of the new filter.

Figure 25. Oil Change

A.Oil Drain Tube

B.Oil Filter

C.Dip Stick

D.Checking Oil Level

6.Dump the oil out of the filter and install the filter on the filter base. Turn the filter clockwise until the rub- ber gasket meets the filter base. Then turn 2/3 to 1 full turn more.

7.Reinstall the oil drain plug (A).

8.Fill the crankcase with oil. See CHECK ENGINE OIL LEVEL above.

9.Test run the engine to check for leaks. Stop the engine for 1 minute, then recheck the oil level.

23

Page 23
Image 23
Craftsman 107.2777 Check Engine OIL Level, Change Engine OIL & Filter, Oil Drain Tube, Dip Stick Checking Oil Level

107.2777 specifications

The Craftsman 107.2777 is a versatile and robust tool that caters to both amateur and professional craftsmen alike. Designed for superior performance and user convenience, this power tool is a favorite among DIY enthusiasts and contractors who appreciate its reliability and feature-rich design.

One of the standout features of the Craftsman 107.2777 is its powerful motor, which delivers outstanding torque and efficiency. This motor is designed to handle a variety of tasks, from heavy-duty applications to delicate work, allowing users to seamlessly transition between different projects. The tool’s lightweight construction also means that it’s easy to maneuver, reducing fatigue during extended use.

The Craftsman 107.2777 boasts an ergonomic design that emphasizes user comfort. Its non-slip grip provides a secure hold, while the optimized balance ensures that the tool feels stable in hand. This is particularly advantageous for long periods of use, as it minimizes strain on the wrist and hand.

In terms of versatility, the Craftsman 107.2777 is equipped with an adjustable speed setting, allowing users to tailor the tool’s performance to match the requirements of specific tasks. This feature is especially useful when working with various materials, from wood and metal to plastic. The tool also comes with multiple attachments and accessories, enhancing its functionality for a wide range of applications.

Safety is a paramount consideration in the design of the Craftsman 107.2777. The tool features a built-in safety switch that prevents accidental activation, giving users peace of mind while working on projects. Additionally, the durable casing protects the internal components from dust and debris, helping to prolong the life of the tool.

Another key characteristic of the Craftsman 107.2777 is its compatibility with a range of Craftsman accessories. This means users can easily expand their tool collection without having to worry about compatibility issues, making this model a cost-effective choice for those looking to enhance their workshop capabilities.

Overall, the Craftsman 107.2777 stands out as a reliable, efficient, and user-friendly tool that meets the demands of any crafting job. Its combination of advanced features, ergonomic design, and safety considerations make it a must-have for both novice DIYers and seasoned professionals. Whether you’re tackling home improvement projects, building furniture, or working on repairs, the Craftsman 107.2777 delivers exceptional performance and versatility.