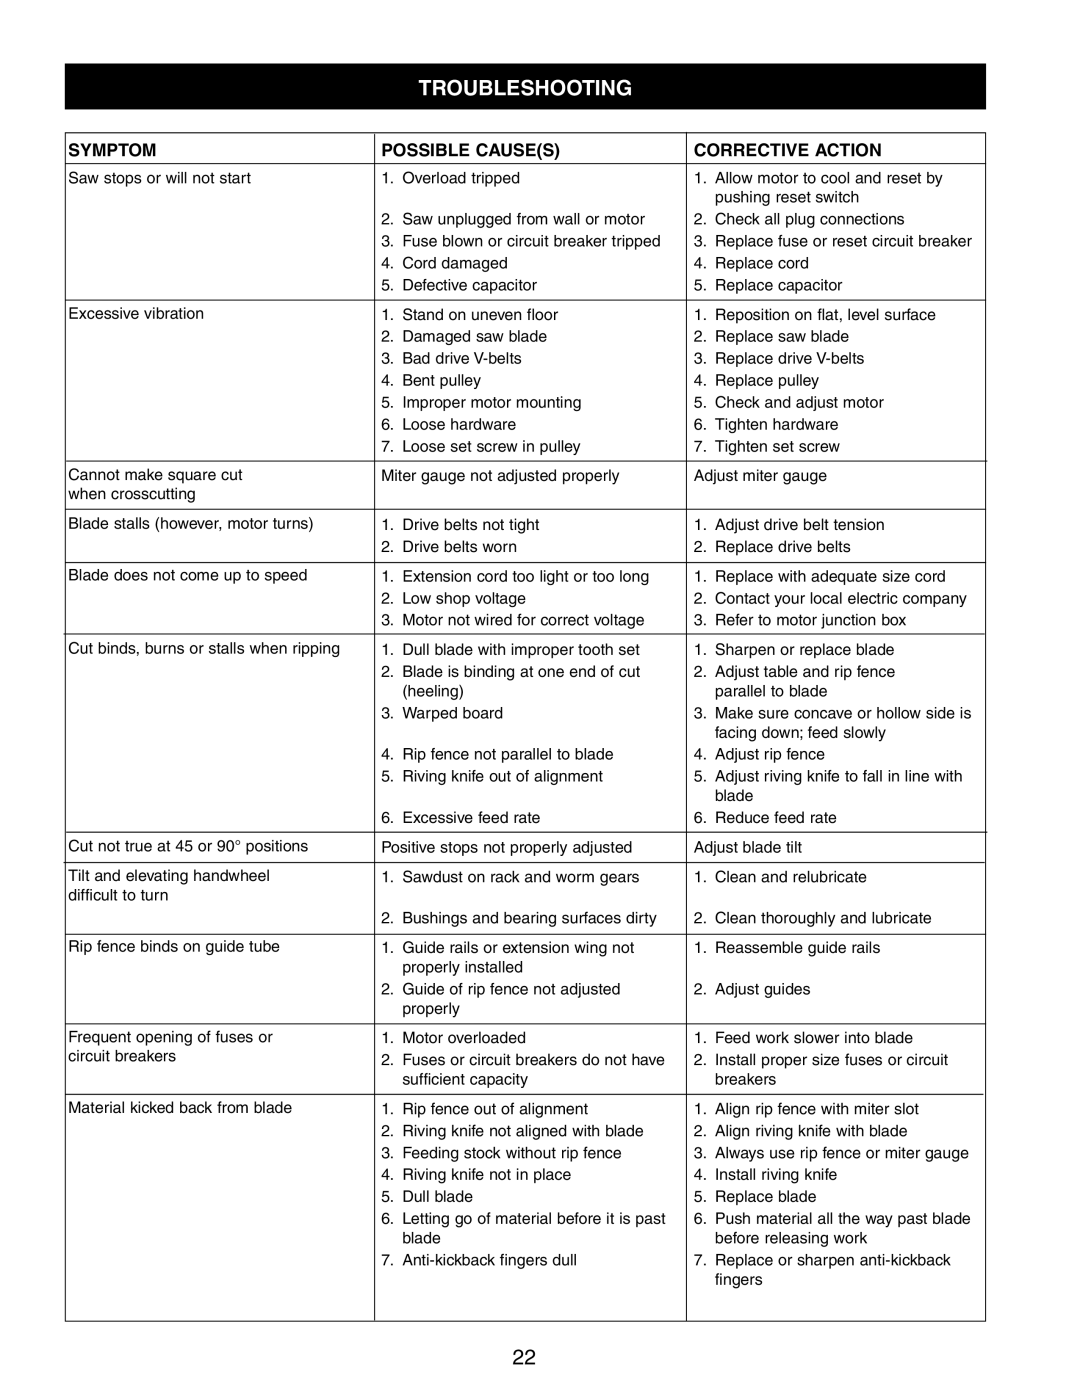
TROUBLESHOOTING
SYMPTOM | POSSIBLE CAUSE(S) | CORRECTIVE ACTION |
| ||
|
|
|
|
| |
Saw stops or will not start | 1. Overload tripped | 1. | Allow motor to cool and reset by |
| |
|
|
|
| pushing reset switch |
|
| 2. | Saw unplugged from wall or motor | 2. | Check all plug connections |
|
| 3. | Fuse blown or circuit breaker tripped | 3. | Replace fuse or reset circuit breaker |
|
| 4. | Cord damaged | 4. | Replace cord |
|
| 5. | Defective capacitor | 5. | Replace capacitor |
|
|
|
|
|
| |
Excessive vibration | 1. Stand on uneven floor | 1. | Reposition on flat, level surface |
| |
| 2. | Damaged saw blade | 2. | Replace saw blade |
|
| 3. | Bad drive | 3. | Replace drive |
|
| 4. | Bent pulley | 4. | Replace pulley |
|
| 5. | Improper motor mounting | 5. | Check and adjust motor |
|
| 6. | Loose hardware | 6. | Tighten hardware |
|
| 7. | Loose set screw in pulley | 7. | Tighten set screw |
|
|
|
|
| ||
Cannot make square cut | Miter gauge not adjusted properly | Adjust miter gauge |
| ||
when crosscutting |
|
|
|
|
|
|
|
|
|
|
|
Blade stalls (however, motor turns) | 1. | Drive belts not tight | 1. | Adjust drive belt tension |
|
| 2. | Drive belts worn | 2. | Replace drive belts |
|
|
|
|
|
| |
Blade does not come up to speed | 1. Extension cord too light or too long | 1. | Replace with adequate size cord |
| |
| 2. | Low shop voltage | 2. | Contact your local electric company |
|
| 3. | Motor not wired for correct voltage | 3. | Refer to motor junction box |
|
|
|
|
|
| |
Cut binds, burns or stalls when ripping | 1. Dull blade with improper tooth set | 1. | Sharpen or replace blade |
| |
| 2. | Blade is binding at one end of cut | 2. | Adjust table and rip fence |
|
|
| (heeling) |
| parallel to blade |
|
| 3. | Warped board | 3. | Make sure concave or hollow side is |
|
|
|
|
| facing down; feed slowly |
|
| 4. | Rip fence not parallel to blade | 4. | Adjust rip fence |
|
| 5. | Riving knife out of alignment | 5. | Adjust riving knife to fall in line with |
|
|
|
|
| blade |
|
| 6. | Excessive feed rate | 6. | Reduce feed rate |
|
|
|
|
| ||
Cut not true at 45 or 90¡ positions | Positive stops not properly adjusted | Adjust blade tilt |
| ||
|
|
|
|
| |
Tilt and elevating handwheel | 1. Sawdust on rack and worm gears | 1. | Clean and relubricate |
| |
difficult to turn |
|
|
|
|
|
| 2. | Bushings and bearing surfaces dirty | 2. | Clean thoroughly and lubricate |
|
|
|
|
|
| |
Rip fence binds on guide tube | 1. Guide rails or extension wing not | 1. | Reassemble guide rails |
| |
|
| properly installed |
|
|
|
| 2. | Guide of rip fence not adjusted | 2. | Adjust guides |
|
|
| properly |
|
|
|
|
|
|
|
| |
Frequent opening of fuses or | 1. Motor overloaded | 1. | Feed work slower into blade |
| |
circuit breakers | 2. | Fuses or circuit breakers do not have | 2. | Install proper size fuses or circuit |
|
|
| sufficient capacity |
| breakers |
|
|
|
|
|
| |
Material kicked back from blade | 1. Rip fence out of alignment | 1. | Align rip fence with miter slot |
| |
| 2. | Riving knife not aligned with blade | 2. | Align riving knife with blade |
|
| 3. | Feeding stock without rip fence | 3. | Always use rip fence or miter gauge |
|
| 4. | Riving knife not in place | 4. | Install riving knife |
|
| 5. | Dull blade | 5. | Replace blade |
|
| 6. | Letting go of material before it is past | 6. | Push material all the way past blade |
|
|
| blade |
| before releasing work |
|
| 7. | 7. | Replace or sharpen |
| |
|
|
|
| fingers |
|
|
|
|
|
|
|
22