W . d e l l . c o m s u p p o r t . d e l l . c o m
Quick Reference Guide
Abbreviations and Acronyms
Contents
Contents
Finding Information
When you use
Use the Service Tag to
Enter the Express Service
When contacting technical support
Your computer
Ordered
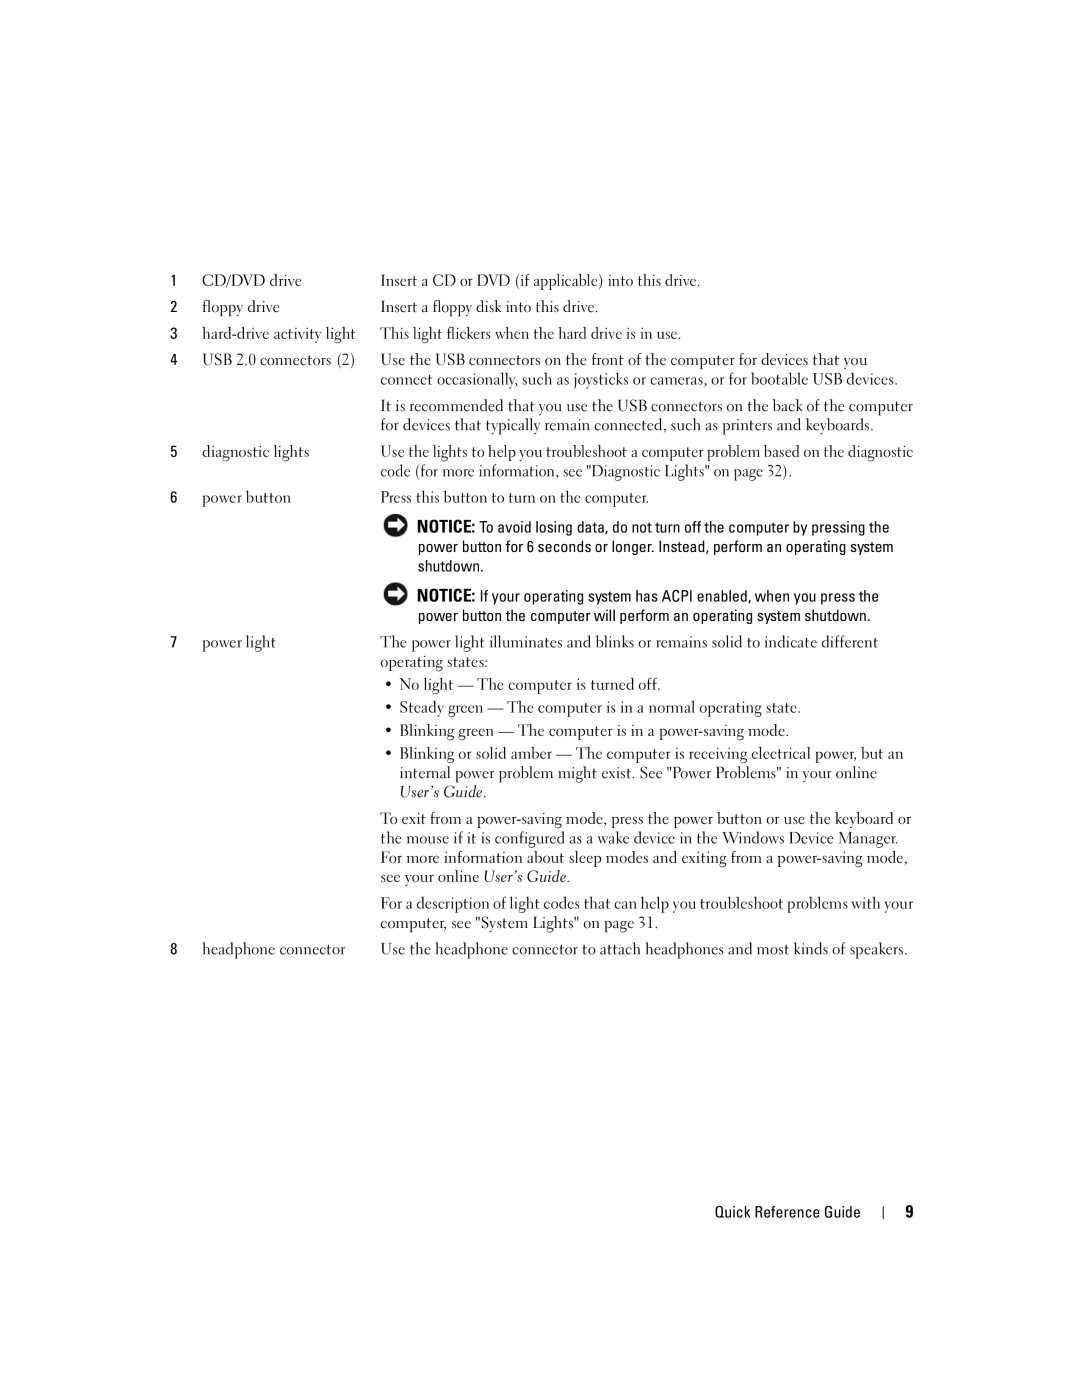
Mini Tower Computer Front View
System Views
Insert a floppy disk into this drive
Code for more information, see Diagnostic Lights on
Press this button to turn on the computer
Shutdown
Cover release latch Padlock ring
Mini Tower Computer Back View
Mini Tower Computer Back-Panel Connectors
Desktop Computer Front View
Your computer see System Lights on
Desktop Computer Back View
Desktop Computer Back-Panel Connectors
Securely attached
USB printer, plug it into a USB connector
Reliable operation
On state
Before You Begin
Removing the Computer Cover
Turning Off Your Computer
Turn Off Computer Turn off computer window, click Turn off
Mini Tower Computer
Security cable slot Cover release latch Padlock ring
Desktop Computer
Inside Your Computer
Fan connector FAN
CD/DVD drive connector IDE Quick Reference Guide
System Board Components
Jumper Setting
Jumper Settings
Mini Tower Computer
Jumpered unjumpered Quick Reference Guide
Desktop Computer
System Board Components
Desktop Computer
Jumper Setting Description
Setting Up Your Computer
Set Up Your Keyboard and Mouse Set Up Your Monitor
Dell Diagnostics
Solving Problems
Power Connections
When to Use the Dell Diagnostics
Starting the Dell Diagnostics From Your Hard Drive
Dell Diagnostics Main Menu
Option Function
Tab Function
System Lights
Power Light Problem Description Suggested Resolution
Light Pattern Problem Description Suggested Resolution
Diagnostic Lights
Information on reinstalling memory
Integrated graphics, contact Dell. For
Online User’s Guide
Reinstalled all modules without error
Have identified a faulty module or
If available, install properly working
If the problem persists, contact Dell. For
Code Cause
Beep Codes
Resolving Software and Hardware Incompatibilities
Using Microsoft Windows XP System Restore
Reinstalling Microsoft Windows XP
Booting From the Operating System CD
Reinstalling Windows XP
Click Device Manager
Click Roll Back Driver
Windows XP Setup
Using the Drivers and Utilities CD
Index
Problems. See troubleshooting
Index
Guia de Referência Rápida
Abreviações e acrônimos
Notas, Avisos e Advertências
Computador de mesa Conectores do painel traseiro
Como solucionar problemas de incompatibilidades de
Como usar o recurso Restauração do sistema do
Como reinstalar o Microsoft Windows XP
Índice
Como obter informações
Guia do usuário
Memórias, discos rígidos e sistemas
Upgrades Atualizações Informações
Todas as regiões
Operacionais
Fornecido com o seu computador
CD do sistema operacional
Computador minitorre Vista frontal
Vistas do sistema
Desligue-o através do sistema operacional
Pressione esse botão para ligar o computador
Computador minitorre Vista traseira
Impressão de que a luz está constantemente acesa
Computador minitorre Conectores do painel traseiro
Computador de mesa Vista frontal
Guia de Referência Rápida
Computador de mesa Vista traseira
Computador de mesa Conectores do painel traseiro
Posição de 115
Você tiver uma impressora USB, conecte-a a um conector USB
Conector paralelo
Do usuário on-line
Rede
Antes de começar
Como remover a tampa do computador
Como desligar o computador
Na janela Desligar o computador, clique em Desativar
Desligue o computador
Computador minitorre
Guia de Referência Rápida
Computador de mesa
Parte interna do computador
Componentes da placa de sistema
Jumper de senha Pswd
Conector da unidade de CD/DVD IDE Guia de Referência Rápida
Jumper Configuração Descrição
Configurações dos jumpers
Computador minitorre
Com jumper
Computador de mesa
Conectores de unidades serial ATA SATA0, SATA2
Computador de mesa
Conecte o teclado e o mouse
Como configurar o computador
Configurar o teclado e o mouse Instalar o monitor
Conexões de energia
Como solucionar problemas
Etiqueta de serviço
Código de serviço expresso
Guia de Referência Rápida
Menu principal do Dell Diagnostics
Opção Função
Guia Função
Luz de alimentação Descrição do problema Solução sugerida
Luz de alimentação pode indicar um problema no computador
Luzes do sistema
Line
Luzes de diagnóstico
Se você tiver um módulo de memória
Padrão de luz Descrição do problema Solução sugerida
Módulos de memória, consulte o guia do
Usuário on-line
Está instalando são compatíveis com o
DVD estejam conectados corretamente
Aparece na tela do monitor
Código Causa
Códigos de bipe
Código Causa
Como restaurar o computador a um estado operacional anterior
Clique na guia Restauração do sistema
Como reinstalar o Microsoft Windows XP
Antes de começar
Na janela Propriedades do sistema, clique na guia Hardware
Propriedades
Clique em Gerenciador de dispositivos
Clique em Reverter driver
Como reinstalar o Windows XP
Avançar
Instalação do Windows XP
Como usar o CD Drivers and Utilities
Instruções de segurança
Luzes alimentação, 56 diagnóstico, 75 sistema
Placa de sistema, 64 Placa-mãe. Consulte placa de sistema
Guia de instalação, 50 reinstalar o Windows XP
Restauração do sistema, 80 solução de problemas de
Guía de referencia rápida
Abreviaturas y siglas
Notas, Avisos y Precauciones
129
Contenido
Localización de información
Comunidad debates en línea con otros clientes de Dell
Rápido
Sistema operativo que haya solicitado
¿Qué busca? Aquí lo encontrará Cómo utilizar Windows XP
Nota El CD del sistema operativo es
Envíe con su ordenador
Ordenador de minitorre Vista anterior
Vistas del sistema
Guía de referencia rápida
La cubierta
Ordenador de minitorre Vista posterior
Anillo del candado
Inserte un candado para bloquear la cubierta del ordenador
Ordenador de minitorre Conectores del panel posterior
Ordenador de sobremesa Vista anterior
Mediante el sistema operativo
100
Ordenador de sobremesa Vista posterior
101
Ordenador de sobremesa Conectores del panel posterior
Antes de empezar
Cómo quitar la cubierta del ordenador
Cómo apagar el ordenador
Antes de trabajar en el interior de su ordenador
103
Ordenador de minitorre
104
105
Ordenador de sobremesa
106
Interior de su ordenador
107
Componentes de la placa base
108
Configuración de pentes
Ordenador de minitorre
Puente Posición Descripción
109
110
Configuración de puentes
111
Ordenador de sobremesa
112
Configuración del ordenador
113
Configurar el teclado y el ratón Configurar el monitor
Cuándo utilizar los Dell Diagnostics
Solución de problemas
Conexiones de alimentación
114
115
Cómo iniciar Dell Diagnostics desde la unidad de disco duro
116
Menú principal de Dell Diagnostics
Opción Función
Ficha Función
117
Indicadores luminosos del sistema
Indicador de Descripción del problema
Indicadores de diagnóstico
118
119
120
121
Códigos de sonido
Cómo resolver incompatibilidades de software y hardware
Cómo deshacer la última operación de Restaurar sistema
Haga clic en Rendimiento y administración
Activación de la función Restaurar sistema
123
Cómo volver a instalar Microsoft Windows XP
Configuración de Windows XP
Arranque desde el CD Operating System Sistema operativo
125
126
Uso del CD Drivers and Utilities
Controladores para el ordenador
127
128
Índice
130