Preparing the Tool
NOTICE: NEVER spray or in any other way apply lubricants or cleaning solvents inside the tool. This can seriously affect the life and performance of the tool. NOTE: The battery pack is not fully charged out of the carton. Follow instructions outlined (refer to Charging Procedures).
1.Read the Nailer Safety Warnings section of this manual.
2.Wear eye and ear protection.
3.Remove battery from tool.
4.Ensure magazine is empty of all fastners.
5.Check for smooth and proper operation of contact trip and pusher assemblies. Do not use tool if either assembly is not functioning properly. NEVER use a tool that has the contact trip restrained in the actuated position.
6.Keep tool pointed away from yourself and others.
7.Insert fully charged battery pack.
Using the Trigger Lock-off (Fig. 8)
![]() WARNING: To reduce the risk of serious personal injury, do not keep trigger depressed when tool is not in use. Keep the trigger
WARNING: To reduce the risk of serious personal injury, do not keep trigger depressed when tool is not in use. Keep the trigger
2.Tip the tool up until the fastener strip slides freely out of the magazine.
3.With battery removed, check the nosepiece to verify there are no nails remaining.
NOTE: The tool is equipped with a magnet in the nose area for improved tool performance. When unloading, always verify that the small sticks of nails are not held to the magnetized nose piece.
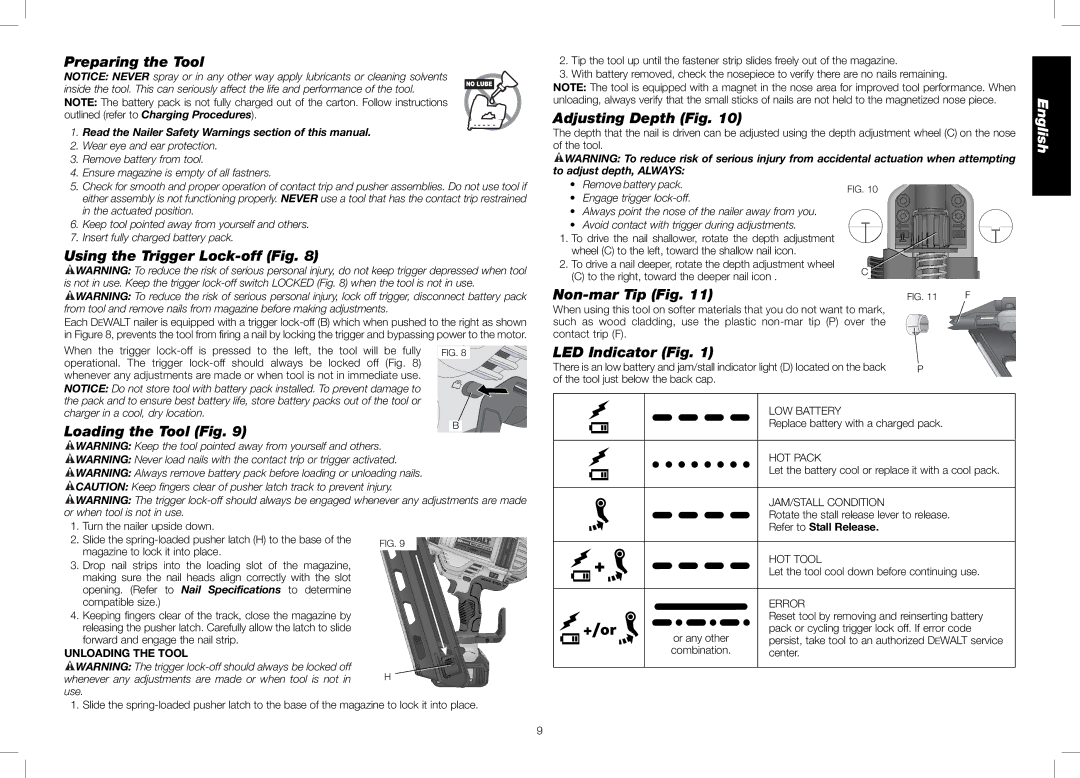
Adjusting Depth (Fig. 10)
The depth that the nail is driven can be adjusted using the depth adjustment wheel (C) on the nose of the tool.
![]() WARNING: To reduce risk of serious injury from accidental actuation when attempting to adjust depth, ALWAYS:
WARNING: To reduce risk of serious injury from accidental actuation when attempting to adjust depth, ALWAYS:
• Remove battery pack. | FIG. 10 |
• Engage trigger
• Always point the nose of the nailer away from you.
• Avoid contact with trigger during adjustments.
1. | To drive the nail shallower, rotate the depth adjustment |
|
| wheel (C) to the left, toward the shallow nail icon. |
|
2. | To drive a nail deeper, rotate the depth adjustment wheel | C |
| (C) to the right, toward the deeper nail icon . | |
|
|
English
![]() WARNING: To reduce the risk of serious personal injury, lock off trigger, disconnect battery pack from tool and remove nails from magazine before making adjustments.
WARNING: To reduce the risk of serious personal injury, lock off trigger, disconnect battery pack from tool and remove nails from magazine before making adjustments.
Each DEWALT nailer is equipped with a trigger
When the trigger | FIG. 8 |
operational. The trigger |
|
whenever any adjustments are made or when tool is not in immediate use. |
|
NOTICE: Do not store tool with battery pack installed. To prevent damage to |
|
the pack and to ensure best battery life, store battery packs out of the tool or |
|
Non-mar Tip (Fig. 11)
When using this tool on softer materials that you do not want to mark, such as wood cladding, use the plastic
LED Indicator (Fig. 1)
There is an low battery and jam/stall indicator light (D) located on the back of the tool just below the back cap.
FIG. 11 | F | ||
|
|
|
|
|
|
|
|
P
charger in a cool, dry location. | B | |
Loading the Tool (Fig. 9) | ||
| ||
WARNING: Keep the tool pointed away from yourself and others. |
|
![]() WARNING: Never load nails with the contact trip or trigger activated.
WARNING: Never load nails with the contact trip or trigger activated.
![]() WARNING: Always remove battery pack before loading or unloading nails.
WARNING: Always remove battery pack before loading or unloading nails.
![]() CAUTION: Keep fingers clear of pusher latch track to prevent injury.
CAUTION: Keep fingers clear of pusher latch track to prevent injury.
![]() WARNING: The trigger
WARNING: The trigger
1. Turn the nailer upside down.
2. Slide the
3. Drop nail strips into the loading slot of the magazine, making sure the nail heads align correctly with the slot opening. (Refer to Nail Specifications to determine compatible size.)
4. Keeping fingers clear of the track, close the magazine by releasing the pusher latch. Carefully allow the latch to slide forward and engage the nail strip.
UNLOADING THE TOOL
![]() WARNING: The trigger
WARNING: The trigger
1. Slide the
|
| LOW BATTERY | |
|
| Replace battery with a charged pack. | |
|
|
| |
|
| HOT PACK | |
|
| Let the battery cool or replace it with a cool pack. | |
|
|
| |
|
| JAM/STALL CONDITION | |
|
| Rotate the stall release lever to release. | |
|
| Refer to Stall Release. | |
|
|
| |
+ |
| HOT TOOL | |
| Let the tool cool down before continuing use. | ||
|
|
| |
|
| ERROR | |
+/or |
| Reset tool by removing and reinserting battery | |
or any other | pack or cycling trigger lock off. If error code | ||
persist, take tool to an authorized DEWALT service | |||
| |||
| combination. | center. |
9