CONTROLS OVERVIEW
Main unit
|
|
| Front view |
|
| Right side view |
|
| Back view |
| ||||
|
|
|
|
|
|
|
|
|
| 11 |
|
|
|
|
|
|
|
|
|
|
|
|
|
| 12 |
|
|
|
|
|
|
|
|
|
|
|
|
|
| 13 |
|
|
|
|
|
|
|
|
|
|
|
|
|
| 14 |
|
|
|
|
|
|
|
|
|
|
|
|
|
| 15 |
|
|
|
|
|
|
|
|
|
|
|
|
|
| 16 |
|
|
|
|
|
|
|
|
|
|
|
|
|
| 17 |
|
|
|
|
|
|
|
|
| SETUP | SUBTITLE VOL – | VOL + |
|
| 18 |
|
|
|
|
1 | 2 | 3 4 | 5 | 6 | 7 | 8 | 9 | 10 | 2 | 19 | 20 | 21 | 22 | 21 |
| ||||||||||||||
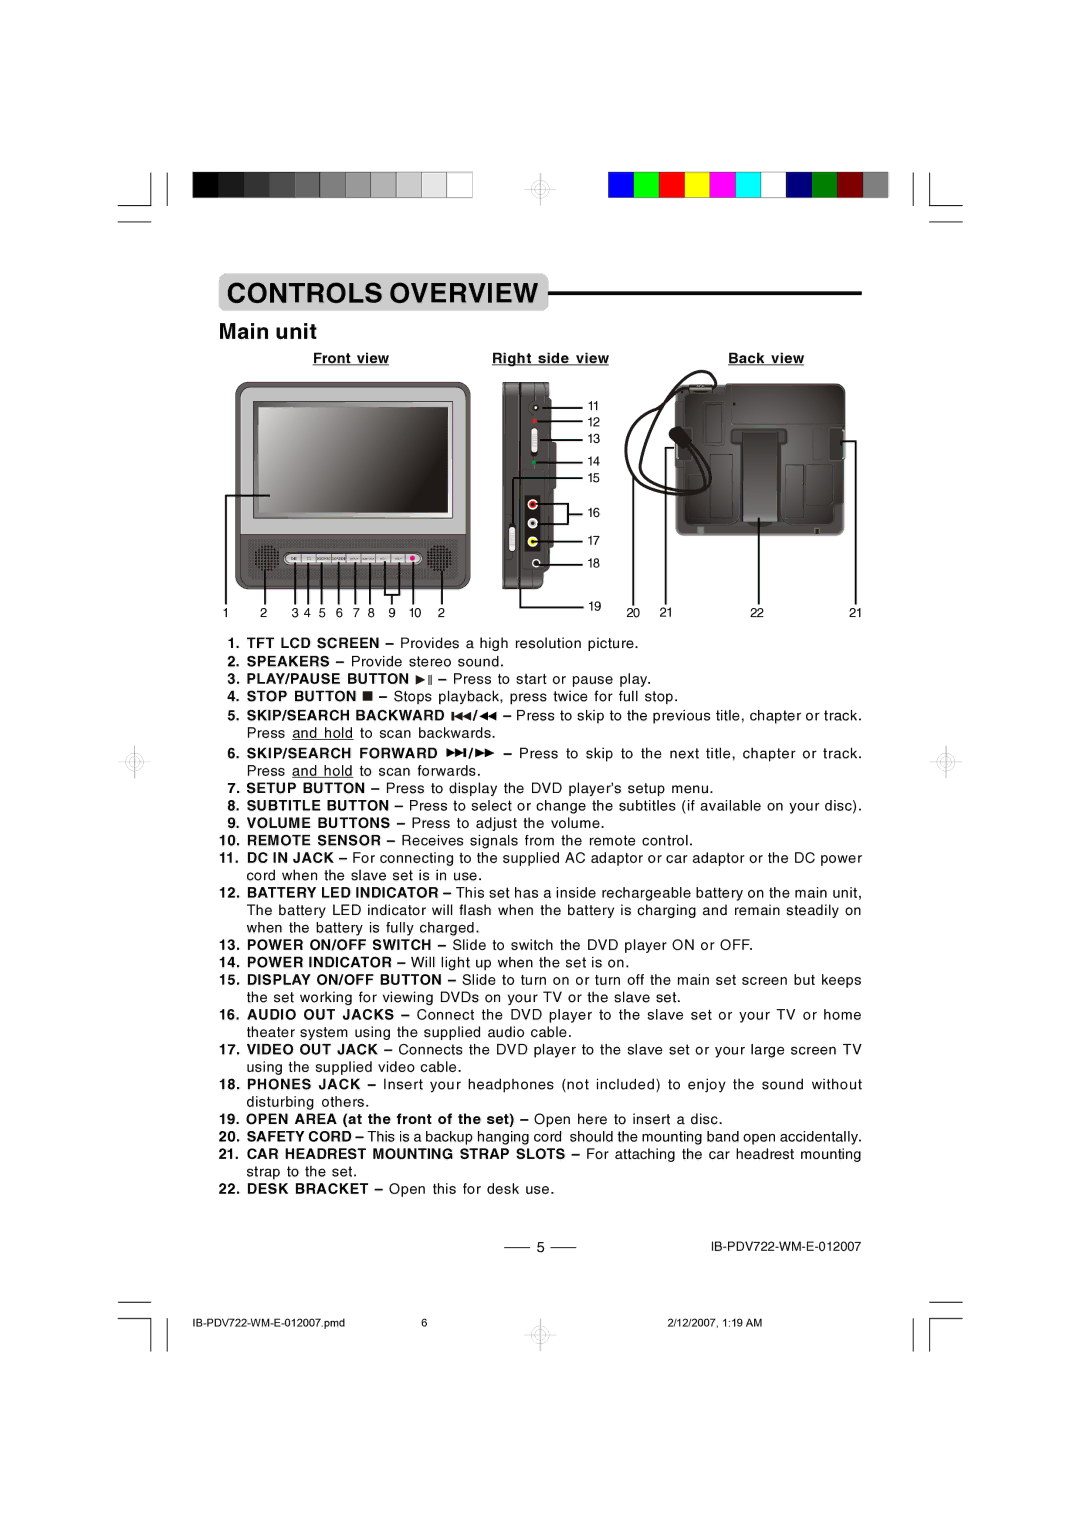
1.TFT LCD SCREEN – Provides a high resolution picture.
2.SPEAKERS – Provide stereo sound.
3.PLAY/PAUSE BUTTON ![]()
![]()
![]() – Press to start or pause play.
– Press to start or pause play.
4.STOP BUTTON ![]() – Stops playback, press twice for full stop.
– Stops playback, press twice for full stop.
5.SKIP/SEARCH BACKWARD ![]()
![]() /
/ ![]() – Press to skip to the previous title, chapter or track. Press and hold to scan backwards.
– Press to skip to the previous title, chapter or track. Press and hold to scan backwards.
6.SKIP/SEARCH FORWARD ![]()
![]() /
/ ![]() – Press to skip to the next title, chapter or track. Press and hold to scan forwards.
– Press to skip to the next title, chapter or track. Press and hold to scan forwards.
7.SETUP BUTTON – Press to display the DVD player’s setup menu.
8.SUBTITLE BUTTON – Press to select or change the subtitles (if available on your disc).
9.VOLUME BUTTONS – Press to adjust the volume.
10.REMOTE SENSOR – Receives signals from the remote control.
11.DC IN JACK – For connecting to the supplied AC adaptor or car adaptor or the DC power cord when the slave set is in use.
12.BATTERY LED INDICATOR – This set has a inside rechargeable battery on the main unit, The battery LED indicator will flash when the battery is charging and remain steadily on when the battery is fully charged.
13.POWER ON/OFF SWITCH – Slide to switch the DVD player ON or OFF.
14.POWER INDICATOR – Will light up when the set is on.
15.DISPLAY ON/OFF BUTTON – Slide to turn on or turn off the main set screen but keeps the set working for viewing DVDs on your TV or the slave set.
16.AUDIO OUT JACKS – Connect the DVD player to the slave set or your TV or home theater system using the supplied audio cable.
17.VIDEO OUT JACK – Connects the DVD player to the slave set or your large screen TV using the supplied video cable.
18.PHONES JACK – Insert your headphones (not included) to enjoy the sound without disturbing others.
19.OPEN AREA (at the front of the set) – Open here to insert a disc.
20.SAFETY CORD – This is a backup hanging cord should the mounting band open accidentally.
21.CAR HEADREST MOUNTING STRAP SLOTS – For attaching the car headrest mounting strap to the set.
22.DESK BRACKET – Open this for desk use.
5 |
2/12/2007, 1:19 AM
