|
|
|
|
|
|
|
|
| Adjusting the picture |
|
|
| |
|
|
|
|
|
|
|
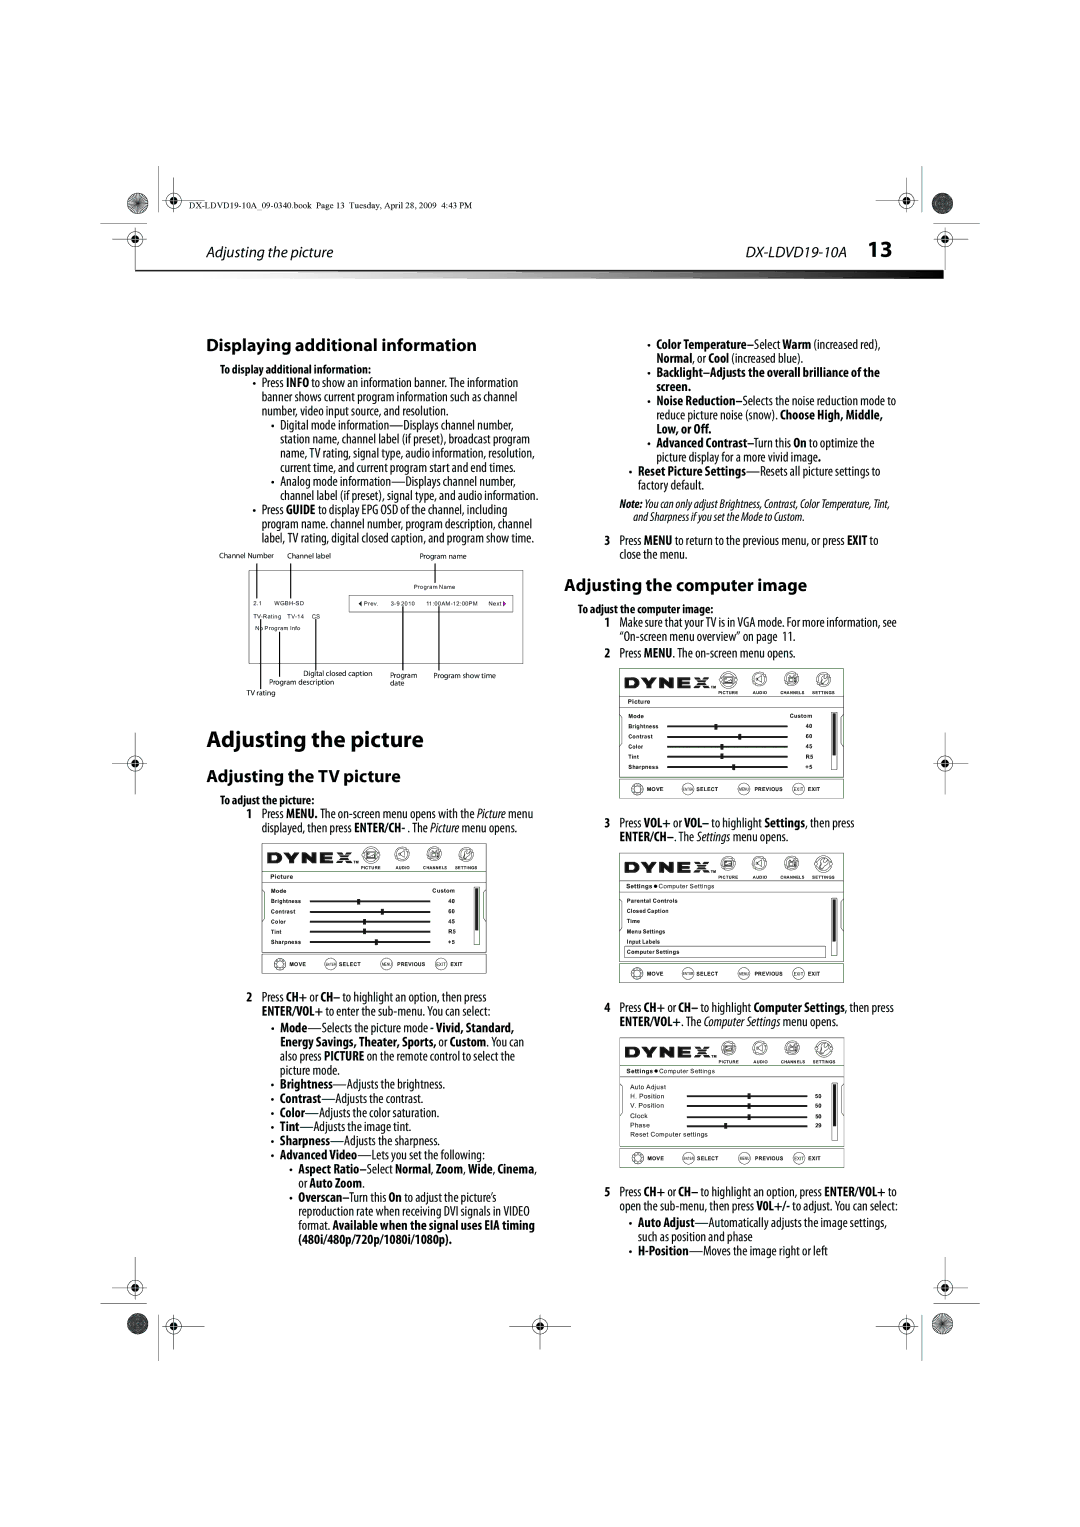
Displaying additional information
To display additional information:
•Press INFO to show an information banner. The information banner shows current program information such as channel number, video input source, and resolution.
•Digital mode
•Analog mode
•Press GUIDE to display EPG OSD of the channel, including program name. channel number, program description, channel label, TV rating, digital closed caption, and program show time.
Channel Number | Channel label | Program name | |||
|
|
|
|
|
|
|
|
|
| Program Name | |
| 2.1 |
|
| ||
|
| Prev. |
| ||
| CS |
|
| ||
|
|
| |||
| No Program Info |
|
|
| |
|
|
|
|
|
|
•Color
•Backlight–Adjusts the overall brilliance of the screen.
•Noise
Low, or Off.
•Advanced
•Reset Picture
Note: You can only adjust Brightness, Contrast, Color Temperature, Tint, and Sharpness if you set the Mode to Custom.
3Press MENU to return to the previous menu, or press EXIT to close the menu.
Adjusting the computer image
To adjust the computer image:
1Make sure that your TV is in VGA mode. For more information, see
2Press MENU. The
Digital closed caption | Program | Program show time |
Program description | date |
|
TV rating |
|
|
Adjusting the picture
Adjusting the TV picture
To adjust the picture:
1Press MENU. The
|
|
| PICTURE | AUDIO | CHANNELS | SETTINGS |
Picture |
|
|
|
|
| |
Mode |
|
|
| Custom | ||
Brightness |
|
|
|
| 40 | |
Contrast |
|
|
|
| 60 | |
Color |
|
|
|
| 45 | |
Tint |
|
|
|
|
| R5 |
Sharpness |
|
|
|
| +5 | |
CH+ | + MOVE | ENTER SELECT | MENU | PREVIOUS EXIT | EXIT | |
- | ||||||
VOL | VOL |
|
|
|
|
|
CH-
|
|
| PICTURE | AUDIO | CHANNELS | SETTINGS |
Picture |
|
|
|
|
| |
Mode |
|
|
| Custom | ||
Brightness |
|
|
|
| 40 | |
Contrast |
|
|
|
| 60 | |
Color |
|
|
|
| 45 | |
Tint |
|
|
|
|
| R5 |
Sharpness |
|
|
|
| +5 | |
CH+ | + MOVE | ENTER SELECT | MENU | PREVIOUS EXIT | EXIT | |
- | ||||||
VOL | VOL |
|
|
|
|
|
CH-
3Press VOL+ or VOL– to highlight Settings, then press
|
|
| PICTURE | AUDIO | CHANNELS | SETTINGS | |
Settings Computer Settings |
|
|
|
|
| ||
Parental Controls |
|
|
|
|
|
| |
Closed Caption |
|
|
|
|
|
| |
Time |
|
|
|
|
|
|
|
Menu Settings |
|
|
|
|
|
| |
Input Labels |
|
|
|
|
|
| |
Computer Settings |
|
|
|
|
|
| |
CH+ | + MOVE | ENTER SELECT | MENU | PREVIOUS | EXIT | EXIT | |
- | |||||||
VOL | VOL |
|
|
|
|
|
|
CH-
2Press CH+ or CH– to highlight an option, then press ENTER/VOL+ to enter the
•
•
•
•
•
•
•Advanced
•Aspect Ratio–Select Normal, Zoom, Wide, Cinema, or Auto Zoom.
•
4Press CH+ or CH– to highlight Computer Settings, then press ENTER/VOL+. The Computer Settings menu opens.
|
|
| PICTURE | AUDIO | CHANNELS | SETTINGS |
Settings Computer Settings |
|
|
|
| ||
Auto Adjust |
|
|
|
|
| |
H. Position |
|
|
|
| 50 | |
V. Position |
|
|
|
| 50 | |
Clock |
|
|
|
| 50 | |
Phase |
|
|
|
| 29 | |
Reset Computer settings |
|
|
|
| ||
| CH+ | ENTER SELECT | MENU | PREVIOUS EXIT | EXIT | |
- | + MOVE | |||||
VOL | VOL |
|
|
|
|
|
CH-
5Press CH+ or CH– to highlight an option, press ENTER/VOL+ to open the
•Auto
•