|
| TV components |
| 5 |
|
|
|
|
|
|
|
| |||
|
|
|
|
|
|
|
|
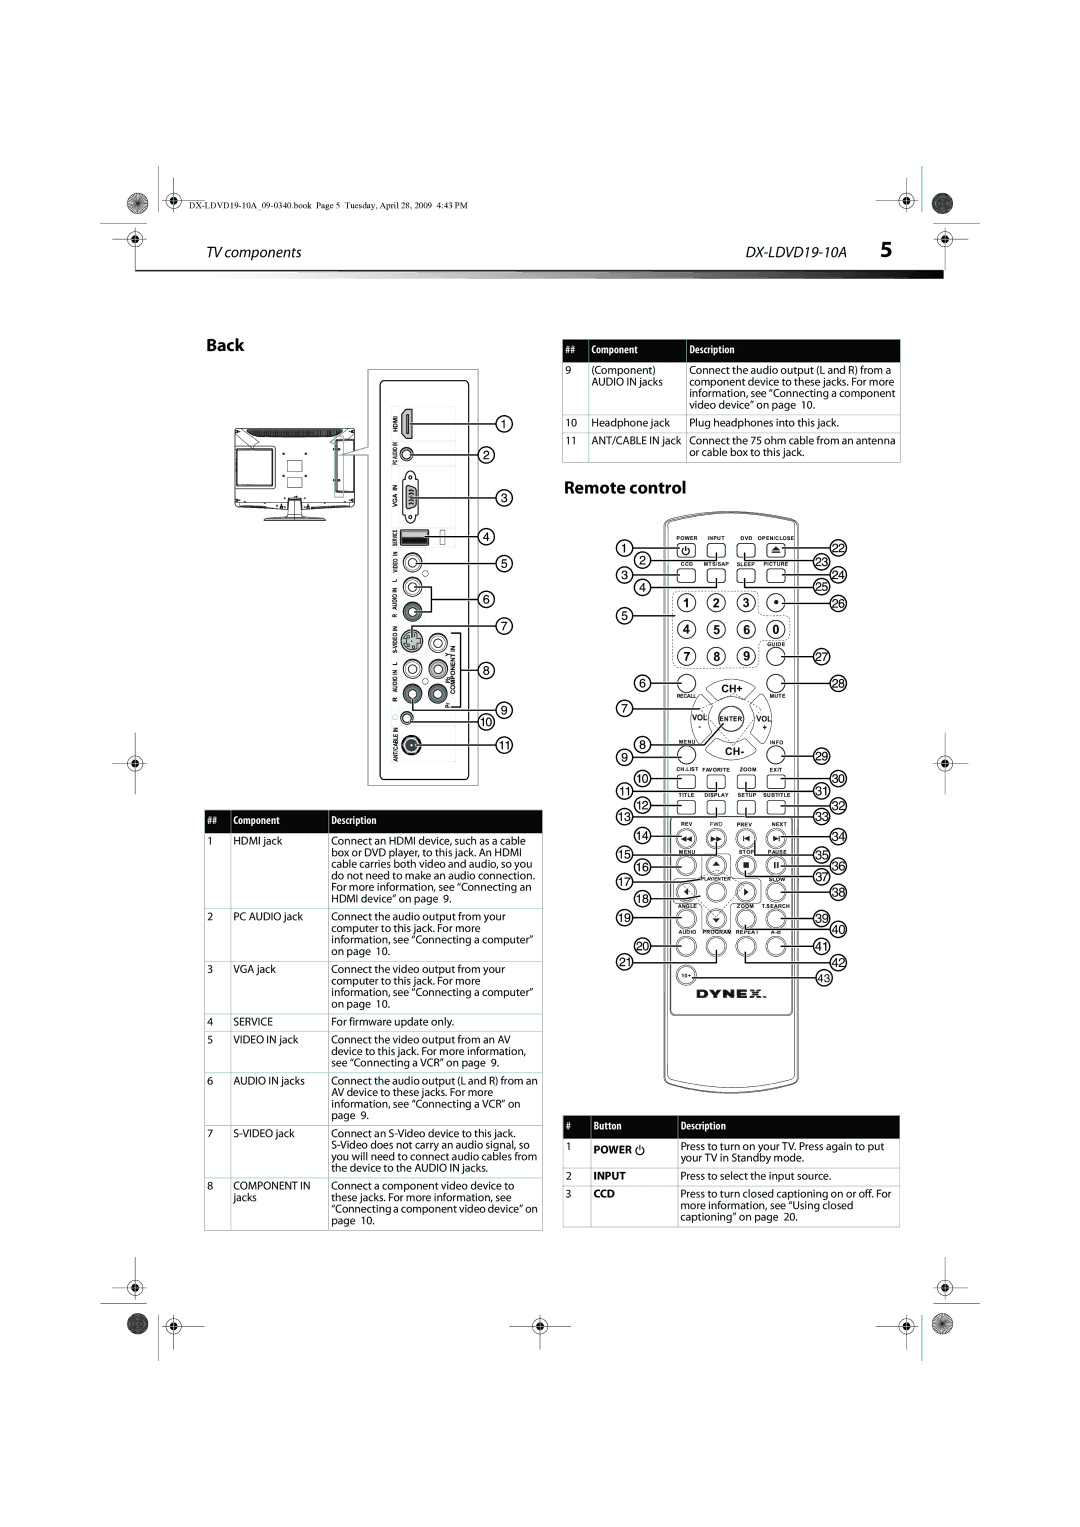
Back
HDMI |
|
PC AUDIO IN |
|
VGA IN |
|
SERVICE |
|
VIDEO IN |
|
L |
|
AUDIO IN |
|
R |
|
AUDIO IN L | Pb Y COMPONENT IN |
R | Pr |
| |
ANT/CABLE IN |
|
|
| ## | Component | Description |
|
|
|
|
|
|
| 1 | HDMI jack | Connect an HDMI device, such as a cable |
|
|
|
| box or DVD player, to this jack. An HDMI |
|
|
|
| cable carries both video and audio, so you |
|
|
|
| do not need to make an audio connection. |
|
|
|
| For more information, see “Connecting an |
|
|
|
| HDMI device” on page 9. |
|
|
|
|
|
|
| 2 | PC AUDIO jack | Connect the audio output from your |
|
|
|
| computer to this jack. For more |
|
|
|
| information, see “Connecting a computer” |
|
|
|
| on page 10. |
|
|
|
|
|
|
| 3 | VGA jack | Connect the video output from your |
|
|
|
| computer to this jack. For more |
|
|
|
| information, see “Connecting a computer” |
|
|
|
| on page 10. |
|
|
|
|
|
|
| 4 | SERVICE | For firmware update only. |
|
|
|
|
|
|
| 5 | VIDEO IN jack | Connect the video output from an AV |
|
|
|
| device to this jack. For more information, |
|
|
|
| see “Connecting a VCR” on page 9. |
|
|
|
|
|
|
| 6 | AUDIO IN jacks | Connect the audio output (L and R) from an |
|
|
|
| AV device to these jacks. For more |
|
|
|
| information, see “Connecting a VCR” on |
|
|
|
| page 9. |
|
|
|
|
|
|
| 7 | Connect an | |
|
|
|
| |
|
|
|
| you will need to connect audio cables from |
|
|
|
| the device to the AUDIO IN jacks. |
|
|
|
|
|
|
| 8 | COMPONENT IN | Connect a component video device to |
|
|
| jacks | these jacks. For more information, see |
|
|
|
| “Connecting a component video device” on |
|
|
|
| page 10. |
|
|
|
|
|
|
|
|
|
|
|
|
|
|
|
|
|
|
|
|
## | Component | Description |
|
|
|
9 | (Component) | Connect the audio output (L and R) from a |
| AUDIO IN jacks | component device to these jacks. For more |
|
| information, see “Connecting a component |
|
| video device” on page 10. |
|
|
|
10 | Headphone jack | Plug headphones into this jack. |
|
|
|
11 | ANT/CABLE IN jack | Connect the 75 ohm cable from an antenna |
|
| or cable box to this jack. |
|
|
|
Remote control
POWER | INPUT | DVD | OPEN/CLOSE |
CCD | MTS/SAP | SLEEP | PICTURE |
1 | 2 | 3 |
|
4 | 5 | 6 | 0 |
|
| 9 | GUIDE |
7 | 8 |
| |
RECALL |
| CH+ | MUTE |
|
|
VOL ENTER VOL
-+
MENU | CH- | INFO |
| |
|
|
| ||
CH.LIST FAVORITE | ZOOM | EXIT |
| |
TITLE | DISPLAY | SETUP | SUBTITLE | 31 |
|
|
|
| 32 |
REV |
| PREV | NEXT | 33 |
|
| |||
|
|
|
| 34 |
MENU |
| STOP | PAUSE | 35 |
|
|
|
| |
|
|
|
| 36 |
| PLAY/ENTER |
| SLOW | 37 |
|
|
|
| 38 |
ANGLE |
| ZOOM | T.SEARCH |
|
|
|
|
| 39 |
AUDIO | PROGRAM REPEAT | 40 | ||
|
|
|
| 41 |
|
|
|
| 42 |
10+ |
|
|
| 43 |
|
|
|
| |
# | Button | Description |
|
| |||
|
|
|
|
|
|
|
|
1 | POWER |
|
| Press to turn on your TV. Press again to put |
|
| |
|
|
| |||||
|
|
| |||||
|
|
|
| your TV in Standby mode. |
|
| |
2 | INPUT | Press to select the input source. |
|
| |||
|
|
|
|
|
|
|
|
3 | CCD | Press to turn closed captioning on or off. For |
|
| |||
|
|
|
| more information, see “Using closed |
|
| |
|
|
|
| captioning” on page 20. |
|
| |
|
|
|
|
|
|
|
|
|
|
|
|
|
|
|
|
|
|
|
|
|
|
|
|
|
|
|
|
|
|
|
|