Main
ii
IMPORTANT
Model No.: Serial No.:
Page
iv
1
1. WARRANTY
2. CONSUMER PRODUCT SAFETY ACT
WARNING:
Introduction
See bottom of projector.
INFORMATION
Caution Concerning Lamp Replacement
PRODUCT DISPOSAL
WARNING:
3
Using the Menu Screen
EIP-3000N_EN_CD_b 06.5.10, 9:37 AM3
How to Read this Owners Manual
For Future Reference
Info
Buttons used in this operation
On-screen display
Contents
Preparing
Introduction
Quick Start
Using
5
Reference
Appendix
IMPORTANT SAFEGUARDS
CAUTION:
15. Overloading
16. Object and Liquid Entry
17. Servicing
18. Damage Requiring Service
19. Replacement Parts
8
Observe the following safeguards when setting up your projector.
Caution regarding usage of the projector
Other connected equipment
Using the projector in other countries
Temperature monitor function
How to Access the PDF Owners Manuals
SETUP MANUAL
Refer to the SETUP MANUAL contained on the supplied CD-ROM for details.
Accessories
Optional accessory
Supplied accessories
Part Names and Functions
Projector
Numbers in Z refer to the main pages in this owners manual where the topic is explained.
Rear View
Numbers in Z refer to the main pages in this owners manual where the topic is explained.
Part Names and Functions (Continued)
15
Inserting the Batteries
Attach the cover and slide it until it clicks into place.
Insert the batteries.
Press the P mark on the cover and slide it in the direction of the arrow.
Quick Start
Setup and Projection
4. Adjust the projected image with the Setup Guide
_P. 30
_P. 33
6. Select the INPUT mode
_P. 32
Setting up the Projector
Side View
Setting up the Projector
Standard Setup (Front Projection)
Example of standard setup
Projection (PRJ) Mode
Indication of the Projection Image Size and Projection Distance
Setting up the Projector (Continued)
Screen Size and Projection Distance
Minimum [L1] Maximum [L2]
Picture (Screen) size
NORMAL Mode (4:3)
Connections
INPUT Terminals and Connectable Main Equipment
Rear View
Samples of Cables for Connection
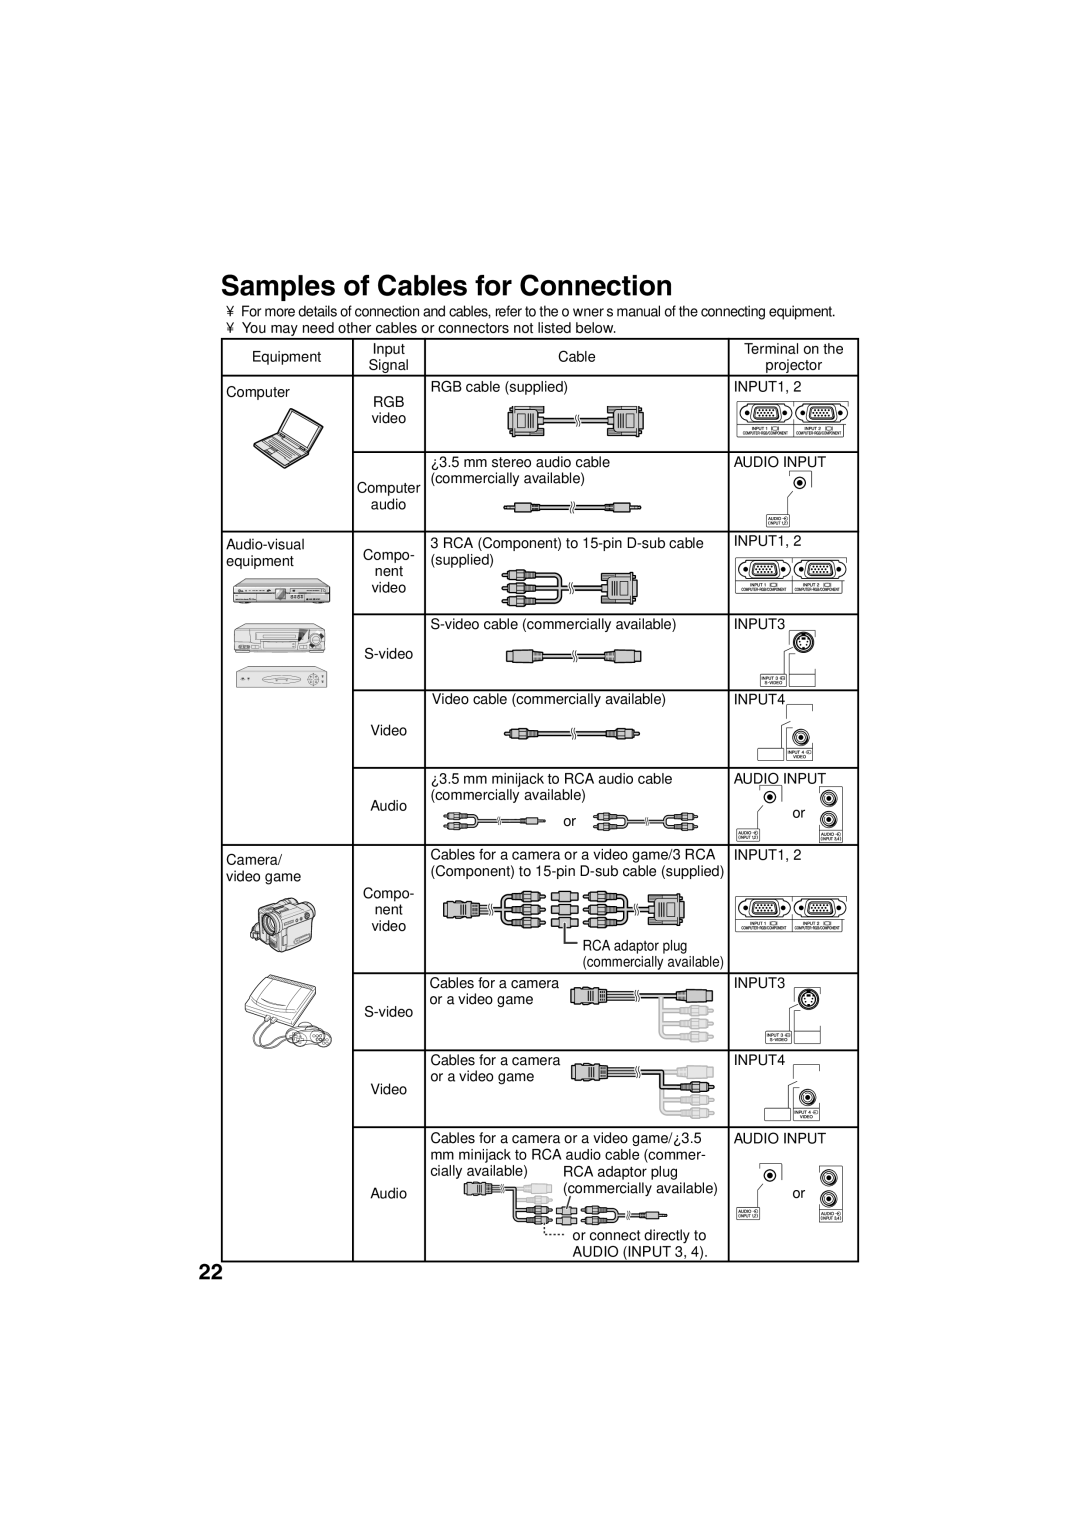
Connecting to a Computer
Connecting to Video Equipment
When using a 3 RCA (Component) to 15-pin D-sub cable (INPUT1 or INPUT2)
When using an S-video cable (INPUT3)
When using a composite video cable (INPUT4)
Connecting to a Monitor with RGB Input Terminal
Controlling the Projector by a Computer
When connecting to a computer using an RS-232C serial control cable and a DIN- D-sub RS-232C adaptor
Connecting the Power Cord
When connecting to the LAN terminal using a LAN cable
Turning the Projector On/Off
Lamp indicator
Remove the lens cap and press oSTANDBY-ON on the projector or fON on the remote control.
STANDBY-ON button
Turning the Projector on
29
Turning the Power off (Put- ting the Projector into Standby Mode)
R
About the Setup Guide
After turning on the projector, the Setup Guide screen appears to assist you with projector setup.
Image Projection
Rotate the focus ring to adjust the fo- cus while watching the projected image.
1 FOCUS 3 ZOOM4 ENTER
2 HEIGHT ADJUST
Adjusting the Projected Image
3 Adjusting the Height
Image Projection (Continued)
Adjusting the Volume
Displaying the Black Screen and Turning off the Sound Temporarily
Switching the Input Mode
Select the appropriate input mode for the connected equipment.
3
Press P/Q or O/R to adjust the Keystone Correction.
Press g KEYSTONE to enter the Keystone Correction mode.
KEYSTONE button
Adjustment buttons (P/R/O/Q) RETURN button
Image Projection (Continued)
Resize Mode
44
See page
Press HRESIZE.
VIDEO
STRETCH is fixed when 540P, 720P or 1080I signals are entered.
Auto Sync (Auto Sync Adjustment)
Operating with the Remote Control
Freezing a Moving Image
Selecting the Picture Mode
You can select the appropriate picture mode for the projected image, such as movie or video game.
Displaying and Setting the Break Timer
Menu Items
EIP-3000N_EN_CD_i 06.5.10, 9:46 AM37
Pict. SCR - ADJ PRJ Net. Help
SEL./ADJ. ENTER END
Off
Menu Items (Continued)
Network menu
Main menu Sub menu
Page 49
Help menu The items you can set with the Help
menu
Help menu n Page 51
Using the Menu Screen
Menu Selections (Adjustments)
Press BMENU.
Press Q or O and select Picture to adjust.
Press P or R and select Bright to adjust.
To adjust the projected image while watching it
Press hENTER.
The item displayed by itself
42
Picture Adjustment (Picture menu)
1 1
QExample: Picture screen menu for INPUT 1 (RGB) mode
QExample: Picture screen menu for INPUT 3 mode
1 1 1 Selecting the Picture Mode
43
4 Progressive
5 Lamp Setting
2 Adjusting the Image
3Adjusting the Color Temperature
Adjusting the Projected Image (SCR - ADJ menu)
1 Setting the Resize Mode
EIP-3000N_EN_CD_j 06.5.10, 9:47 AM44
O buttonQ button
O button
Page
46
Adjusting the Projector Function (PRJ - ADJ menu)
4
1 Auto Search Function
2Auto Sync (Auto Sync Adjustment)
3Auto Power Off Function
47
88
99
77
Select System Lock, then press hENTER or Q.
Adjusting the Projector Function (PRJ - ADJ menu) (Continued)
49
Setting up the Projector Network Environment (Network menu)
aChanging the Password
1Setting a Password
If you forget the password
o p o p o p r
2
hENTER. Enter IP Address using P, R, Q and O, then press hENTER.
4
Q and O, then press hENTER.
5
Troubleshooting with the Help menu
Utilizing the Help menu func- tions
ENTER button
press hENTER.
Note
Maintenance
Maintenance Indicators
Top View
Maintenance Indicators (Continued)
Regarding the Lamp
Lamp
Caution Concerning the Lamp
Replacing the Lamp
Caution
Regarding the Lamp (Continued)
Removing and Installing the Lamp Unit
Warning!
Disconnect the power cord.
Remove the lamp unit cover.
Resetting the Lamp Timer
R button
AC socket
Reset the lamp timer after replacing the lamp.
Insert the new lamp unit.
Computer Compatibility Chart
PC/MAC
Troubleshooting
Troubleshooting (Continued)
Specifications
Dimensions
Units: inches (mm)
EIP-3000N_EN_CD_m 06.5.10, 9:51 AM62
Index
A-Key to better communications
U.S.A.
Deutschland & sterreich
Canada
Eastern Europe