COMPUTER INPUT

WHEN SELECT INPUT 2 (5 BNC INPUT JACKS )

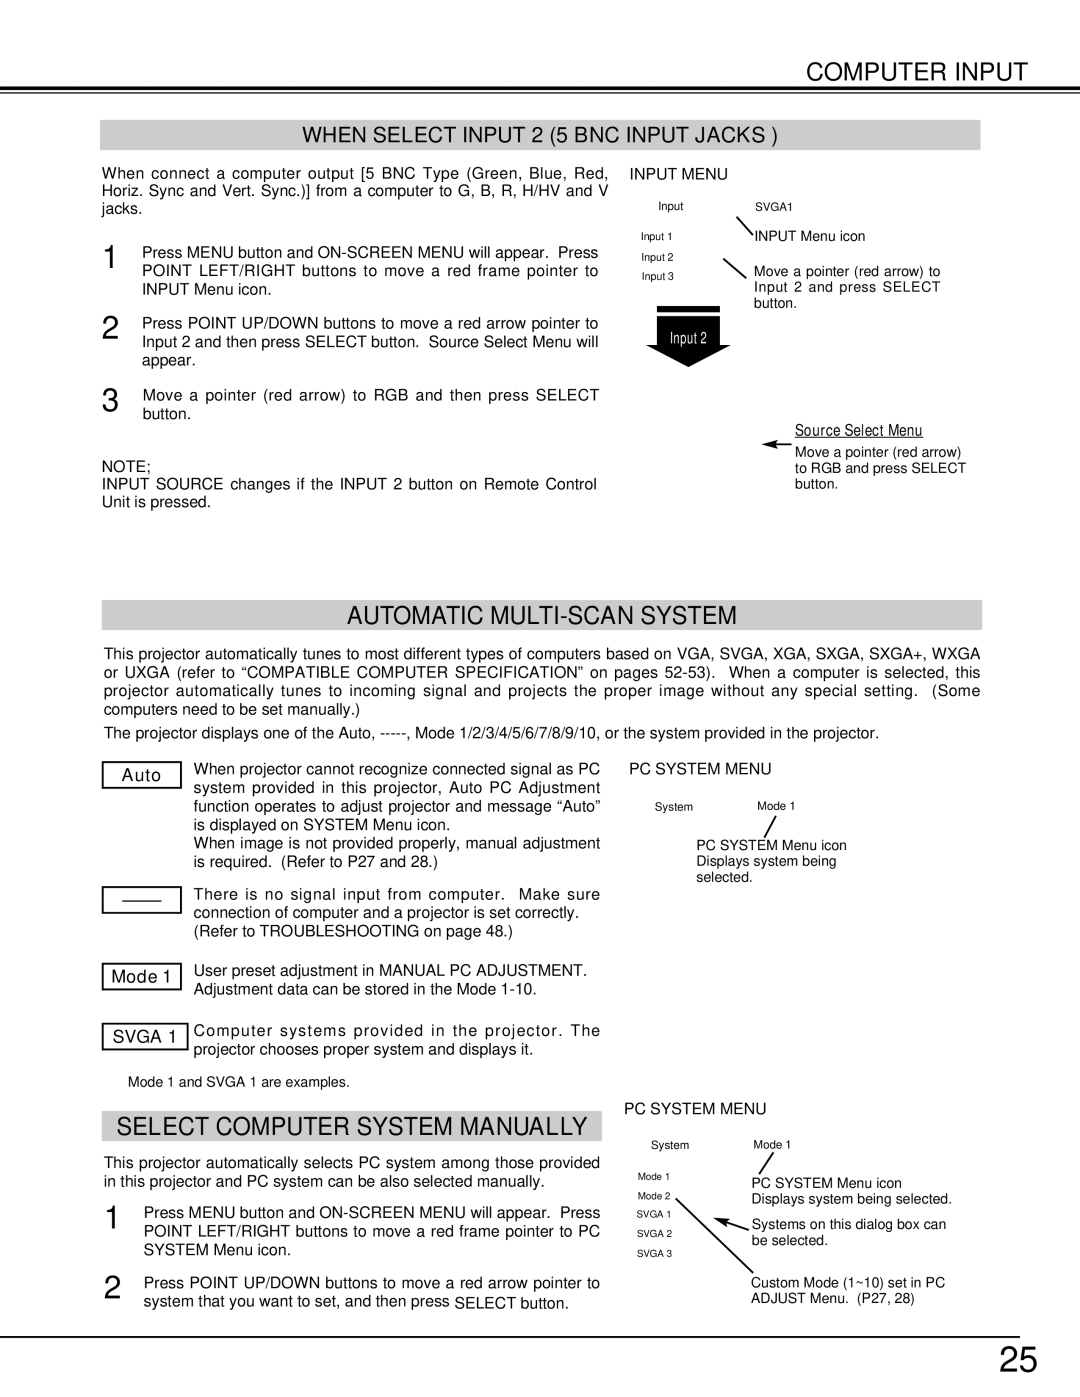
When connect a computer output [5 BNC Type (Green, Blue, Red, Horiz. Sync and Vert. Sync.)] from a computer to G, B, R, H/HV and V jacks.

1

Press MENU button and ON-SCREEN MENU will appear. Press


POINT LEFT/RIGHT buttons to move a red frame pointer to


INPUT Menu icon.

2

Press POINT UP/DOWN buttons to move a red arrow pointer to


Input 2 and then press SELECT button. Source Select Menu will


appear.

3

Move a pointer (red arrow) to RGB and then press SELECT


button.

NOTE;

INPUT SOURCE changes if the INPUT 2 button on Remote Control Unit is pressed.

INPUT MENU

InputSVGA1

Input 1


INPUT Menu icon

Input 2


Move a pointer (red arrow) to

Input 3


Input 2 and press SELECT


button.


Input 2


Source Select Menu

Move a pointer (red arrow) to RGB and press SELECT button.

AUTOMATIC MULTI-SCAN SYSTEM

This projector automatically tunes to most different types of computers based on VGA, SVGA, XGA, SXGA, SXGA+, WXGA or UXGA (refer to “COMPATIBLE COMPUTER SPECIFICATION” on pages 52-53). When a computer is selected, this projector automatically tunes to incoming signal and projects the proper image without any special setting. (Some computers need to be set manually.)

The projector displays one of the Auto, -----, Mode 1/2/3/4/5/6/7/8/9/10, or the system provided in the projector.

Auto

When projector cannot recognize connected signal as PC system provided in this projector, Auto PC Adjustment function operates to adjust projector and message “Auto” is displayed on SYSTEM Menu icon.

When image is not provided properly, manual adjustment is required. (Refer to P27 and 28.)

PC SYSTEM MENU

System

Mode 1

PC SYSTEM Menu icon Displays system being selected.

––––There is no signal input from computer. Make sure connection of computer and a projector is set correctly. (Refer to TROUBLESHOOTING on page 48.)

Mode 1 User preset adjustment in MANUAL PC ADJUSTMENT. Adjustment data can be stored in the Mode 1-10.

SVGA 1 Computer systems provided in the projector. The projector chooses proper system and displays it.

Mode 1 and SVGA 1 are examples.

SELECT COMPUTER SYSTEM MANUALLY

PC SYSTEM MENU

This projector automatically selects PC system among those provided in this projector and PC system can be also selected manually.

1

Press MENU button and ON-SCREEN MENU will appear. Press


POINT LEFT/RIGHT buttons to move a red frame pointer to PC


SYSTEM Menu icon.

2

Press POINT UP/DOWN buttons to move a red arrow pointer to


system that you want to set, and then press SELECT button.

System

Mode 1

Mode 2

SVGA 1

SVGA 2

SVGA 3

Mode 1

PC SYSTEM Menu icon Displays system being selected.

Systems on this dialog box can be selected.

Custom Mode (1~10) set in PC ADJUST Menu. (P27, 28)

25

Page 25
Image 25
Eiki LC-W3 instruction manual Automatic MULTI-SCAN System, PC System Menu

LC-W3 specifications

The Eiki LC-W3 is a high-performance LCD projector designed for both educational and corporate environments, offering a blend of advanced technologies and user-friendly features that make it a popular choice for presentations and multimedia content.

One of the standout characteristics of the Eiki LC-W3 is its impressive brightness level, boasting a high lumens output that ensures clear images even in well-lit rooms. This makes it ideal for large venues, classrooms, and conference rooms, where ambient light can often detract from projection quality. The projector also features a native WXGA resolution of 1280 x 800 pixels, providing a sharp and detailed image that enhances viewer engagement.

In terms of connectivity, the LC-W3 is equipped with a variety of input options, including HDMI, VGA, and USB ports. This versatility allows users to connect a range of devices such as laptops, Blu-ray players, and even USB drives for direct playback of multimedia files. The inclusion of network capabilities also empowers users to perform wireless presentations, making it convenient for tech-savvy audiences.

The projector also comes with advanced lens shift and zoom capabilities, making it easier to position the projector without sacrificing image quality. This is particularly valuable in dynamic presentation environments where the projector’s location might frequently change. With a 1.5x optical zoom, users can project large images from shorter distances, accommodating diverse room layouts.

Additionally, the Eiki LC-W3 integrates sophisticated image technologies, including digital keystone correction, which allows for easy adjustments to the image shape and ensures a perfect rectangle even when the projector is not perfectly aligned with the screen. This is particularly beneficial in environments with fixed projector placements or limited setup options.

The Eiki LC-W3 also emphasizes energy efficiency, utilizing a lamp life of up to 5,000 hours in eco mode. This not only contributes to lower operational costs but also minimizes downtime with less frequent lamp replacements.

Overall, the Eiki LC-W3 is characterized by its combination of brightness, resolution, connectivity, and user-friendly features. It is designed to meet the demanding needs of professional environments, making it an excellent choice for educators, corporate trainers, and anyone needing a reliable projection solution. Whether for delivering impactful presentations or showcasing detailed visuals, the LC-W3 stands out as a robust projector in its class.