Manuals
/
Elmira Stove Works
/
Kitchen Appliance
/
Range
Elmira Stove Works
1954
manual
Oven Light, CLOCK vs. DIGITAL DISPLAY, Self Clean, Bake Or Broil
Models:
1954
1
15
32
32
Download
32 pages
38.66 Kb
12
13
14
15
16
17
18
19
Troubleshooting
Install
Standard Oven Baking Chart
Setting Minute Timer
Warranty
Maintenance
Self-CleaningOven
Weight
Pressure Testing
Safety
Page 15
Image 15
Page 14
Page 16
Page 15
Image 15
Page 14
Page 16
Contents
Electric Ranges Model
#1704-4
Installation and Operating Instructions for
NORTHSTAR
GAS RANGE WARNING
BEFORE USING YOUR RANGE READ THIS BOOK CAREFULLY
TABLE OF CONTENTS
Before you request service
Hot Surface
SAFETY INSTRUCTIONS
Children
Storage
Safety
SAFETY INSTRUCTIONS - GAS
Self-CleaningOven
Service
“DO IT YOURSELF” PROCEDURE
INSTALLING YOUR RANGE
Mobile Home Installation
Power cord installation
Minimum Clearances to Combustibles
Location
Temperatures
Clearances
High Speed Radiant - Electric Top Burners
ELECTRIC COOKTOP
SELECTION & USE OF POTS & PANS
Surface Elements Controls
Things Not To Do On A Ceramic Cooktop
Care and Cleaning
1. Saving on Cleaning Time
Energy Tips
GAS COOKTOP
How To Deal With Burned-OnSpots
GRIDDLE OPTION
CANNING
To Clean Burners
GAS BURNER CLEANING
Operating Range During a Power Failure
Manual Burner Adjustment On Low
The Oven Vent
Pressure Testing
Gas Leak Testing
GAS SUPPLY SYSTEM
Models
Installation of “LP” Spuds
Disconnect Power to Range
RANGE TOP CONVERSION TO “LP”
A. PLASTIC COVER
OVEN CONVERSION MODEL
To Convert Oven Bake and Broil Burner
To Convert Oven Broiler Burner
SETTING MINUTE TIMER
SETTING CLOCK - ALL MODELS
If the “low” flame needs to be adjusted
Adjust Oven Broil Burner Flame if needed
OVEN LIGHT
SELF CLEAN
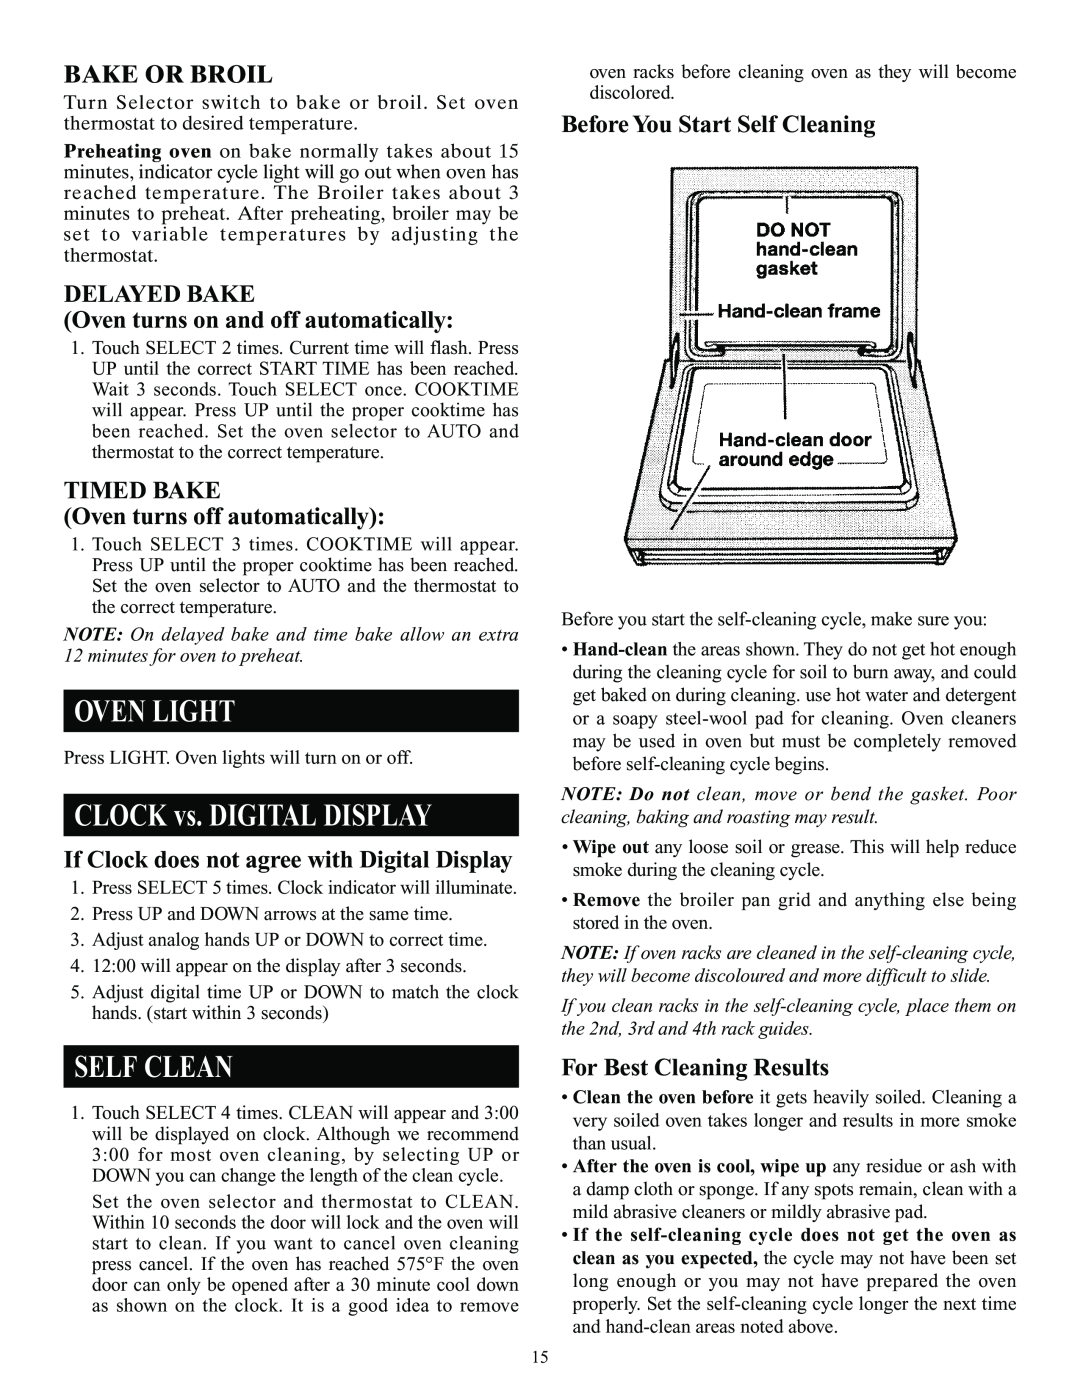
Before You Start Self Cleaning
For Best Cleaning Results
Automatic Door Lock
MAINTENANCE & MINOR REPAIR
Resetting Breakers
REPLACING OVEN LIGHTS
Warning Do not touch ignitor when it is sparking
GAS TROUBLESHOOTING
PROBLEM
WARMING DRAWER CONTROLS Setting the Temperature
Closed Door Broiling only
CONVECTION COOKING TIPS
Convection Roasting Rack
Roasting tips
Convection Broiling
General Broiling Tips
To remove oven racks
Rack Placement for Specific Foods
Oven Rack Positions
For Proper Cooking Follow These Guidelines
MEAT
STANDARD OVEN MEAT ROASTING CHART
WEIGHT
APPROXIMATE
SIDE
STANDARD OVEN BAKING CHART
Broiling Chart
TIME MINUTES
Preheating
CONVECTION MEAT ROASTING CHART
INTRODUCTION TO CONVECTION COOKING
Air Flow
Perfect Poultry
Convection Baking and Roasting
Memorable Meats
Bakeware Selection
Effortless Quick Breads
CONVECTION POULTRY ROASTING CHART
CONVECTION YEAST BREAD BAKING CHART
Incredible Egg & Cheese Dishes
Cookies
CONVECTION QUICK BREADS BAKING CHART
CONVECTION DESSERT BAKING CHART
Yeast Breads
OVEN CIRCUIT
MODELS 1954 & 1955 NORTHSTAR WIRING DIAGRAM
Switch 7-F
ELECTRIC SURFACE UNITS
STAINS TO COOKTOP
SERVICING RANGE UNDER COOK TOP
CLEANING GUIDE
Clean after each use
SEE PAGE 10 & 14 FOR GAS TROUBLESHOOTING
RANGE TROUBLESHOOTING
Page
Page
OUR FACTORY HELP LINE NUMBER IS
Elmira Stove Works
WARRANTY
FOR WARRANTY SERVICE
Top
Page
Image
Contents