Adjusting The Speaker Levels (TEST TONE)

After you have connected all 6 speakers to the main unit and positioned the speakers as described on the previous page, the next step is to adjust the sound level of each of the 5 satellites, using the Test Tone, so that the level at your normal listening position seems to be the same. This adjustment should be made with the Test Tone only, not while you are watching a DVD movie. Remember that most of the action and dialog in a movie will occur in front of you and the sound will come from the 3 front satellites and the subwoofer. The rear speakers are designed to operate only when there is some action or special sound effects taking place behind you. If you adjust the level of the two rear speakers incorrectly so that you constantly hear sound behind you, you will not get the proper surround effect.


ADJ/VOL +


+


SELECT


-


POWER


ADJ/VOL -

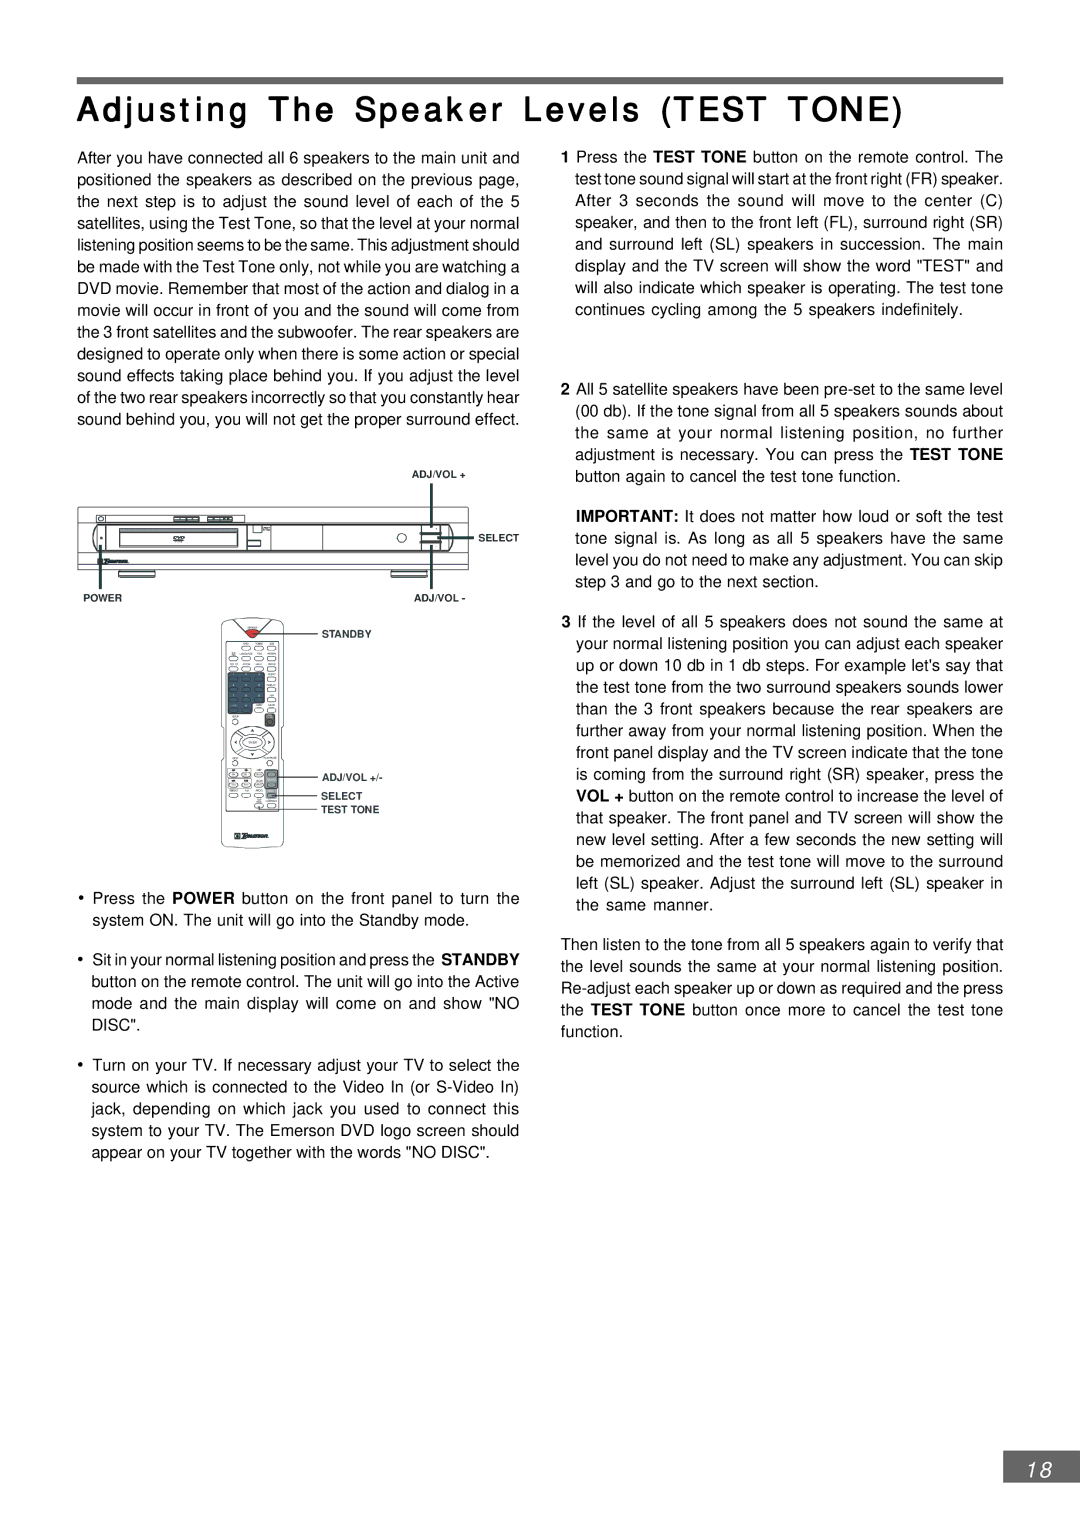
1 Press the TEST TONE button on the remote control. The test tone sound signal will start at the front right (FR) speaker. After 3 seconds the sound will move to the center (C) speaker, and then to the front left (FL), surround right (SR) and surround left (SL) speakers in succession. The main display and the TV screen will show the word "TEST" and will also indicate which speaker is operating. The test tone continues cycling among the 5 speakers indefinitely.

2All 5 satellite speakers have been pre-set to the same level (00 db). If the tone signal from all 5 speakers sounds about the same at your normal listening position, no further adjustment is necessary. You can press the TEST TONE button again to cancel the test tone function.

IMPORTANT: It does not matter how loud or soft the test tone signal is. As long as all 5 speakers have the same level you do not need to make any adjustment. You can skip step 3 and go to the next section.

STANDBY


DVD

TUNER

AUX

SUB

LANGUAGE

TITLE

RETURN

TITLE

GO TO

ZOOM

MENU

ANGLE

1

2

3

AUDIO

4

5

6

DISPLAY

7

8

9

N/P

>10

0

SLEEP

MUTE

SETUP


OPEN/


CLOSE


ENTER


STOP


PLAY/PAUSE


STEP


STA-

STA +

ST/MO

+


SLOW

ADJ/VOL

TUN

TUN+

MEMO


REPEAT

A-B

PROG.

SELECT


TEST

LISTENING


TONE

STANDBY

ADJ/VOL +/-

SELECT TEST TONE

3 If the level of all 5 speakers does not sound the same at your normal listening position you can adjust each speaker up or down 10 db in 1 db steps. For example let's say that the test tone from the two surround speakers sounds lower than the 3 front speakers because the rear speakers are further away from your normal listening position. When the front panel display and the TV screen indicate that the tone is coming from the surround right (SR) speaker, press the VOL + button on the remote control to increase the level of that speaker. The front panel and TV screen will show the new level setting. After a few seconds the new setting will be memorized and the test tone will move to the surround left (SL) speaker. Adjust the surround left (SL) speaker in

Press the POWER button on the front panel to turn the system ON. The unit will go into the Standby mode.

Sit in your normal listening position and press the STANDBY button on the remote control. The unit will go into the Active mode and the main display will come on and show "NO DISC".

Turn on your TV. If necessary adjust your TV to select the source which is connected to the Video In (or S-Video In) jack, depending on which jack you used to connect this system to your TV. The Emerson DVD logo screen should appear on your TV together with the words "NO DISC".

the same manner.

Then listen to the tone from all 5 speakers again to verify that the level sounds the same at your normal listening position. Re-adjust each speaker up or down as required and the press the TEST TONE button once more to cancel the test tone function.

18

Page 19
Image 19
Emerson AV301 owner manual Adjusting The Speaker Levels Test Tone

AV301 specifications

The Emerson AV301 is a versatile and innovative device designed for optimal performance in various applications across industries. Its robust features and cutting-edge technology make it an ideal solution for process automation and control, enhancing efficiency and productivity.

One of the standout features of the AV301 is its advanced control capabilities. The device is equipped with a high-speed processor that enables quick data processing and real-time response to changing environmental conditions. This ensures that operations remain smooth and efficient, reducing downtime and increasing overall productivity.

Another key characteristic of the Emerson AV301 is its user-friendly interface. The device includes a large, intuitive touchscreen that simplifies configuration and monitoring, allowing operators to easily access critical information and make adjustments as needed. This focus on usability helps to minimize training time for new users, facilitating faster onboarding and reducing errors in operation.

Moreover, the AV301 incorporates state-of-the-art communication technologies. It supports multiple communication protocols, including Ethernet, Modbus, and Profibus, enabling seamless integration with existing systems and devices. This flexibility allows users to customize their setup according to specific needs while ensuring compatibility across diverse operations.

In terms of safety and reliability, the Emerson AV301 is designed to meet rigorous industry standards. It features built-in redundancy and fail-safe mechanisms, which help to minimize risks and protect against unexpected failures. This level of reliability is crucial for industries where downtime can lead to significant financial losses or safety hazards.

Additionally, the device offers extensive diagnostic and monitoring capabilities. It includes advanced algorithms that provide detailed insights into system performance, allowing teams to proactively identify and resolve potential issues before they escalate. This predictive maintenance approach not only enhances reliability but also optimizes resource allocation and scheduling.

The Emerson AV301 is also environmentally conscious, designed with energy efficiency in mind. Its low-power consumption features help reduce operational costs and contribute to a greener footprint.

In summary, the Emerson AV301 is a powerful tool for process automation, equipped with advanced control features, a user-friendly interface, flexible communication options, and a commitment to safety and efficiency. Its diagnostic capabilities and energy-efficient design further enhance its value, making the AV301 a top choice for industries aiming to optimize their operations. With the Emerson AV301, businesses can leverage technology to drive performance and ensure sustainable growth.