Installation
THERMOSTAT INSTALLED:
This control board can be placed into two (2) different modes:
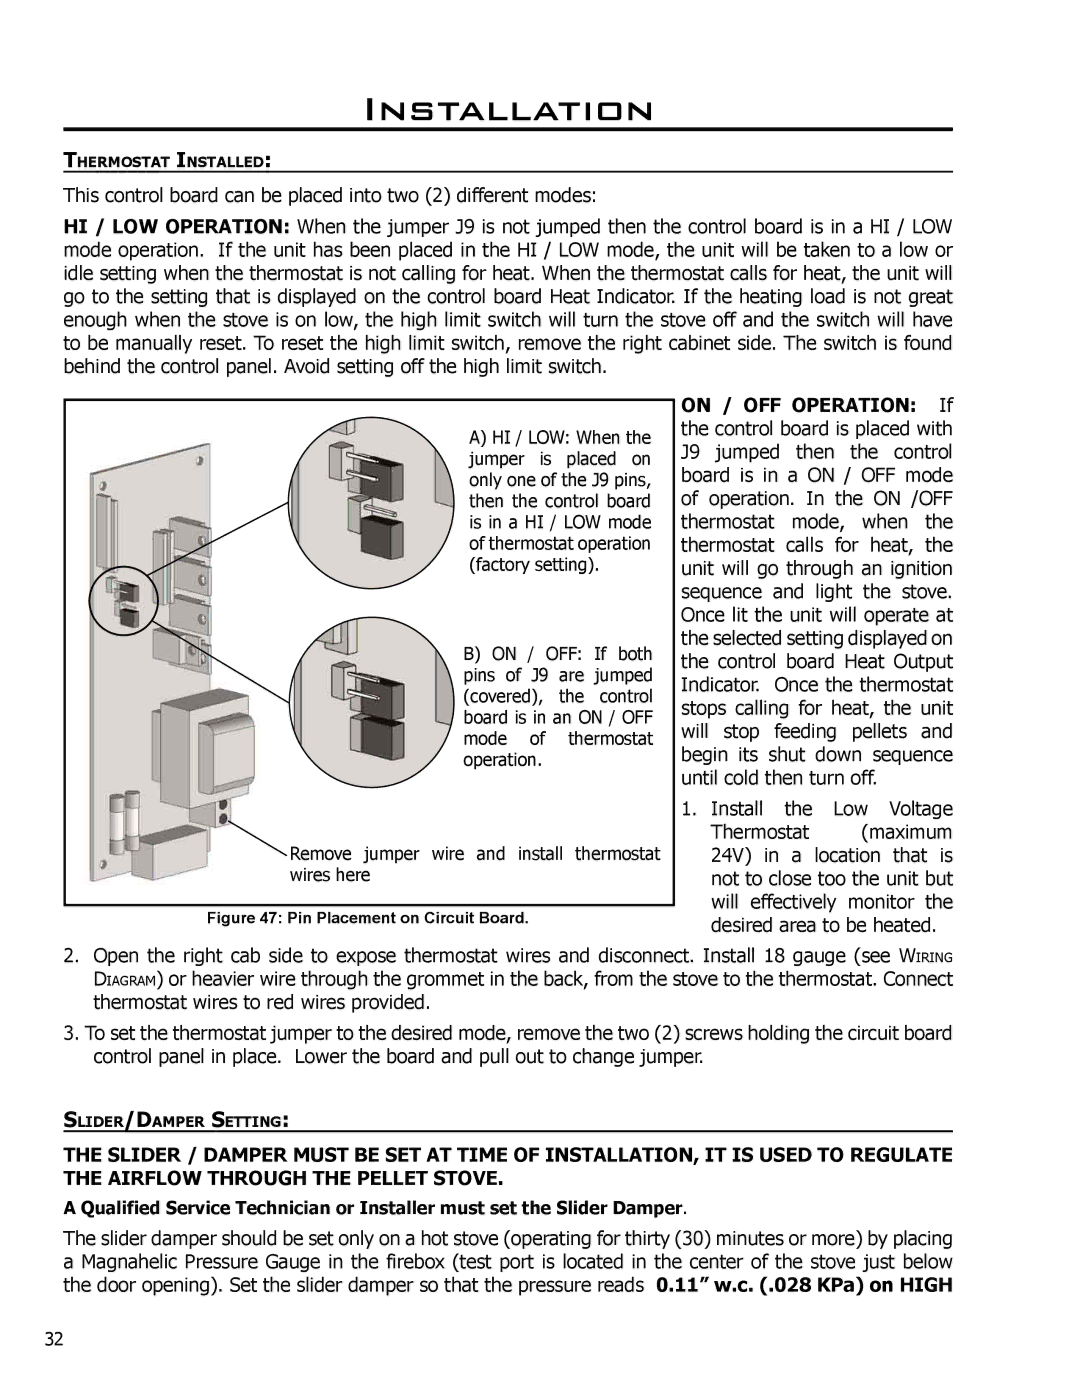
HI / LOW OPERATION: When the jumper J9 is not jumped then the control board is in a HI / LOW mode operation. If the unit has been placed in the HI / LOW mode, the unit will be taken to a low or idle setting when the thermostat is not calling for heat. When the thermostat calls for heat, the unit will go to the setting that is displayed on the control board Heat Indicator. If the heating load is not great enough when the stove is on low, the high limit switch will turn the stove off and the switch will have to be manually reset. To reset the high limit switch, remove the right cabinet side. The switch is found behind the control panel. Avoid setting off the high limit switch.
A) HI / LOW: When the jumper is placed on only one of the J9 pins, then the control board is in a HI / LOW mode of thermostat operation (factory setting).
B) ON / OFF: If both pins of J9 are jumped (covered), the control board is in an ON / OFF mode of thermostat operation.
![]() Remove jumper wire and install thermostat wires here
Remove jumper wire and install thermostat wires here
Figure 47: Pin Placement on Circuit Board.
ON / OFF OPERATION: If the control board is placed with J9 jumped then the control board is in a ON / OFF mode of operation. In the ON /OFF thermostat mode, when the thermostat calls for heat, the unit will go through an ignition sequence and light the stove. Once lit the unit will operate at the selected setting displayed on the control board Heat Output Indicator. Once the thermostat stops calling for heat, the unit will stop feeding pellets and begin its shut down sequence until cold then turn off.
1.Install the Low Voltage
Thermostat (maximum 24V) in a location that is not to close too the unit but will effectively monitor the desired area to be heated.
2.Open the right cab side to expose thermostat wires and disconnect. Install 18 gauge (see WIRING DIAGRAM) or heavier wire through the grommet in the back, from the stove to the thermostat. Connect thermostat wires to red wires provided.
3.To set the thermostat jumper to the desired mode, remove the two (2) screws holding the circuit board control panel in place. Lower the board and pull out to change jumper.
SLIDER/DAMPER SETTING:
THE SLIDER / DAMPER MUST BE SET AT TIME OF INSTALLATION, IT IS USED TO REGULATE THE AIRFLOW THROUGH THE PELLET STOVE.
A Qualified Service Technician or Installer must set the Slider Damper.
The slider damper should be set only on a hot stove (operating for thirty (30) minutes or more) by placing a Magnahelic Pressure Gauge in the firebox (test port is located in the center of the stove just below the door opening). Set the slider damper so that the pressure reads 0.11” w.c. (.028 KPa) on HIGH
32
