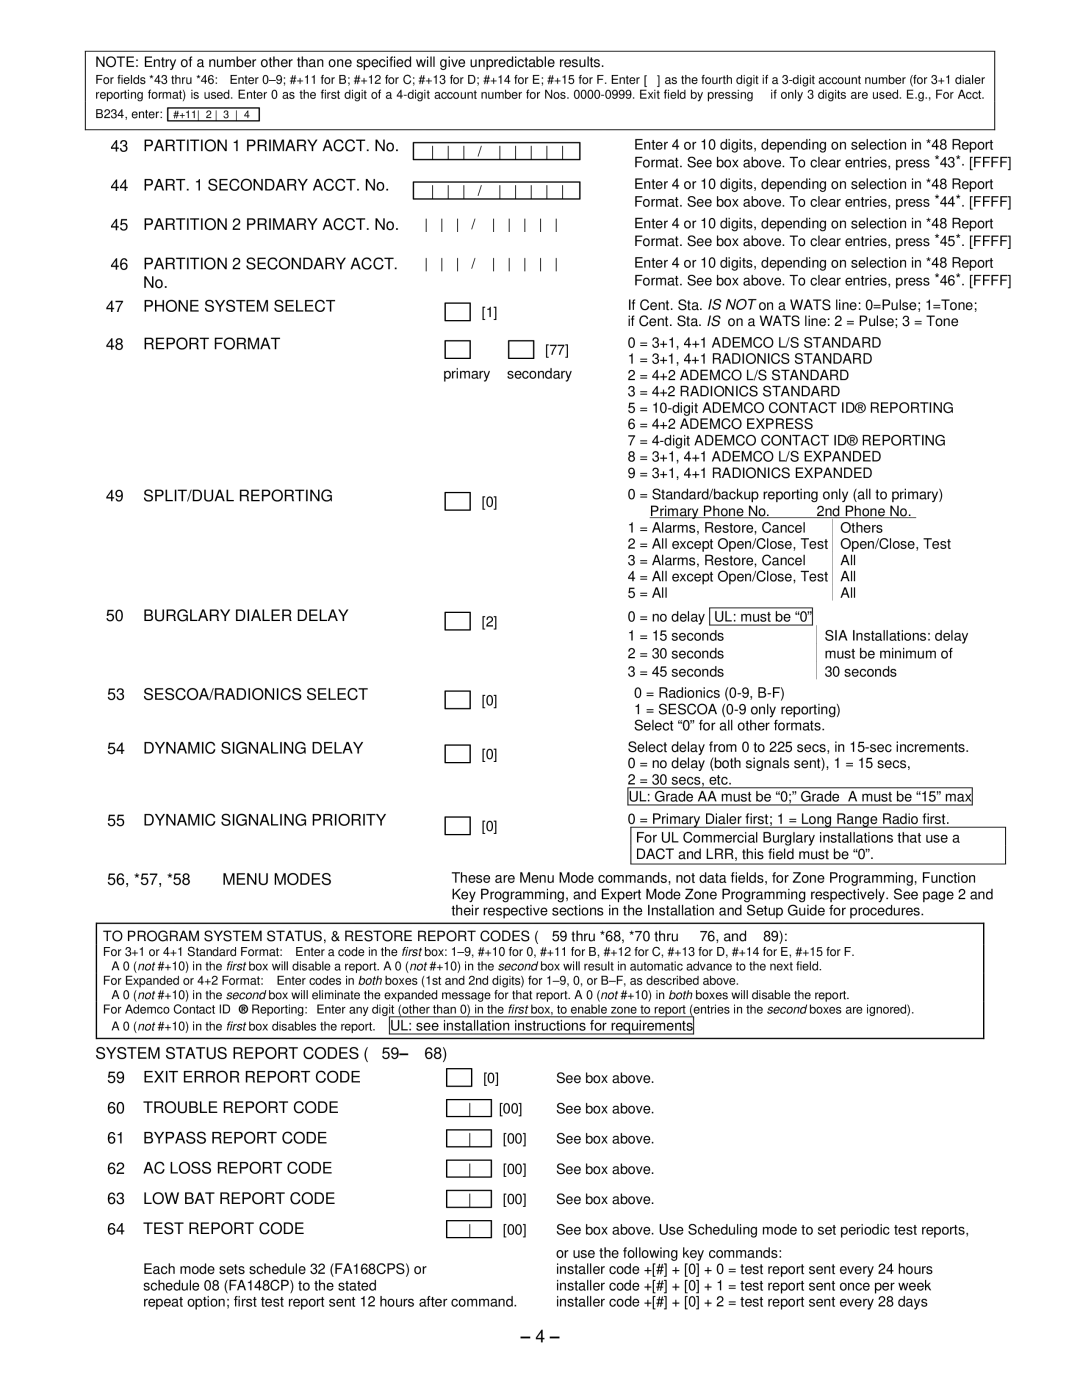
NOTE: Entry of a number other than one specified will give unpredictable results.
For fields *43 thru *46: Enter
B234, enter:
#+11 2 3 4
✱43 PARTITION 1 PRIMARY ACCT. No.
✱44 PART. 1 SECONDARY ACCT. No.
✱45 PARTITION 2 PRIMARY ACCT. No.
✱46 PARTITION 2 SECONDARY ACCT. No.
✱47 PHONE SYSTEM SELECT
✱48 REPORT FORMAT
✱49 SPLIT/DUAL REPORTING
✱50 BURGLARY DIALER DELAY
✱53 SESCOA/RADIONICS SELECT
✱54 DYNAMIC SIGNALING DELAY
✱55 DYNAMIC SIGNALING PRIORITY
/
| / | |||||||||
/ | ||||||||||
/ | ||||||||||
|
|
|
|
| [1] |
|
|
|
|
|
|
|
|
|
|
|
|
|
|
| |
|
|
|
|
|
|
|
|
| [77] | |
|
|
|
|
|
|
|
|
| ||
| primary | secondary | ||||||||
[0]
[2]
[0]
[0]
[0]
Enter 4 or 10 digits, depending on selection in *48 Report Format. See box above. To clear entries, press *43*. [FFFF] Enter 4 or 10 digits, depending on selection in *48 Report Format. See box above. To clear entries, press *44*. [FFFF] Enter 4 or 10 digits, depending on selection in *48 Report Format. See box above. To clear entries, press *45*. [FFFF] Enter 4 or 10 digits, depending on selection in *48 Report Format. See box above. To clear entries, press *46*. [FFFF]
If Cent. Sta. IS NOT on a WATS line: 0=Pulse; 1=Tone;
if Cent. Sta. IS on a WATS line: 2 = Pulse; 3 = Tone
0 | = 3+1, 4+1 ADEMCO L/S STANDARD | |||||||
1 | = 3+1, 4+1 RADIONICS STANDARD | |||||||
2 | = 4+2 ADEMCO L/S STANDARD | |||||||
3 | = 4+2 RADIONICS STANDARD |
|
| |||||
5 | = | |||||||
6 | = 4+2 ADEMCO EXPRESS |
|
|
|
| |||
7 | = | |||||||
8 | = 3+1, 4+1 ADEMCO L/S EXPANDED | |||||||
9 | = 3+1, 4+1 RADIONICS EXPANDED | |||||||
0 | = Standard/backup reporting only (all to primary) | |||||||
|
| Primary Phone No. | 2nd Phone No. |
| ||||
1 | = Alarms, Restore, Cancel |
|
| Others | ||||
2 | = All except Open/Close, Test |
| Open/Close, Test | |||||
3 | = Alarms, Restore, Cancel |
|
| All | ||||
4 | = All except Open/Close, Test |
| All | |||||
5 | = All |
|
| All | ||||
|
|
|
|
|
|
|
| |
0 | = no delay | UL: must be “0” |
|
|
|
|
| |
1 | = 15 seconds | SIA Installations: delay | ||||||
2 | = 30 seconds | must be minimum of | ||||||
3 | = 45 seconds | 30 seconds | ||||||
0= Radionics
1= SESCOA
Select delay from 0 to 225 secs, in
2 = 30 secs, etc.
UL: Grade AA must be “0;” Grade A must be “15” max
0 = Primary Dialer first; 1 = Long Range Radio first. For UL Commercial Burglary installations that use a DACT and LRR, this field must be “0”.
✱56, *57, *58 MENU MODES
These are Menu Mode commands, not data fields, for Zone Programming, Function Key Programming, and Expert Mode Zone Programming respectively. See page 2 and their respective sections in the Installation and Setup Guide for procedures.
TO PROGRAM SYSTEM STATUS, & RESTORE REPORT CODES (✱59 thru *68, *70 thru ✱76, and ✱89):
For 3+1 or 4+1 Standard Format: Enter a code in the first box:
For Expanded or 4+2 Format: Enter codes in both boxes (1st and 2nd digits) for
A 0 (not #+10) in the second box will eliminate the expanded message for that report. A 0 (not #+10) in both boxes will disable the report.
For Ademco Contact ID® Reporting: Enter any digit (other than 0) in the first box, to enable zone to report (entries in the second boxes are ignored).
A 0 (not #+10) in the first box disables the report.
UL: see installation instructions for requirements
SYSTEM STATUS REPORT CODES (✱59–✱ 68)
✱59 EXIT ERROR REPORT CODE ✱60 TROUBLE REPORT CODE ✱61 BYPASS REPORT CODE ✱62 AC LOSS REPORT CODE ✱63 LOW BAT REPORT CODE ✱64 TEST REPORT CODE
[0]See box above.
[00] | See box above. | |
| [00] | See box above. |
| [00] | See box above. |
| [00] | See box above. |
| [00] | See box above. Use Scheduling mode to set periodic test reports, |
Each mode sets schedule 32 (FA168CPS) or schedule 08 (FA148CP) to the stated
repeat option; first test report sent 12 hours after command.
or use the following key commands:
installer code +[#] + [0] + 0 = test report sent every 24 hours installer code +[#] + [0] + 1 = test report sent once per week installer code +[#] + [0] + 2 = test report sent every 28 days
– 4 –