Fluke 196C/199C
Page
Limited Warranty & Limitation of Liability
Service Centers
Table of Contents
Using Replay, Zoom and Cursors
Using The Multimeter
Using The Recorder Functions
Fluke 196C/199C
Iii
Specifications
Statement of Conformity
Declaration of Conformity
Manufacturer
Sample tests
Unpacking the Test Tool Kit
ScopeMeter Test Tool Kit
Battery Charger country dependent
# Description
Safety Information Read First
Safety Information Read First
If Safety Features are Impaired
Use of the test tool in a manner not specified may
Impair the protection provided by the equipment
Using The Scope
Powering the Test Tool
About this Chapter
Resetting the Test Tool
Screen After Reset
Navigating a Menu
Open the Waveform Options
Hiding Key Labels and Menus
Input Connections
Making Scope Connections
Scope Connections
Displaying an Unknown Signal with Connect-and-View
Screen After an Auto Set
Making Automatic Scope Measurements
Freezing the Screen
Hz and V peak-peak as Scope Readings
Using Average, Persistence and Glitch Capture
Using Average for Smoothing Waveforms
Open the Waveform Options menu
Digital Persistence Infinite
Using Persistence to Display Waveforms
Persistence... menu
Envelope Off
Displaying Glitches
Suppressing High Frequency Noise
Acquiring Waveforms
Selecting AC-Coupling
Reversing the Polarity of the Displayed Waveform
Menu
Variable Input Sensitivity
Open the Input a Options
Select and accept Variable
Using Waveform Mathematics Functions
Working with Noisy Waveforms
Select 10kHz HF reject to
Comparing Waveforms
Analyzing Waveforms
Using The Multimeter
Making Meter Connections
Making Multimeter Measurements
Measuring Resistance Values
Highlight a ac
Making a Current Measurement
Open the Measurement menu
Open the Current Probe
Ampere Measurement Readings
Activate manual ranging
Freezing the Readings
Selecting Auto/Manual Ranges
Increase or decrease the range
Making Relative Measurements
Making a Relative Measurement
Using The Recorder Functions
Opening the Recorder Main Menu
Plotting Measurements Over Time TrendPlot
Starting a TrendPlot Function
Highlight Trend Plot Scope
Displaying Recorded Data
TrendPlot Reading
Open the Recorder Options
Changing the Recorder Options
Turning Off the TrendPlot Display
Exit the recorder function
Recording Scope Waveforms In Deep Memory Scope Record
Starting a Scope Record Function
Highlight Scope Record
Using ScopeRecord in Single Sweep Mode
Using External Triggering to Start or Stop Scope Record
Analyzing a TrendPlot or Scope Record
Triggered Single Sweep Recording
Using Replay, Zoom and Cursors
Replaying the 100 Most Recent Scope Screens
Replaying Step-by-Step
Replaying a Waveform
Replaying Continuously
Turning Off the Replay Function
Capturing 100 Intermittents Automatically
Zooming in on a Waveform
Zooming in a Waveform
Displaying the Zoomed Waveform
Turning Off the Zoom Function
Using Horizontal Cursors on a Waveform
Making Cursor Measurements
Using Vertical Cursors on a Waveform
Turn off the cursors
Using Cursors on a A+B, A-B or A*B Waveform
Making Rise Time Measurements
Triggering on Waveforms
Setting Trigger Level and Slope
Screen with all Trigger Information Adjust the trigger level
Using Trigger Delay or Pre-trigger
Trigger Delay or Pre-trigger View
Automatic Trigger Options
Open the Trigger Options menu
Open the Automatic Trigger
Select Free Run, jump to Noise
Triggering on Edges
Open the Trigger Options menu Open the Trigger on Edge menu
Reject Filter
Triggering on Noisy Waveforms
Making a Single Acquisition
Making a Single Shot Measurement
Triggering on External Waveforms
Select 1.2V under the Ext Level
Label
Triggering on Video Signals
Select Video on a to open
Trigger on Video menu
Triggering on Video Lines
Enable video line selection
Triggering on Video Frames
Choose Field
Select Pulse Width on A... to
Triggering on Pulses
Detecting Narrow Pulses
Open the Trigger on Pulse Width
Tip
Finding Missing Pulses
Triggering on Missing Pulses
Using Memory, PC and Printer
Saving and Recalling
Display the SAVE/PRINT key labels
Saving Screens with Associated Setups
Highlight SCREEN+SETUP location
Save the actual screen
Open the Recall menu
Recalling a Setup Configuration
Viewing Stored Screens
Connecting to a Computer
Documenting Screens
Open the View... menu
Connecting to a Printer
Connecting a Serial Printer
Printing a Screen
Setting up the Printing Configuration
Open the Printer Setup submenu
Baud Rate
Fluke 196C/199C
Using the Standard Accessories
Tips
Probing Using 2-mm Heavy Duty Test Probes
Heavy Duty Fixed Connections for Scope
Tips
Using the Independently Floating Isolated Inputs
Measuring Using Independently Floating Isolated Inputs
Parasitic capacitance between analog Digital reference
Turn the test tool off
Using the Tilt Stand
Suppressing Key Labels and Menu’s
Press and hold
Open the Language Select
Adjusting the Contrast and Brightness
Changing the Information Language
Accept French as the language
Open Display Options menu Open Date Adjust menu
Changing the Display Color
Changing Date and Time
Saving Battery Life
Setting the Power Down Timer
To Coupling
Open the Auto Set Adjust menu
Changing the Auto Set Options
Select Unchanged
Cleaning the Test Tool
Maintaining the Test Tool
Storing the Test Tool
Charging the Batteries
Charging the Batteries
Extending Battery Operation Time
Start the refresh cycle
Replacing the NiMH Battery Pack BP190
Calibrating the Voltage Probes
Maintaining the Test Tool
Start the probe calibration
Displaying Calibration Information
Parts and Accessories
Standard Accessories
Open the Version & Calibration
Standard Accessories Ordering Code
Ordering Code
TL24 General Purpose Leads
Ordering Code
Optional Accessories
SW90W
Troubleshooting
Battery Operated Fluke Accessories Do Not Function
FlukeView Does Not Recognize The Test Tool
Safety Characteristics
Specifications
Performance Characteristics
Introduction
Dual Input Oscilloscope
Isolated Inputs a and B Vertical
Horizontal
Edge Trigger
Trigger and Delay
Automatic Connect-and-View Trigger
Isolated External Trigger
Automatic Scope Measurements
AC Voltage VAC
AC+DC Voltage True RMS
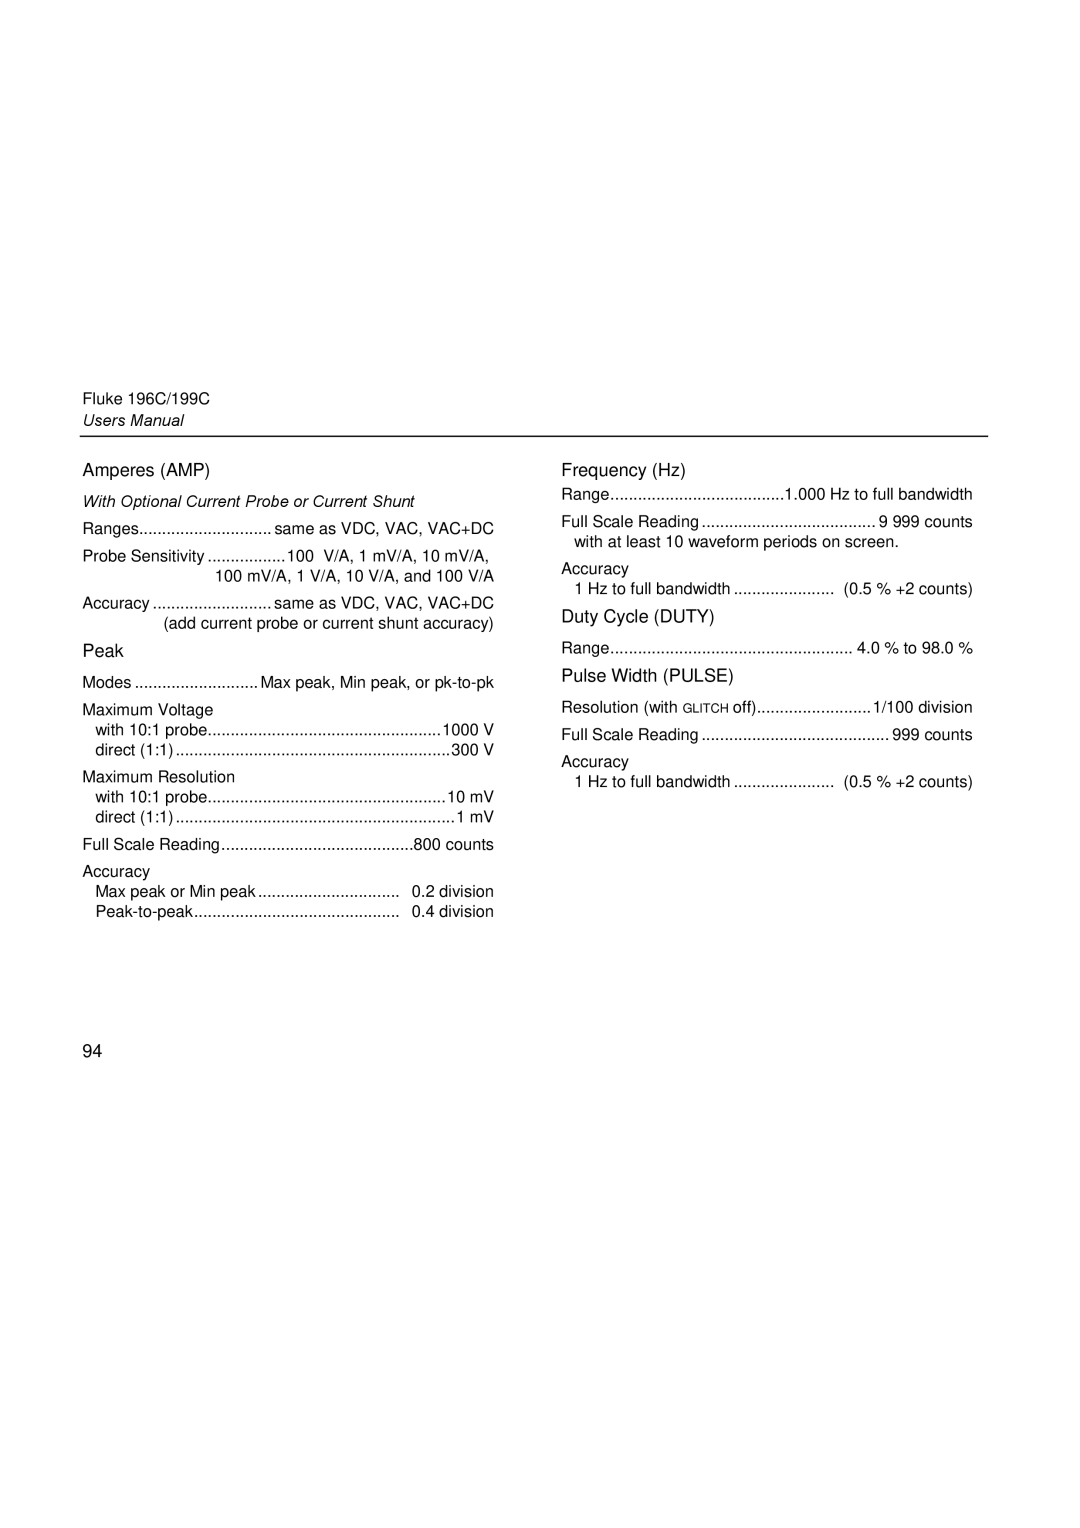
Frequency Hz
Amperes AMP
Peak
Duty Cycle Duty
Temperature Temp
Power
Phase
Decibel dB
Meter
DMM Measurements on Meter Inputs
Diode
Recorder
TrendPlot Meter or Scope
Scope Record
Zoom, Replay and Cursors
Miscellaneous
Optical InterfacePort
Probe Calibration
Memory
Mechanical
Environmental
Safety
Max. Input Voltages
Max. Floating Voltage
Probe
Safety
Electrical specifications
Environmental
104
Electromagnetic Immunity
106
Index
Average
108
Max. Floating Voltage, 102, 103 Max. Input Voltage
110