Owner’s Manual and Installation Instructions
Installation Instructions
et instructions d’installation
GEAppliances.com
INSTALLATION
IMPORTANT SAFETY INFORMATION READ ALL INSTRUCTIONS BEFORE USING
SAFETY
REFRIGERATOR SAFETY INFORMATION
SAFETY CONT
CONNECTING ELECTRICITY
SAVE THESE INSTRUCTIONS
PROPER DISPOSAL OF YOUR OLD REFRIGERATOR
Space-saving ice maker
About the features
Showcase LED lighting
Drop-down tray
Ice/water filter Remove filter/bypass plug
Door ice bin
Door Alarm Ice Maker Lock Controls
About the controls with temperature settings
Reset Filter
Refrigerator
Changing the Temperature for Control Style B
Changing the Temperature for Control Style A
Changing Temp. for Control Style C
To Change the Refrigerator Temperature
PreciseFill setting
About the controls - features
TurboFreeze setting
TurboCool setting
Sounds to alert when the freezer or fresh food doors have
Reset Filter
Adjust freezer compartment temperature
Controls Style C, Internal Controls
Important Facts About Your Dispenser
About the dispenser
To Use the Internal Water Dispenser
To reinstall Dispenser Tray Type A Only
To Use HANDS FREE AUTO FILL
About autofill
To Stop AUTO FILL
Important Facts about AUTO FILL
Installing the Filter Cartridge
When to replace the filter cartridge
About the GE RPWFE water filter cartridge
Water Filter Cartridge
Rearranging the Shelves
About the fresh food storage options
Spillproof Shelves
Quick Space Shelf
Adjustable Bins on the Door
Non-Adjustable Dairy Bin
Non-Adjustable Bins on the Door Dispenser Models - Left Hand Door
Drop down tray
temperature controlled drawer
About the climate zone and
ClimateZone
Temperature Controlled Drawer
How to Remove and Replace Drawer Divider
How to Remove and Replace the Adjustable Deli/Produce Drawer
About the climate zone and temperature controlled drawer
To remove
About the freezer
Non-Adjustable Bin in the Freezer
Freezer Basket and Drawer
Basket Removal
About the automatic ice maker
How to Turn the Ice Maker On/Off
Ice Bucket and Dispenser
Extra Ice Storage
Cleaning the Outside
Care and cleaning of the refrigerator
Cleaning the Inside
Behind the Refrigerator
Refrigerator Lights LEDs
Replacing the lights
Refrigerator
Installation Instructions
BEFORE YOU BEGIN
PREPARATION
Moving THE REFRIGERATOR
Installation Instructions
Overall Height to Top of Hinge Cover
Height to Top of Cabinet
REFRIGERATOR LOCATION
INSTALLING THE REFRIGERATOR
CLEARANCES
1 REMOVE THE FRESH FOOD DOOR HANDLE
3 REMOVE THE REFRIGERATOR DOORS
INSTALLING THE REFRIGERATOR cont
3 REMOVE THE REFRIGERATOR DOORS cont
Lifting Hazard
REMOVE THE REFRIGERATOR DOORS cont
5 REINSTALLING THE REFRIGERATOR DOORS
4 REMOVE CENTER HINGE if necessary
REMOVE OPPOSITE DOOR
7 REPLACING THE FREEZER DOOR
6 REMOVE THE FREEZER DOOR
Step 4 - Tighten the 3 screws on each side right and left
Instructions for adjusting freezer door gaps
Refer to 239D4144P001, Pub No
10 REMOVE PACKAGING
8 LEVEL THE FREEZER DOOR
9 LEVEL THE FREEZER DOOR cont
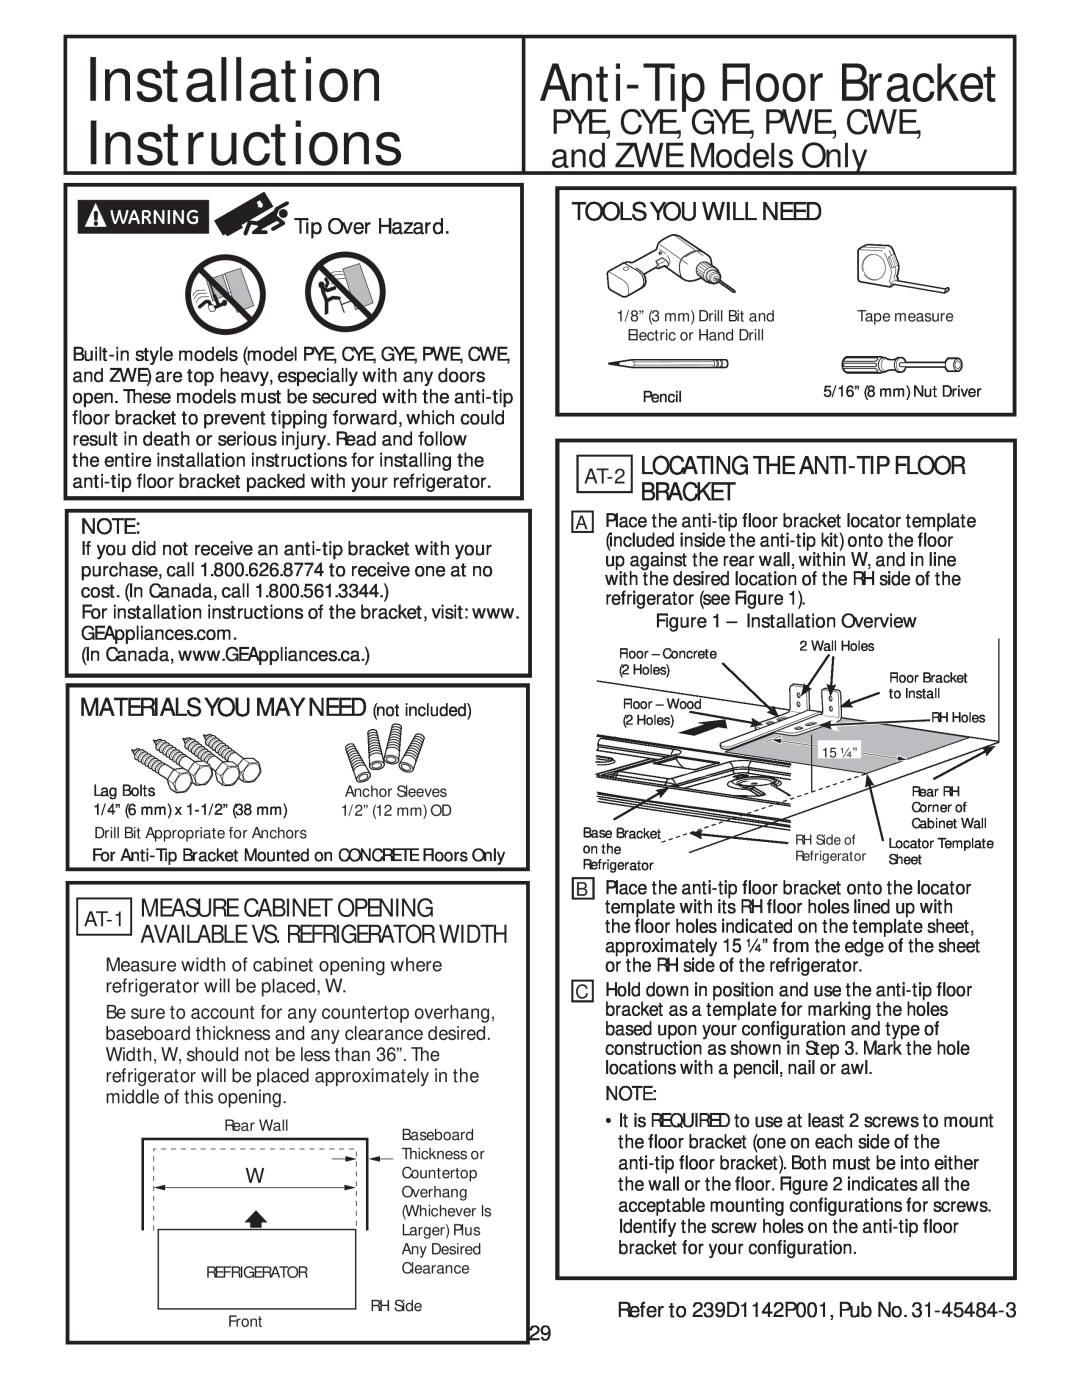
PYE, CYE, GYE, PWE, CWE, and ZWE Models Only
Installation Instructions
MATERIALS YOU MAY NEED not included
AT-1 MEASURE CABINET OPENING
BRACKET cont
AT-3 ANTI-TIP BRACKET INSTALLATION
AT-4 POSITIONING THE REFRIGERATOR
LOCATING THE ANTI-TIP FLOOR
TO THE HOUSE WATER LINE
CONNECTING THE REFRIGERATOR
Before connecting the water line to the house, purge
A cold water supply is required for automatic ice maker
13 PLUG IN THE REFRIGERATOR
12 TURN ON THE WATER SUPPLY
14 LEVEL THE REFRIGERATOR
15 LEVEL THE REFRIGERATOR DOORS
Non-Dispense
Refrigerator Assembly Instructions, suggested assembly
Models
Instrucciones de montaje del refrigerador, ensamble sugerido
WHAT YOU WILL NEED
INSTALLING THE WATER LINE
WHAT YOU WILL NEED CONT
INSTALLING THE WATER LINE cont
1 SHUT OFF THE MAIN WATER SUPPLY
2 CHOOSE THE VALVE LOCATION
4 FASTEN THE SHUTOFF VALVE
INSTALLING THE WATER LINE cont
7 CONNECT THE TUBING TO THE VALVE
5 TIGHTEN THE PIPE CLAMP
WATER SOUNDS
Normal operating conditions
START UP COOLING
HUMMM
Problem
Before you call for service…
Possible Causes
What to Do
About the Automatic Ice Maker
Troubleshooting Tips cont
AUTO FILL
AUTO FILL overfills
com or calling 800.ge.CARES
Truth or Myth
Truth or Myth?
Answer
Truth or Myth cont
For the Period of
Refrigerator Warranty
GE Will Replace
What GE Will Not Cover
RPWFE Water Filter Cartridge Limited Warranty
BuyerSeller
workmanship during this limited thirty-day warranty
What is Not Covered
Application Guidelines/Water Supply Parameters
Performance Data Sheet Model GE RPWFE
RPWFE
Consignes d’utilisation
Instructions d’installation
Assistance à la clientèle
Consignes de sécurité
Site Internet d’Électroménagers GE
IMPORTANTES CONSIGNES DE SÉCURITÉ
VEUILLEZ LIRE TOUTES LES CONSIGNES AVANT UTILISATION
SÉCURITÉ
VEUILLEZ LIRE TOUTES LES CONSIGNES AVANT UTILISATION
CONSERVEZ CES INSTRUCTIONS
BRANCHEMENTS ÉLECTRIQUES
MISE AU REBUT APPROPRIÉE DE VOTRE ANCIEN RÉFRIGÉRATEUR
Machine à glaçons à faible encombrement
A propos des fonctions
Éclairage à DEL
Plateau rabattable
GEAppliances.ca
Installation de la cartouche filtrante
Bac à glace de porte
Bac rabattable pour les produits laitiers
À propos des paramètres de température
Modification de la température pour un style de contrôle A
Changer la temp., pour le type de commande C
Modification de la température pour un style de contrôle B
Pour changer la température, pressez et relâchez la touche
Style de commandes B
Style de commandes A
Commandes externes
À propos des contrôles - Funciones
Commandes internes
Style de commandes C
À propos des contrôles - Funciones
Réinstallation du filtre
Informations importantes concernant votre distributeur
A propos du distributeur
Pour utiliser le distributeur d’eau interne
AVERTISSEMENT Risque de lacération
Pour utiliser le remplissage automatique mains libres
À propos du remplissage automatique
Pour arrêter le Remplissage automatique
Faits importants à propos du Remplissage automatique
Installation de la cartouche filtrante
Remplacement de la cartouche filtrante
A propos de la cartouche RPWFE du filtre à eau GE
Cartouche filtrante à eau
Réorganisation des clayettes
A propos du stockage des produits frais
Clayettes anti-déversement
Clayette QuickSpace
Bac à produits laitiers non réglable
A propos du stockage des produits frais
Bacs de porte réglables
Plateau rabattable
à température contrôlée
A propos de la zone climatisée & du tiroir
Zone climatisée
Tiroir à température contrôlée
Comment retirer le séparateur du tiroir et le remettre en place
A propos de la zone climatisée & du tiroir à température contrôlée
Pour le retirer
Pour le remettre en place
Panier et tiroir du congélateur
À propos du congélateur
Retrait d’un panier
Bac non réglable dans le congélateur
Seau à glaçons et distributeur
À propos de la machine à glaçons automatique
Comment allumer ou éteindre la machine à glaçons ?
Stockage de glace supplémentaire
Nettoyage de l’extérieur
Entretien et nettoyage du réfrigérateur
Panneaux, poignées de porte et garniture en acier inoxydable
Pièces en plastique argenté
Ampoules du réfrigérateur DEL
Remplacement des ampoules
Réfrigérateur
Instructions d’installation
Modèles GE and GE Profile
AVANT DE COMMENCER
DÉPLACEMENT DU RÉFRIGÉRATEUR
Instructions d’installation
Hauteur hors tout du haut du cache de la charnière
Hauteur du haut du réfrigérateur
EMPLACEMENT DU RÉFRIGÉRATEUR
INSTALLATION DU RÉFRIGÉRATEUR
DÉGAGEMENTS
RETRAIT DES PORTES DU RÉFRIGÉRATEUR
3 RETRAIT DES PORTES DU RÉFRIGÉRATEUR
INSTALLATION DU RÉFRIGÉRATEUR suite
MISE EN GARDE Risque lors du levage de charge
RETRAIT DES PORTES DU RÉFRIGÉRATEUR suite
4 RETRAIT DE LA CHARNIÈRE CENTRALE si nécessaire
5 REINSTALLATION DES PORTES DU RÉFRIGÉRATEUR
RETRAIT DE LA PORTE OPPOSÉE
un couple de 65 po-lb. Avec la porte
RETRAIT DE LA PORTE DU CONGÉLATEUR
7 REINSTALLATION DE LA PORTE DU CONGÉLATEUR
Reportez-vous à 239D4144P001 Pub No
9 MISE À NIVEAU DE LA PORTE DU CONGÉLATEUR suite
8 MISE À NIVEAU DE LA PORTE DU CONGÉLATEUR
10 RETRAIT DE L’EMBALLAGE
MATÉRIEL DONT VOUS POUVEZ AVOIR BESOIN non inclus
Modèle PYE, PWE seulement
RÉFRIGÉRATEUR
OUTILLAGE NÉCESSAIRE
C Mur en BOIS et sol CARRELE
AT-3 INSTALLATION DU SYSTÈME ANTI- BASCULEMENT
Figure 2 - Emplacements acceptables pour les vis
RACCORDEMENT DU RÉFRIGÉRATEUR À LA CONDUITE D’EAU DE LA MAISON
15 MISE À NIVEAU DES PORTES DU RÉFRIGÉRATEUR
12 OUVRIR L’ALIMENTATION EN EAU
14 MISE À NIVEAU DU RÉFRIGÉRATEUR
Pour positionner les bacs dans les portes
PIÈCES NÉCESSAIRES
INSTALLATION DE LA CONDUITE D’EAU
PIÈCES NÉCESSAIRES suite
INSTALLATION DE LA CONDUITE D’EAU suite
PURGER L’EAU DES TUYAUTERIES
3 PERCAGE D’UN TROU POUR LE ROBINET
5 SERRAGE DU COLLIER
4 FIXATION DU ROBINET D’ARRÊT
6 PASSAGE DU TUYAU
8 PURGE DU TUYAU
BRUITS D’EAU
Conditions normaux de fonctionnement
OUUCH
Entendez-vous ce que j’entends ? Ces conditions sont normaux
Avant d’appeler à un réparateur…
Solution
Problème
Causes Possibles
machine à glaçons automatique
Conseils de dépannage suite
tactant en ligne sur GEAppliances.ca ou par téléphone au
Mythe ou réalité
Mythe ou réalité ?
Réponse
tactant en ligne sur GEAppliances.ca ou par téléphone au
GE remplacera
Garantie du réfrigérateur
garantie de
Ce qui n’est pas couvert par GE
Acheteur Vendeur
Certificat de garantie de la cartouche RPWFE du filtre à eau
Débit de service
Fiche technique de performance Modèle GE RPWFE
Capacité 170 gal. 643,5 litres
Conditions dapplication/Paramètres dalimentation deau
GEAppliances.ca
Assistance à la clientèle
Pièces Détachées et Accessoires
Programmation d’une réparation
Studio de Conception Réaliste
Instrucciones de Instalación Preparación para Instalar
Instrucciones de seguridad. . . 92 Instrucciones de Funcionamiento
Consejos para la Solución
Soporte al Cliente
LEA TODAS LAS INSTRUCCIONES ANTES DE USAR
INFORMACIÓN IMPORTANTE DE SEGURIDAD
Sitio Web de Electrodomésticos de GE
INSTALACIÓN
LEA TODAS LAS INSTRUCCIONES ANTES DE USAR
GUARDE ESTAS INSTRUCCIONES
CONEXIÓN DE LA ELECTRICIDAD
FORMA ADECUADA DE DESCARTAR SU ANTIGUO REFRIGERADOR
Máquina de hacer hielo con ahorro de espacio
Acerca de las funciones
Luz LED de exhibición
Bandeja desplegable
Recipiente de hielo en la puerta
Acerca de las funciones
Recipiente de lácteos desplegable
Hielo en la puerta/ filtro de agua
Sobre los controles con ajustes de temperatura
Cambio de la Temperatura para el Estilo de Control B
Cambio de Temperatura para el Estilo de Control C
Para Cambiar la Temperatura del Refrigerador
Para Cambiar la Temperatura del Freezer
Configuración de Llenado Preciso
Acerca de las funciones de los controles
Configuración de la máquina de hacer hielo
Configuración de TurboFreeze
Estilo de Control C, Controles Internos
Acerca de las funciones de los controles
Reinicio del Filtro
Controles de Bloqueo
A fin de eliminar la Bandeja del Dispensador Tipo A Únicamente
Acerca del dispensador
A fin de eliminar la Bandeja del Dispensador Tipo B Únicamente
Para reinstalar la Bandeja del Dispensador Tipo A Únicamente
Para Usar LLENADO AUTOMÁTICO CON MANOS LIBRES
Acerca del llenado automático
Para Detener AUTO FILL LLENADO AUTOMÁTICO
Factor Importante acerca del LLENADO AUTOMÁTICO
Acerca del cartucho del filtro de agua RPWFE de GE
de comidas frescas
Acerca de las opciones de almacenamiento
Cómo Reorganizar los Estantes
Estantes a Prueba de Derrames
Recipiente de Lácteos No Ajustable
Acerca de las opciones de almacenamiento de comidas frescas
Recipientes Ajustables a la Puerta
Recipientes No Ajustables a la Puerta - Modelos con Dispensador
Cajón con Control de Temperatura
Acerca de climate zone área climática y del cajón
con control de temperatura
Cultivados
Cómo Retirar y Reemplazar el Cajón Ajustable de Embutidos/ Productos
Cómo Retirar y Reemplazar el Divisor del Cajón
Para retirar
Acerca del freezer
Hielera y Dispensador
Acerca de la máquina de hacer hielo automática
Cómo Encender/ Apagar la Máquina de Hacer Hielo
Almacenamiento de Hielo Adicional
Limpieza de la Parte Exterior
Cuidado y limpieza del refrigerador
Los paneles de acero inoxidable, manijas de las puertas y componentes
Limpieza de la Parte Interior
Luces del Refrigerador LEDs
Reemplazo de las luces
Instrucciones de Instalación
Refrigerador
Modelos GE y GE Profile
PREPARACIÓN
CÓMO MOVER EL REFRIGERADOR
Instrucciones de Instalación
Altura General a la Parte Superior de la
Tapa de la Bisagra
CÓMO INSTALAR EL REFRIGERADOR
CÓMO INSTALAR EL REFRIGERADOR
ESPACIO NECESARIO
CÓMO RETIRAR LAS PUERTAS DEL REFRIGERADOR
PRECAUCIÓN Riesgo al levantar la puerta
CÓMO INSTALAR EL REFRIGERADOR cont
3 RETIRE LAS PUERTAS DEL REFRIGERADOR
RETIRE LAS PUERTAS DEL REFRIGERADOR cont
5 REINSTALACIÓN DE LAS PUERTAS DEL
REFRIGERADOR
RETIRE LA BISAGRA CENTRAL si es necesario
REINSTALACIÓN DE LAS PUERTAS DEL REFRIGERADOR cont
Abra la puerta del freezer hasta su extensión completa
RETIRE LA PUERTA DEL FREEZER
7 REEMPLAZO DE LA PUERTA DEL FREEZER
Consulte 239D4144P001 Pub Nº
Instrucciones para ajustar los espacios de la puerta del freezer
¡IMPORTANTE
8 NIVELACIÓN DE LA PUERTA DEL FREEZER
10 RETIRE EL EMBALAJE
9 NIVELACIÓN DE LA PUERTA DEL FREEZER cont
HERRAMIENTAS NECESARIAS
Instrucciones de Instalación
UBICACIÓN DEL SOPORTE DE PISO AT-2 ANTI-VOLCADURAS
NOTA
Figura 2 - Ubicaciones Aceptables
ANTI-VOLCADURAS cont
para la Colocación de Tornillos
AT-2 UBICACIÓN DEL SOPORTE DE PISO
CÓMO CONECTAR EL REFRIGERADOR AL SUMINISTRO DE AGUA DEL HOGAR
NOTAS
15 NIVELACIÓN DE LAS PATAS DEL REFRIGERADOR
12 ABRA EL SUMINISTRO DE AGUA
13 ENCHUFE EN EL REFRIGERADOR
14 NIVELACIÓN DEL REFRIGERADOR
Coloque los recipientes en las puertas
LO QUE NECESITARÁ
CÓMO INSTALAR LA TUBERÍA DE AGUA
ANTES DE COMENZAR
LO QUE NECESITARÁ CONT
CÓMO INSTALAR LA TUBERÍA DE AGUA Cont
1 CIERRE EL SUMINISTRO DE AGUA PRINCIPAL
2 ELIJA LA UBICACIÓN DE LA VÁLVULA
7 CONECTE LA TUBERÍA A LA VÁLVULA
4 AJUSTE LA VÁLVULA DE CIERRE
5 AJUSTE LA ABRAZADERA DE LA TUBERÍA
6 ENRUTE LA TUBERÍA
HUMMM WHOOSH
Condiciones de funcionamiento normal
SONIDOS DEL AGUA
ROTURAS y CHASQUIDOS
Antes de Solicitar el Servicio Técnico…
Problema
Causas Posibles
Consejos para la Solución de Problemas
Problema
Consejos para la Solución de Problemas cont
Causas Posibles
Qué hacer
Verdad o Mito?
Verdad o Mito
Respuesta
Explicación
Verdad o Mito? cont
Verdad o Mito cont
Por el Período de
Garantía del Refrigerador. Para clientes en Estados Unidos
GE Reemplazará
Qué No Cubrirá GE
CompradorVendedor
Garantía Limitada del Cartucho del Filtro de Agua RPWFE
o llame al 800.GE.CARES
RPWFE
Pautas de Aplicación/ Parámetros de Suministro de Agua
Ficha Técnica de Funcionamiento del Modelo GE RPWFE
AVISO
Sustancia Evaluada
Servicio Programado
Consumer Support
Estudio de Diseño de la Vida Real
Garantías Extendidas
Parts and Accessories
Schedule Service
GE Appliances Website
Real Life Design Studio