The oven control allows you to turn the oven on or off automatically at specific times that you set.

NOTE: Before beginning make sure the oven clock shows the correct time of day.

To set the clock, first press the CLOCK pad.

“TIME” will flash in the display. Press INCREASE or DECREASE pad until correct time of day is displayed. Press the CLOCK pad to start.

Do not lock the oven door with the door latch during time baking. This is used for self-cleaning only.

How to Set Delay Start and Stop

Quick Reminder:

1.Press COOK TIME pad.

2.Press INCREASE/ DECREASE pad to set cooking time.

3.Press STOP TIME pad.

4.Press INCREASE/ DECREASE pad until desired Stop Time appears in display.

5.Press BAKE pad.

6.Press INCREASE/ DECREASE pad to select oven temperature.

Delay Start and Stop is setting the oven timer to turn the oven on and off automatically at a later time than the present time of day.

For exam~le: Let’s sav it’s 2:00 and dinner time is

L.

shortly after 7:00. The recipe suggests 3 hours baking time at 325°F. Here’s how:

To avoid possible burns, place the shelves in the correct position before you set Delay Start.

Step 1: Close the oven door.

Step 2: Press COOK TIME pad.

COOK nTIME

~A Step 3: For 3 hours of cooking time, press INCREASE pad until “3:00”

n appears in the display.

Step 4: Press STOP TIME pad.

STOP nTIME

“5:00” appears on


. .-$.-

the display and


--

/1

1


J_ “J


“STOP TIME”

~g[

(“l(Ll


flashes. The control

E

.-


automatically sets Stop Time by adding the Cook Time to the time of day. In this example, the time of day is 2:00 and the Cook Time is 3 hours. Adding 3 hours to the time of day equals 5:00.

Step 5: Change Stop Time from 5:00 to 7:00 by pressing INCREASE pad until “7:00” appears in the display.

I BAKE Step 6: Press BAKE pad.

I

( J

Step 7: Press INCREASE pad. The last oven set temperature appears in the display. Press INCREASE or DECREASE pad until “325°” is displayed.

At 4:00, the oven will turn on automatically. The word “ON” and the changing temperature, starting at 100°F., will be displayed. When the oven reaches the temperature you set, a tone will sound. The oven will continue to cook for the programmed 3 hours and shut off automatically at 7:00.

Step 8: Remove food from the oven. Remember, even though oven shuts off automatically, foods continue cooking after controls are off.

NOTE: When setting your oven for a Delay Start, never let foods that spoil easily such as milk, eggs, fish, stuffings, poultry and pork sit out for more than one hour before or after cooking. Room temperature promotes the growth of harmful bacteria. Be sure that the oven light is off because heat from the bulb%ill speed harmful bacteria growth.

15

Page 15
Image 15
GE JGBP26GEN, JGBP27GEN installation instructions How to Set Delay Start and Stop, Quick Reminder

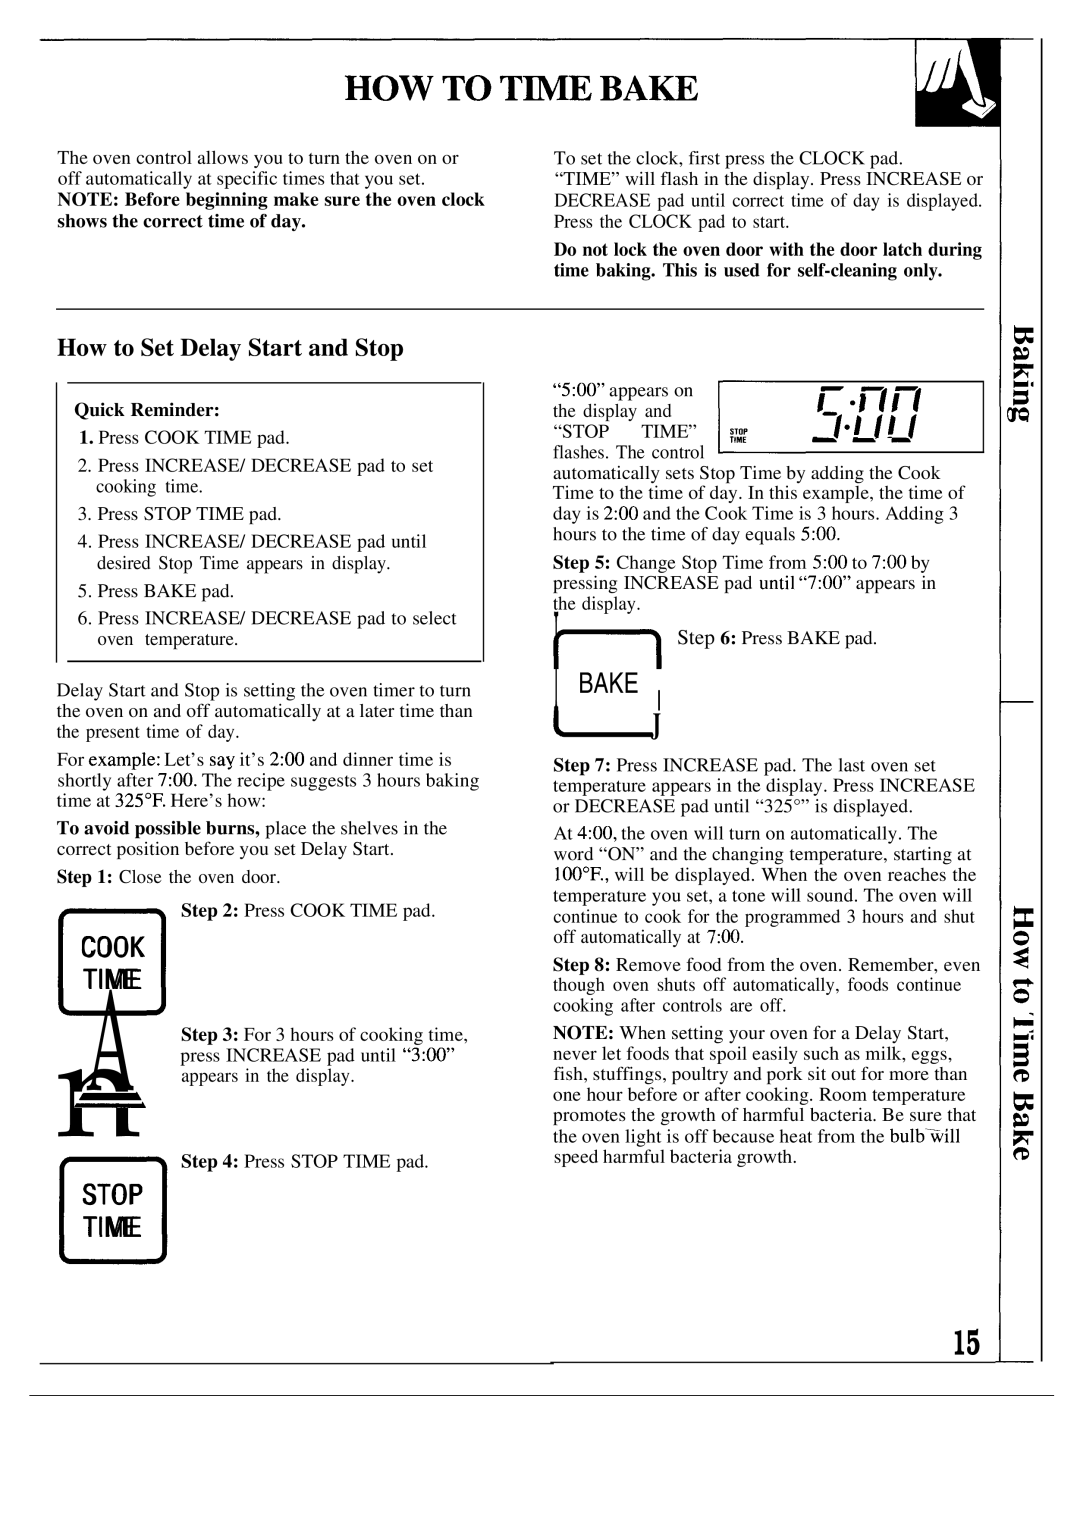
JGBP26GEN, JGBP27GEN specifications

The GE JGBP27GEN and JGBP26GEN are two exceptional gas ranges that stand out in the market for their advanced features and user-friendly technologies. Both models cater to home chefs looking for precision in cooking, reliability, and a sturdy design that can withstand the rigors of daily use.

The GE JGBP27GEN features a spacious 5.0 cu. ft. oven capacity, providing ample room for large meals, whether it's a holiday feast or a weeknight dinner. This range is equipped with an extra-large oven window that allows users to monitor their cooking without opening the door, thus maintaining optimal temperatures. The oven also boasts a self-cleaning feature, utilizing high heat to eliminate food residue, making upkeep effortless for busy homeowners.

On the other hand, the JGBP26GEN presents a similar oven capacity but comes with a slightly more simplified design, yet it does not compromise on performance. Both models utilize a powerful 15,000 BTU burner, which ensures rapid heating and efficient cooking. With multiple burners ranging from simmer to high-heat settings, users have the flexibility to prepare a variety of dishes simultaneously.

A standout feature of both the JGBP27GEN and JGBP26GEN is their continuous grates, crafted from durable cast iron. These grates provide a stable cooking surface, allowing cookware to glide easily from burner to burner. This design is particularly advantageous for users who employ multiple pots and pans at once.

In terms of additional technologies, both models come equipped with a precise simmer burner that can maintain low temperatures ideal for delicate sauces and simmering tasks. The ranges also include an integrated electronic ignition system, which offers reliable and efficient ignition without the need for matches or lighters.

For aesthetics, both ranges are available in a classic stainless steel finish that adds a modern touch to any kitchen decor. The controls are conveniently located at the front, ensuring ease of use while cooking.

In summary, the GE JGBP27GEN and JGBP26GEN gas ranges combine modern functionality with user-oriented features, making them suitable choices for any cook. Their spacious ovens, powerful burners, and ease of maintenance speak to the needs of both novice cooks and seasoned chefs, making meal preparation enjoyable and efficient.