Main
GE Appliances
Ranges
183D5580P083 49-80036 7-00 JR 350A4502P218
XL44Self-Cleaning Gas
www.geappliances.com
Safety Instructions
Operating Instructions, Tips
Care and Cleaning
ANTI-TIP DEVICE
GE & You, A Service Partnership.
FOR YOUR RECORDS
Write the model and serial numbers here:
www.geappliances.com
Troubleshooting Tips
WARNING
ANTI-TIP DEVICE
SAFETY PRECAUTIONS
IMPORTANT SAFETY NOTICE
Safety Instructions Installation Instructions Troubleshooting Tips
SAFETY PRECAUTIONS
Installation of the range
WARNING:
SURFACE BURNERS
OFF
HI
LITE
Safety Instructions Installation Instructions Troubleshooting Tips
OVEN
COOK MEAT AND POULTRY THOROUGHLY
SELF-CLEANING OVEN
Do not touch the heating element or the interior surface of the warming drawer.
REMEMBER:
ELECTRIC WARMING DRAWER (on some models)
READ AND FOLLOW THIS SAFETY INFORMATION CAREFULLY. SAVE THESE INSTRUCTIONS
Using the surface burners.
Throughout this manual, features and appearance may vary from your model.
clicking
How to Light a Surface Burner
How to Select Flame Size
Using the surface burners.
Stove Top Grills
Wok This Way
Top-of-Range Cookware
Stainless Steel:
Using the oven controls.
Throughout this manual, features and appearance may vary from your model.
Oven Control, Clock and Timer Features and Settings
BAKE Pad
BROIL HI/LO Pad
Using the oven controls.
Oven Control, Clock and Timer Features and Settings
BAKE Pad
BROIL HI/LO Pad
Function Indicators
Special features of your oven control
(on some models)
.
12 Hour Shut-Off
Fahrenheit or Centigrade Temperature Selection
Special features of your oven control
(on some models)
.
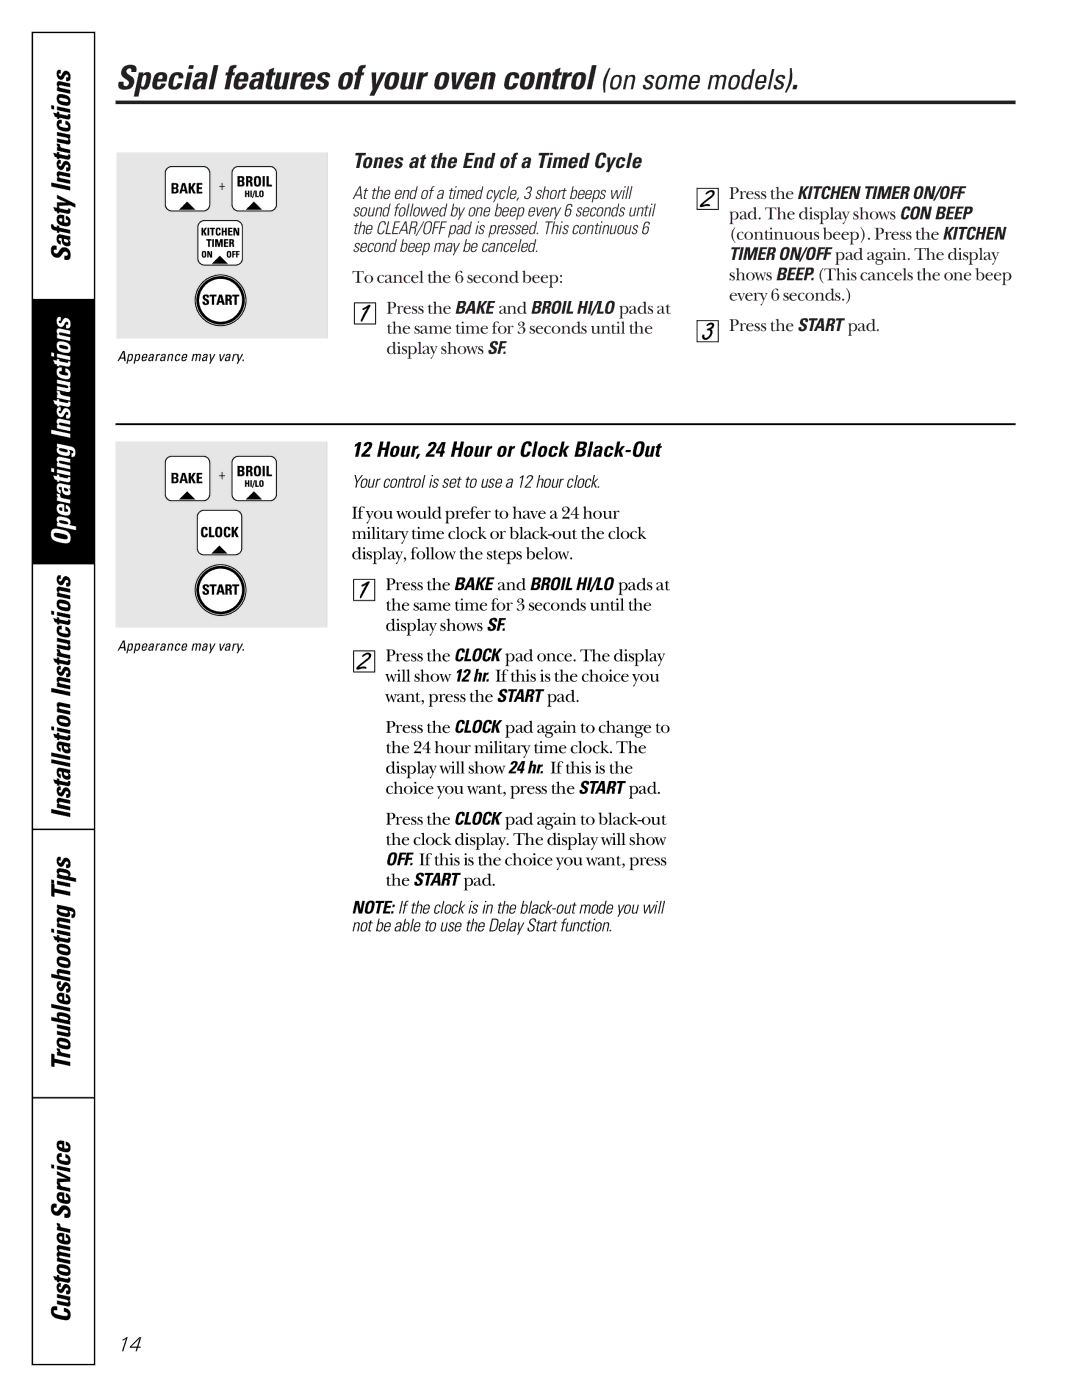
Tones at the End of a Timed Cycle
12 Hour, 24 Hour or Clock Black-Out
Cook and Hold
Changing the Speed of the Increase or Decrease Pads
Using the oven.
To avoid possible burns, place the shelves in the desired position before you turn the oven on.
Before you begin
Power Outage for Electric Ignition Models
Oven Light
How to Set the Oven for Baking or Roasting
CLEAR/OFF
100
ON
+
Using the oven.
CLEAR/OFF
START
LO Broil,
BROIL HI/LO
Using the clock and timer.
Not all features are on all models.
To Set the Clock
To Set the Timer
Power Outage
Using the timed baking and roasting features.
How to Set an Immediate Start and Automatic Stop
How to Set a Delayed Start and Automatic Stop
Adjust the oven thermostatDo it yourself!
To Adjust the Thermostat
Using the electric warming drawer.
OFF
ON
NOTE:
Control Knob
Safety Instructions
Temperature Selection Chart
CAUTION: Do not warm food in the warming drawer for more than two hours.
LO
LO
Using the self-cleaning oven.
Before a Clean Cycle
How to Set the Oven for Cleaning
How to Delay the Start of Cleaning
After a Clean Cycle
Standard Twin Burner Assemblies
On models with standard twin burners, the cooktop lifts up for easy access.
Drip Pans
CAUTION: Do not clean the drip pans in a self- cleaning oven.
Sealed Burner Assemblies
Burner Heads
Burner Caps
NOTE: On some models there are 2 large, one medium and one small head and cap.
Burner Grates
CAUTION: Do not clean the grates in a dishwasher or in a self-cleaning oven.
Cooktop Surface
Oven Bottom
Lift-Off Oven Door
To clean the inside of the door:
To clean the outside of the door:
Broiler Pan and Grid
CAUTION: Do not clean the broiler pan or grid in a self-cleaning oven.
Oven Light Replacement
Removable Warming Drawer
Removable Storage Drawer
To remove:
Do not remove any screws to remove the cover.
Oven Air Vents
Lift-Up Cooktop
To raise the cooktop:
Control Panel and Knobs
Oven Shelves
NOTE: Take the shelves out of the oven before you begin the self-clean cycle.
Fluorescent Top Light
Brushed Chrome Cooktop
Warming Drawer Rack
FOR YOUR SAFETY
If you smell gas:
TOOLS YOU WILL NEED
WARNING!
INSTALLATION SAFETY INSTRUCTIONS
Dimensions and Clearances
CAUTION:
IMPORTANT:
DIMENSIONS AND CLEARANCES
WARNING!
ANTI-TIP DEVICE
IMPORTANT!
LOCATION
Provide Adequate Gas Supply
*Teflon: Registered trademark of DuPont
Your range is designed to operate at a pressure of 4
of water column on natural gas or, if designed for LP gas (propane or butane), 10
of water column.
Gas Pipe and Electrical Outlet Locations for Models with Sealed Burners
Gas Pipe and Electrical Outlet Locations for Models with Standard Twin Burners
Page
Electrical Connections
Electrical Requirements
Preferred Method
CAUTION:
DO NOT USE
Electrical Connections
Usage Situations where Appliance Power Cord will be Disconnected Frequently.
Electric Disconnect
Seal the Openings
Check Ignition of Surface Burners
Quality of Flames
(C) Soft blue flamesNormal for natural gas
(B) Yellow tips on outer cones Normal for LP gas
(A) Yellow flames Call for service
Check Ignition of Oven Burner
Adjust Broil and Oven Burner Air Adjustment Shutters if Necessary
Air adjustment shutters for the top and bottom burners regulate the flow of air to the flames.
Care and cleaning of the range
To remove the oven bottom:
Leveling the Range
Converting to LP Gas
Installing the Anti-Tip Device
RIGHT EDGE
WARNING:
When All Hookups Are Completed:
Before You Call For Service
B
A
Page
Before You Call For Service
Troubleshooting Tips
Page
Page
Page
Page
General Electric Company
Warranty Registration Department P.O. Box 32150 Louisville, KY 40232-2150
GE Service Protection Plus
Please place in envelope and mail to:
Consumer Product Ownership Registration
Follow these three steps to protect your new appliance investment:
Model Number Serial Number
Page
GE Gas Range Warranty
(For customers in the United States)
For The Period Of: GE Will Replace:
What GE Will Not Cover:
GE Gas Range Warranty
(For customers in Canada)
original purchase
free of charge,
full one-year warranty,
Service Telephone Numbers. GE Answer Center
Parts and Accessories
Service Contracts
Special Needs Service
In-Home Repair Service