Operating the Self-CleaningOven

NOTE: Oven has controls for

upper oven and lower oven. Be sure to set the correct control.

Pads on the left side of panel are for the upper oven. Pads on the

right side of panel are for the lower oven. The TIMER

ON/OFF, COOK TIME, and

STOP TIME pads can be used for either oven.

Programmed Cleaning Time:

3hours

Prepare the Oven Before

Setting the Controls

Step 1:

Remove the broiler pan, broiler

rack, all cookware and any aluminum foil from the oven.

(Oven shelves may be left in the oven. NOTE: Shelves will

discolor during the self-cleaning cycle.)

Step 2:

Wipe up heavy soil on oven bottom. If you use soap, rinse thoroughly before self-cleaning to prevent staining.

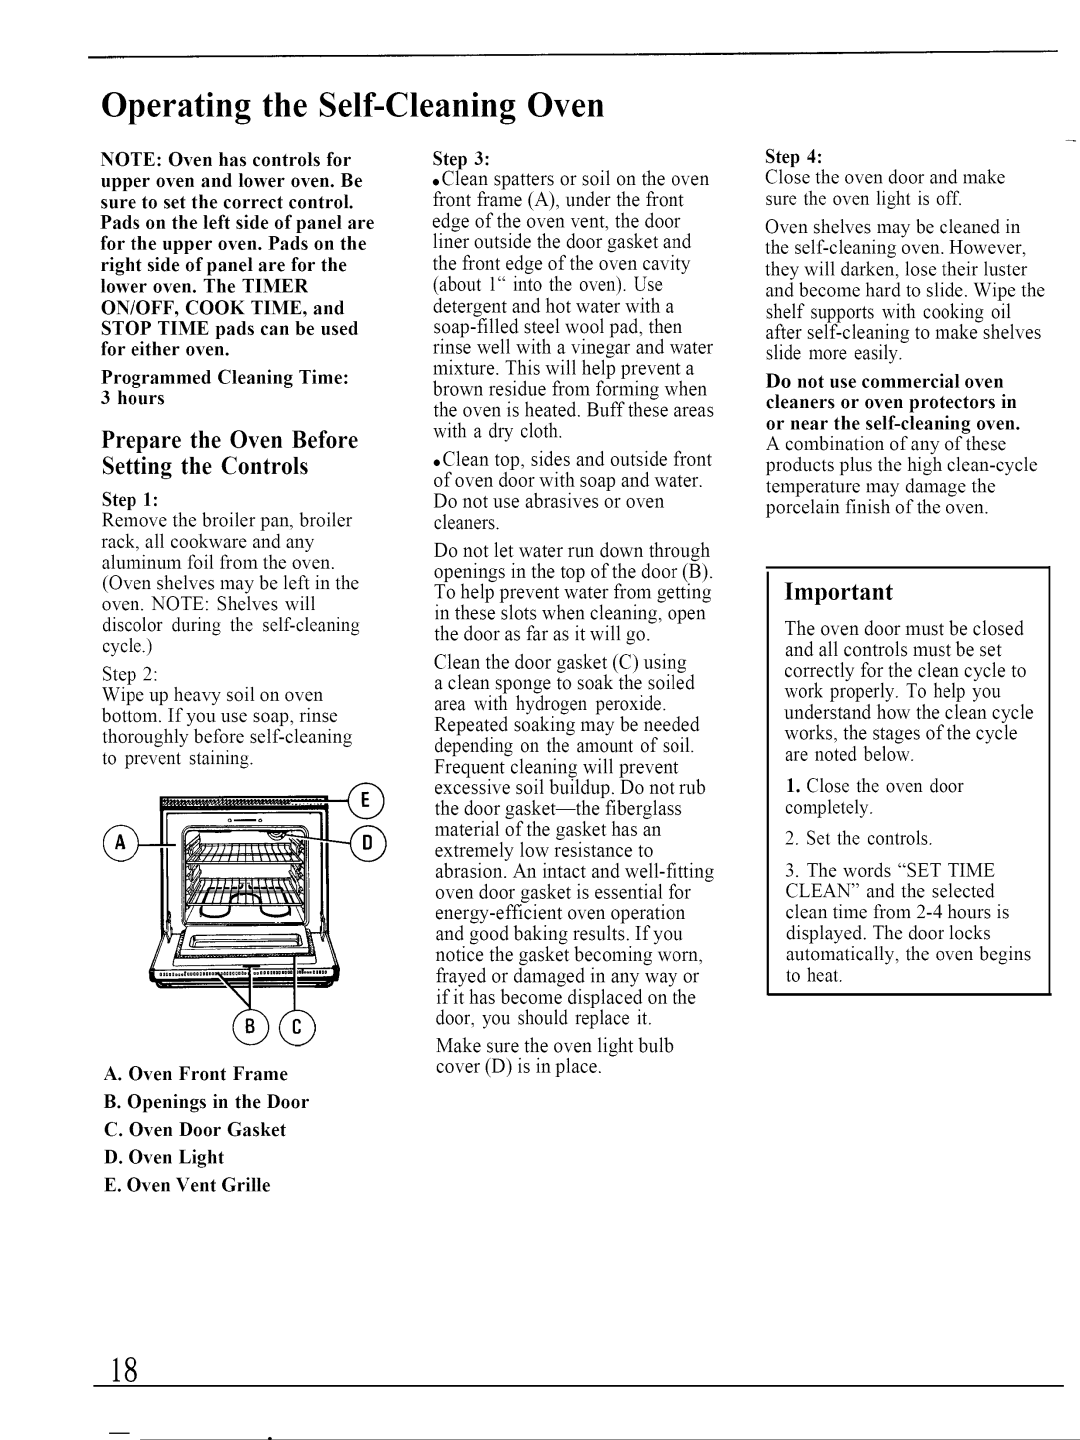
A. Oven Front Frame

B. Openings in the Door

C. Oven Door Gasket

D. Oven Light

E. Oven Vent Grille

Step 3:

Clean spatters or soil on the oven front frame (A), under the front edge of the oven vent, the door liner outside the door gasket and the front edge of the oven cavity (about 1" into the oven). Use detergent and hot water with a soap-filled steel wool pad, then rinse well with a vinegar and water mixture. This will help prevent a

brown residue from forming when the oven is heated. Buff these areas

with a dry cloth.

• Clean top, sides and outside front

of oven door with soap and water. Do not use abrasives or oven

cleaners.

Do not let water run down through openings in the top of the door (B). To help prevent water from getting in these slots when cleaning, open the door as far as it will go.

Clean the door gasket (C) using a clean sponge to soak the soiled area with hydrogen peroxide. Repeated soaking may be needed depending on the amount of soil. Frequent cleaning will prevent excessive soil buildup. Do not rub

the door gasket--the fiberglass material of the gasket has an extremely low resistance to abrasion. An intact and well-fitting oven door gasket is essential for

energy-efficient oven operation and good baking results. If you notice the gasket becoming worn, frayed or damaged in any way or if it has become displaced on the door, you should replace it.

Make sure the oven light bulb cover (D) is in place.

Step 4:

Close the oven door and make sure the oven light is off.

Oven shelves may be cleaned in the self-cleaning oven. However, they will darken, lose their luster and become hard to slide. Wipe the shelf supports with cooking oil after self-cleaning to make shelves slide more easily.

Do not use commercial oven

cleaners or oven protectors in or near the self-cleaning oven.

A combination of any of these products plus the high clean-cycle temperature may damage the porcelain finish of the oven.

Important

The oven door must be closed and all controls must be set correctly for the clean cycle to work properly. To help you understand how the clean cycle works, the stages of the cycle are noted below.

1.Close the oven door completely.

2.Set the controls.

3.The words "SET TIME CLEAN" and the selected clean time from 2-4hours is

displayed. The door locks automatically, the oven begins to heat.

18

Page 18
Image 18
GE JKP45WP, JKP44GP warranty Operating the Self-CleaningOven, Prepare the Oven Before, Setting the Controls

JKP44GP, JKP45WP specifications

The GE JKP45WP and JKP44GP are two innovative kitchen appliances that exemplify efficiency, style, and technological sophistication in modern cooking. Designed with the contemporary home chef in mind, these ovens offer various features that elevate the cooking experience and cater to diverse culinary needs.

One of the standout characteristics of both models is their convection cooking technology. This feature ensures even heat distribution, allowing for faster and more uniform cooking. With a convection fan that circulates hot air, users can expect perfectly baked goods and evenly cooked meats, making meal preparation more straightforward and reliable.

The JKP45WP and JKP44GP come with an impressive capacity, providing ample space for multiple dishes, making them ideal for family gatherings or meal prepping. The ovens offer multiple cooking modes, including bake, broil, and roast, enabling users to experiment with various cooking techniques effortlessly.

Another notable feature is the use of self-cleaning technology in these models. With just the push of a button, the self-clean cycle utilizes high temperatures to eliminate food residues and spills, ensuring that maintaining a clean oven is hassle-free. This attribute not only saves time but also extends the longevity of the appliance, allowing users to enjoy their ovens for years to come.

The JKP45WP and JKP44GP are designed with user convenience in mind. Their intuitive controls and user-friendly interfaces simplify the cooking process. With easy-to-read digital displays, users can effortlessly monitor cooking times and temperatures, ensuring every dish is perfectly prepared.

In terms of safety, both models feature a range of protective elements, including oven locks and auto shut-off options. These enhancements provide peace of mind, especially in households with children, as they minimize the risk of accidental burns or other cooking-related accidents.

Aesthetically, the GE JKP45WP and JKP44GP boast a sleek design that complements contemporary kitchens. Available in various attractive finishes, these ovens elevate the visual appeal of any culinary space.

In conclusion, the GE JKP45WP and JKP44GP are exceptional kitchen ovens that blend cutting-edge technology with practical features. Their convection cooking capabilities, large capacities, and self-cleaning options make them attractive for homeowners seeking efficiency and reliability in their cooking appliances. Whether you are a novice or an experienced chef, these ovens provide the performance and convenience needed to create delicious meals with ease.