49-80548 07-08 JR
Operating Instructions
Consumer Support
Model # Serial #
Consumer Support Troubleshooting Tips Care and Cleaning
Important Safety Notice
Ge.com
Be sure to wipe up excess spillage before
Consumer Support Troubleshooting Tips Care
Cleaning Operating
Probe and any broiler pan, grid
Care and Cleaning Troubleshooting Tips Consumer Support
Using the oven controls
Instructions
Using the upper oven
Cleaning
Consumer Support Troubleshooting Tips Care
Cookies, cupcakes Layer cakes Casseroles Flat Turkey Offset
Using the lower oven
Safety
How to Set the Lower Oven for Baking or Roasting
Close the doors. Always broil with the doors closed
Using the upper and lower ovens
How to Set the Upper and Lower Ovens for Broiling
Broiling Guide
How to Set a Delayed Start and Automatic Stop
Using the timed baking and roasting features
Troubleshooting Tips Consumer Support
How to Set an Immediate Start and Automatic Stop
Insert the probe fully into the food
When the internal temperature
Do not store the probe in the oven
Insert the probe into the meatiest part
Tips Consumer Support
Using the clock, kitchen timer and control lock
Cleaning Troubleshooting
Safety
Pads at the same time until
Adjust the upper or lower oven thermostat-Do it yourself
To Adjust the Thermostat
Type of margarine will affect baking performance
Instructions Operating
Using the convection oven
Convection Roast
Consumer Support Troubleshooting
Cookware for Convection Cooking
After the oven turns off, the end-of-cycle tone will sound
Using the timed features for convection cooking
Safety Instructions
Make sure the clock shows the correct time of day
Cooking time you have set
Touch the Convection Roast pad
Instructions Operating Instructions Care and Cleaning
Troubleshooting Tips Consumer Support
Convection Roasting Guide
Troubleshooting Tips Care and Cleaning Operating
Using the slow cook, pizza, warming and proofing features
CLEAR/OFF pad
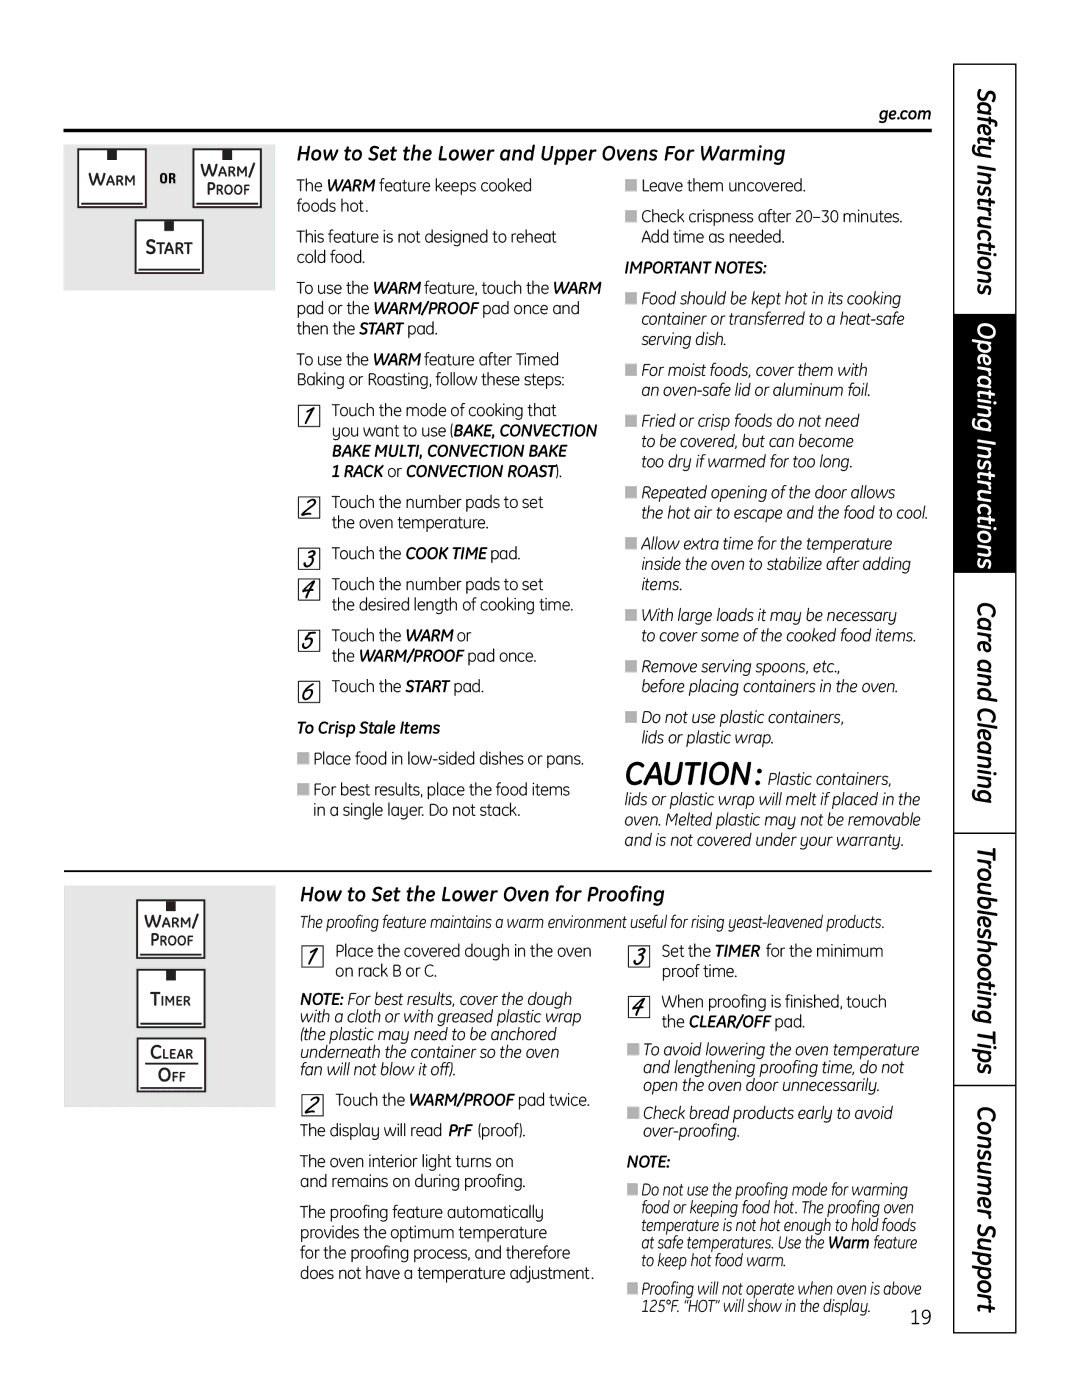
How to Set the Lower and Upper Ovens For Warming
How to Set the Lower Oven for Proofing
To Crisp Stale Items
To self-clean
Using the self-cleaning upper and lower ovens
Before a Clean Cycle
How to Set the Upper/Lower Oven for Cleaning
When Locked goes off, you will be able to open the doors
How to Delay the Start of Cleaning
After a Clean Cycle
You can change the clean time to
Troubleshooting Tips
Special features of your oven control
Safety Instructions
Care and Cleaning
Instructions Operating
Instructions Care and Cleaning
Tone Volume
To deactivate the feature
How to Exit the Sabbath Feature
Using the Sabbath feature. lower oven only
Troubleshooting Tips Care and Cleaning
How to Set for Regular Baking
Cleaning Troubleshooting Tips Consumer Support
Care and cleaning of the oven
Operating
To remove the door
Lift-Off Lower Oven Door
Upper Oven Door
Do not lift the door by the handle
Oven Heating Elements
Troubleshooting Tips Consumer Support
Instructions Operating Instructions Care and Cleaning
Oven Light Bulbs
National Parts Center 800.626.2002 Ge.com
To clean the stainless steel surface
Oven Racks
Stainless Steel Surfaces
Problem Possible Causes What To Do
Before you call for service…ge.com
Close the oven door
Before you call for service…
Burning or oily
Power outage Power outage or surge
To speed the process, set a self-clean cycle for a
Or amount of food being
Operating Instructions
Consumer Support Troubleshooting Tips Care and Cleaning
Benefits Include
With Service Protection Plus you can expect
Cut here
After mailing
GE Will Replace
GE Built-In Electric Oven Warranty
Cleaning Troubleshooting Tips Consumer Support
Care
Real Life Design Studio
Schedule Service
Parts and Accessories
Consumer Support GE Appliances Website
Manual del propietario
Instrucciones de seguridad Instrucciones de operación
Consejos para resolución
Soporte al consumidor
Soporte al Consumidor
Solucionar problemas
Cuidado y limpieza
Consumidor
Soporte al
Cuidado y
Limpieza
Antes de la autolimpieza del horno, remueva
Seguridad
Uso de los controles del horno
Consumidor Soporte al
Cuidado y limpieza
Solucionar problemas
Uso del horno superior
Precaución Cuando use
Posición
Problemas
Uso del horno inferior
Solucionar
Guía para asar a la parrilla
Uso de los hornos superior e inferior
Nuevamente
Que programó, sonarán varios pitidos
Cómo configurar un Inicio inmediato y una Parada automática
Seguridad
Presione el botón Start
En paralelo a la pierna de un pavo completo
Uso de la sonda en el horno de convección inferior
Del enchufe
La ubicación apropiada de la sonda
Limpieza
Solucionarproblemas
Muestre SF
¡El tipo de margarina afectará el desempeño del horneado
Para ajustar el termostato
HI/LO al mismo tiempo durante
Uso del horno de convección
Problemas
Cuidado
Utensilios de cocina para la cocción por convección
Seguridad
Solucionar
Asado por convección
Asegúrese de que el reloj muestre la hora correcta del día
El horno se encenderá inmediatamente
Nota Sonará un tono de atención
De cocción que ha configurado
En la sección de Características especiales
Solucionar
Precaución a fin de
Guía para asar por convección
Pautas y consejos
Configuración del horno bajo para una cocción lenta
Soporte al consumidor
Guía de cocción lenta
Presione el botón Warm o el botón
Cómo configurar el leudado en el horno inferior
Configure el Temporizador en el tiempo de leudado
Cuidado ylimpieza
Limpie el suelo pesado sobre la parte inferior del horno
Antes de un ciclo de limpieza
Cómo programar el horno superior/inferior para su limpieza
De limpieza y olvida cerrar las puertas del horno
De las parrillas del horno
Cómo posponer el inicio de la limpieza
Después de un ciclo de limpieza
Presione el botón Start Las puertas del horno superior
Selección de temperatura en grados Fahrenheit o Centígrados
Características especiales de control de su horno
Función de Ayuda
Apagado después de 12 horas
Conversión Auto Recipe Conversión automática de la recetas
Volumen del Tono
Solucionar
Reloj de 12 horas, 24 horas o supresión del reloj
Uso de la característica Sabbath. horno inferior solamente
Cómo configurar el horneado regular
Para limpiar el interior de las puertas
Cuidado y limpieza del horno
Panel de control
Limpieza de las puertas del horno superior e inferior
Para quitar la puerta
Problemas
Puerta extraíble del horno inferior
Puerta del horno superior
Para retirar
Precaución Antes de
Lámpara de luz del horno
Elementos para calentar el horno
Parrilla horizontal Manijas
Parrillas de horno
Superficies de acero inoxidable
Centro Nacional de Refacciones National Parts Center Ge.com
Problema Causas posibles Qué hacer
De limpieza
Estallido
Humo excesivo
Durante el ciclo
De las parrillas del horno con dicha toalla de papel
Que se utiliza el horno Suena un ventilador
El ventilador fue diseñado para rotar en ambas
Una toalla de papel y limpie los extremos
Notas
Los beneficios incluyen
Con Service Protection Plus, usted puede esperar
Corte aquí
Mes
Técnico. Nuestro número De servicio técnico es
800.432.2737
Nombre Dirección Apellido Departamento # Ciudad
Lo que no está cubierto por GE
Garantía de GE para su horno eléctrico empotrado
Operación
GE reemplazará
Piezas y accesorios
Soporte al consumidor Página Web de GE Appliances
Solicite una reparación
Garantías ampliadas