System Configuration
Delay Settings
Due the different distances between the listening position for the front channel speakers and the surround speakers, the amount of time it takes for sound to reach your ears from the front or surround speakers is different. You may compen- sate for this difference through the use of the delay settings to adjust the timing for the specif- ic speaker placement and acoustic conditions in your listening room or home theater.
If you have already calibrated your system using EzSet+ the delay settings shown will reflect the results of the measurements made by EzSet+.
No further changes are needed unless you wish to change an item to reflect your taste or a non- standard system configuration. To change the settings, follow the instructions below to enter the distance between the speaker’s location and your main listening position. The measurements need not be accurate to the inch, as the system is designed to accommodate typical listening rather than a specific “sweet spot” position.
In addition to adjusting the delay time for each individual speaker position, the AVR is among the few A/V receivers that allows you to adjust the delay for the combined output of all speakers as a group. This feature is called A/V Sync Delay; it allows you to compensate for delays to the video image that may be caused by the process- ing in products such as digital video displays, video scalers, digital cable or satellite systems, or personal video recorders. With proper adjustment of the setting for A/V Sync Delay, you can elimi- nate the loss of lip sync that may be caused by digital video applications.
Although EzSet+ calculates the delay settings for the individual speaker positions with very accu- rate results, the setting for A/V Sync Delay may only be done manually, since it requires that you observe the program material on your video dis- play while adjusting the delay, if any, required for the specific source. Thus, even though you may have used EzSet+ for other delay settings, the A/V Sync Delay should still be configured as out- lined below.
To
Due to the differences in the way each surround mode operates, the delay settings must be estab- lished individually for each surround mode.
However, once the delay settings are configured for the version of the surround mode with the most channels, they need not be entered again for a version of that mode with fewer channels. For example, once the delay settings are estab-
lished for Dolby Pro Logic IIx – Movie, they will be carried over to Dolby Pro Logic II – Movie mode. However, you will need to enter the delay settings separately for each variant mode, such as Dolby Pro Logic IIx – Music, Dolby Pro Logic IIx – Game, Dolby Pro Logic, Dolby 3 Stereo and Dolby Digital EX.
Delay times are adjustable for all surround modes. Although all channels will appear on screen with the default or previously entered dis- tances, the menu system will only allow you to adjust the settings for those channels which are actually used by the current
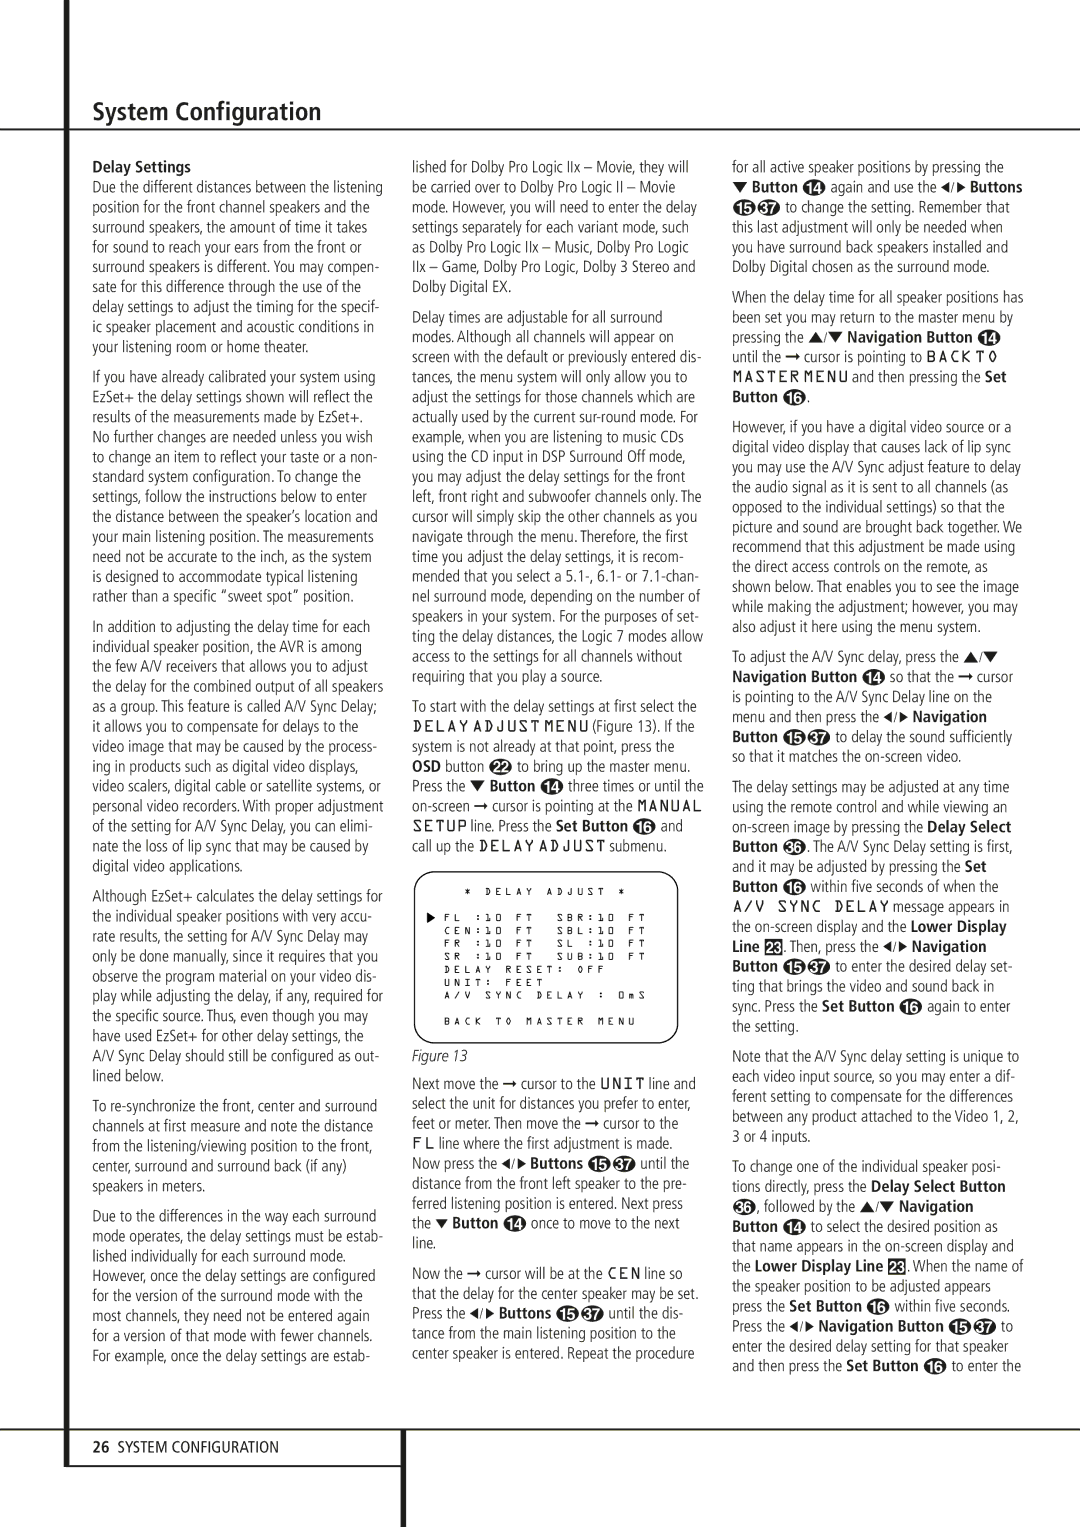
To start with the delay settings at first select the DELAY ADJUST MENU (Figure 13). If the system is not already at that point, press the OSD button L to bring up the master menu. Press the ¤ Button D three times or until the
* | D E L A Y | A D J U S T | * |
|
› F L : 1 0 F T | S B R : 1 0 F T | |||
C E N : 1 0 F T | S B L : 1 0 F T | |||
F R : 1 0 F T | S L : 1 0 | F T | ||
S R : 1 0 F T | S U B : 1 0 | F T | ||
D E L A Y R E S E T : O F F |
|
| ||
U N I T : F E E T |
|
|
| |
A / V S Y N C D E L A Y : | 0 m S | |||
B A C K T O M A S T E R M E N U
Figure 13
Next move the ➞ cursor to the UNIT line and select the unit for distances you prefer to enter, feet or meter. Then move the ➞ cursor to the FL line where the first adjustment is made. Now press the ‹ / › Buttons E until the distance from the front left speaker to the pre- ferred listening position is entered. Next press the ¤ Button D once to move to the next line.
Now the ➞ cursor will be at the CEN line so that the delay for the center speaker may be set. Press the ‹ / › Buttons E until the dis- tance from the main listening position to the center speaker is entered. Repeat the procedure
for all active speaker positions by pressing the
¤Button D again and use the ‹ / › Buttons E to change the setting. Remember that this last adjustment will only be needed when you have surround back speakers installed and Dolby Digital chosen as the surround mode.
When the delay time for all speaker positions has been set you may return to the master menu by pressing the ⁄/¤ Navigation Button D until the ➞ cursor is pointing to BACK TO MASTER MENU and then pressing the Set Button F.
However, if you have a digital video source or a digital video display that causes lack of lip sync you may use the A/V Sync adjust feature to delay the audio signal as it is sent to all channels (as opposed to the individual settings) so that the picture and sound are brought back together. We recommend that this adjustment be made using the direct access controls on the remote, as shown below. That enables you to see the image while making the adjustment; however, you may also adjust it here using the menu system.
To adjust the A/V Sync delay, press the ⁄/¤ Navigation Button D so that the ➞ cursor is pointing to the A/V Sync Delay line on the menu and then press the ‹ / › Navigation Button E to delay the sound sufficiently so that it matches the
The delay settings may be adjusted at any time using the remote control and while viewing an
Note that the A/V Sync delay setting is unique to each video input source, so you may enter a dif- ferent setting to compensate for the differences between any product attached to the Video 1, 2, 3 or 4 inputs.
To change one of the individual speaker posi- tions directly, press the Delay Select Button
,followed by the ⁄/¤ Navigation Button D to select the desired position as that name appears in the
Press the ‹ / › Navigation Button E to
enter the desired delay setting for that speaker and then press the Set Button F to enter the
26SYSTEM CONFIGURATION