System Configuration
to upsample the incoming 48kHz signals to 96kHz for added resolution.
To take advantage of this feature, press the ⁄/¤ Navigation Button Eso that the ➞ cursor is next to the UPSAMPLING line and press the
‹/ › Navigation Button Eso that ON is highlighted in reverse video. Note that this feature is only available for the Dolby Pro Logic II-Music, Dolby Pro Logic II Movie, Dolby Pro Logic and Dolby 3 Stereo modes.
When all desired changes have been made on this menu, press the ⁄/¤ Navigation Button E so that the ➞ cursor is next to the BACK TO MAIN MENU line and press the Set Button
F.
Speaker Setup
This menu tells the AVR which type of speakers are in use. This is important as it adjusts the set- tings that determine which speakers receive low- frequency (bass) information. For each of these settings use the LARGE setting if the speakers for a particular position are traditional full-range loudspeakers that are capable of reproducing sounds below 40Hz. Use the SMALL setting for smaller, frequency-limited satellite speakers that do not reproduce sounds below 40Hz. Note that when “small” speakers are used, a subwoofer is required to reproduce low-frequency sounds. Remember that the “large” and “small” descrip- tions do not refer to the actual physical size of the speakers, but to their ability to reproduce low-fre- quency sounds. If you are in doubt as to which category describes your speakers, consult the specifications in the speakers’ owner’s manual, or ask your dealer.
This menu screen also allows you to enter the set- tings for the AVR’s Quadruple Crossover feature that allows a different crossover point to be used for the front left/right, center, surround and sur- round back speakers. In systems where full-range or tower speakers are used for the front sound- stage or where different brands or models are in use at the various speaker positions, this feature allows you to custom tailor the bass management and redirection circuits with a precision not previously possible.
At last, this menu also makes you chose if the speaker setting will be the same for each input source (GLOBAL), or will be set differently for each input (INDEPENDENT).
Notes:
•When "Independent" is selected for the speaker settings (see below), they need to be made for each input individually and you can determine which speaker should be used depending on the input source selected. So it´s possible e.g. to turn off the Center and/or the Sub with any music source selected and to use them with any movie input source.
22SYSTEM CONFIGURATION
•With the currently selected input all speaker set- tings will be copied to all other surround modes (as far as speakers are used with them) and need not be repeated when another surround mode is selected with that input.
First select any of the DTS Neo:6 modes as with them all speakers and all speaker modes are avail- able. It is easiest to select these modes directly, without the on-screen display, so press the OSD button Lto turn the on-screen display off if it is still visible. Then press the DTS Neo:6 button
on the remote.
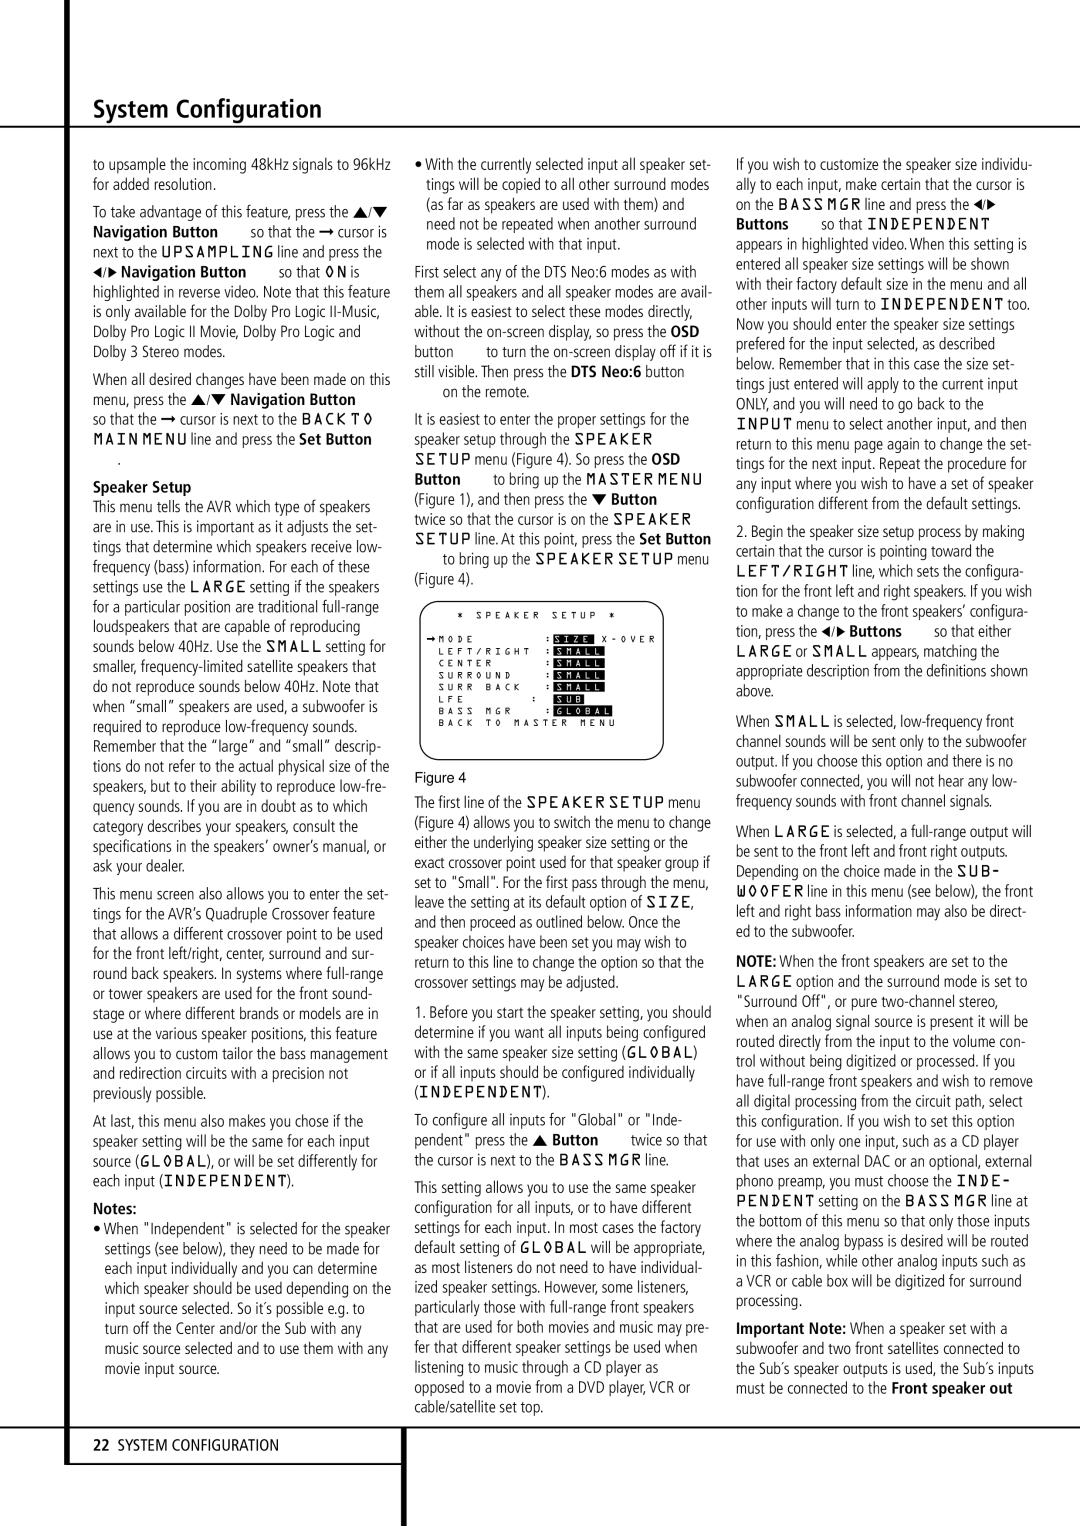
It is easiest to enter the proper settings for the speaker setup through the SPEAKER SETUP menu (Figure 4). So press the OSD Button Lto bring up the MASTER MENU (Figure 1), and then press the ¤ Button E twice so that the cursor is on the SPEAKER SETUP line. At this point, press the Set Button
Fto bring up the SPEAKER SETUP menu (Figure 4).
* | S P E A K E R S E T U P * |
| | | | | | |
M O D E | | | : | S I Z E | X - O V E R |
| | | | | | | | |
L E F T / R I G H T : | S M A L L | | |
| | | |
C E N T E R | | : | S M A L L | |
| | | |
S U R R O U N D | | : | S M A L L | |
| | | |
S U R R B A C K | | : | S M A L L | |
| | | | |
L F E | | : | | S U B | |
B A S S M G R | | : | G L O B A L | |
B A C K T O M A S T E R M E N U
Figure 4
The first line of the SPEAKER SETUP menu (Figure 4) allows you to switch the menu to change either the underlying speaker size setting or the exact crossover point used for that speaker group if set to "Small". For the first pass through the menu, leave the setting at its default option of SIZE, and then proceed as outlined below. Once the speaker choices have been set you may wish to return to this line to change the option so that the crossover settings may be adjusted.
1.Before you start the speaker setting, you should determine if you want all inputs being configured with the same speaker size setting (GLOBAL) or if all inputs should be configured individually (INDEPENDENT).
To configure all inputs for "Global" or "Inde- pendent" press the ⁄ Button Etwice so that the cursor is next to the BASS MGR line.
This setting allows you to use the same speaker configuration for all inputs, or to have different settings for each input. In most cases the factory default setting of GLOBAL will be appropriate, as most listeners do not need to have individual- ized speaker settings. However, some listeners, particularly those with full-range front speakers that are used for both movies and music may pre- fer that different speaker settings be used when listening to music through a CD player as opposed to a movie from a DVD player, VCR or cable/satellite set top.
If you wish to customize the speaker size individu- ally to each input, make certain that the cursor is on the BASS MGR line and press the ‹/› Buttons Eso that INDEPENDENT appears in highlighted video. When this setting is entered all speaker size settings will be shown with their factory default size in the menu and all other inputs will turn to INDEPENDENT too. Now you should enter the speaker size settings prefered for the input selected, as described below. Remember that in this case the size set- tings just entered will apply to the current input ONLY, and you will need to go back to the INPUT menu to select another input, and then return to this menu page again to change the set- tings for the next input. Repeat the procedure for any input where you wish to have a set of speaker configuration different from the default settings.
2.Begin the speaker size setup process by making certain that the cursor is pointing toward the LEFT/RIGHT line, which sets the configura- tion for the front left and right speakers. If you wish to make a change to the front speakers’ configura- tion, press the ‹/ › Buttons Eso that either LARGE or SMALL appears, matching the appropriate description from the definitions shown above.
When SMALL is selected, low-frequency front channel sounds will be sent only to the subwoofer output. If you choose this option and there is no subwoofer connected, you will not hear any low- frequency sounds with front channel signals.
When LARGE is selected, a full-range output will be sent to the front left and front right outputs. Depending on the choice made in the SUB- WOOFER line in this menu (see below), the front left and right bass information may also be direct- ed to the subwoofer.
NOTE: When the front speakers are set to the LARGE option and the surround mode is set to "Surround Off", or pure two-channel stereo, when an analog signal source is present it will be routed directly from the input to the volume con- trol without being digitized or processed. If you have full-range front speakers and wish to remove all digital processing from the circuit path, select this configuration. If you wish to set this option for use with only one input, such as a CD player that uses an external DAC or an optional, external phono preamp, you must choose the INDE- PENDENT setting on the BASS MGR line at the bottom of this menu so that only those inputs where the analog bypass is desired will be routed in this fashion, while other analog inputs such as a VCR or cable box will be digitized for surround processing.
Important Note: When a speaker set with a subwoofer and two front satellites connected to the Sub´s speaker outputs is used, the Sub´s inputs must be connected to the Front speaker out