D. Install Attic Insulation Shield

WARNING! Fire Risk. DO NOT allow loose materials or insulation to touch vent. Hearth & Home Technologies Inc. requires the use of an attic shield.

The National Fuel Gas Code ANSI Z223.1 and NFPA 54 requires an attic shield constructed of 26 gauge minimum metal that extends at least 2 in. (51 mm) above insulation.

Attic shields must meet specifi ed clearance and be se- cured in place.

Flat Ceiling Installation

• Remove one shield from box.

NOTICE: Cut previously installed batt insulation to make room for the attic insulation shield.

Wrap shield around pipe if pipe is already installed in area to be insulated.

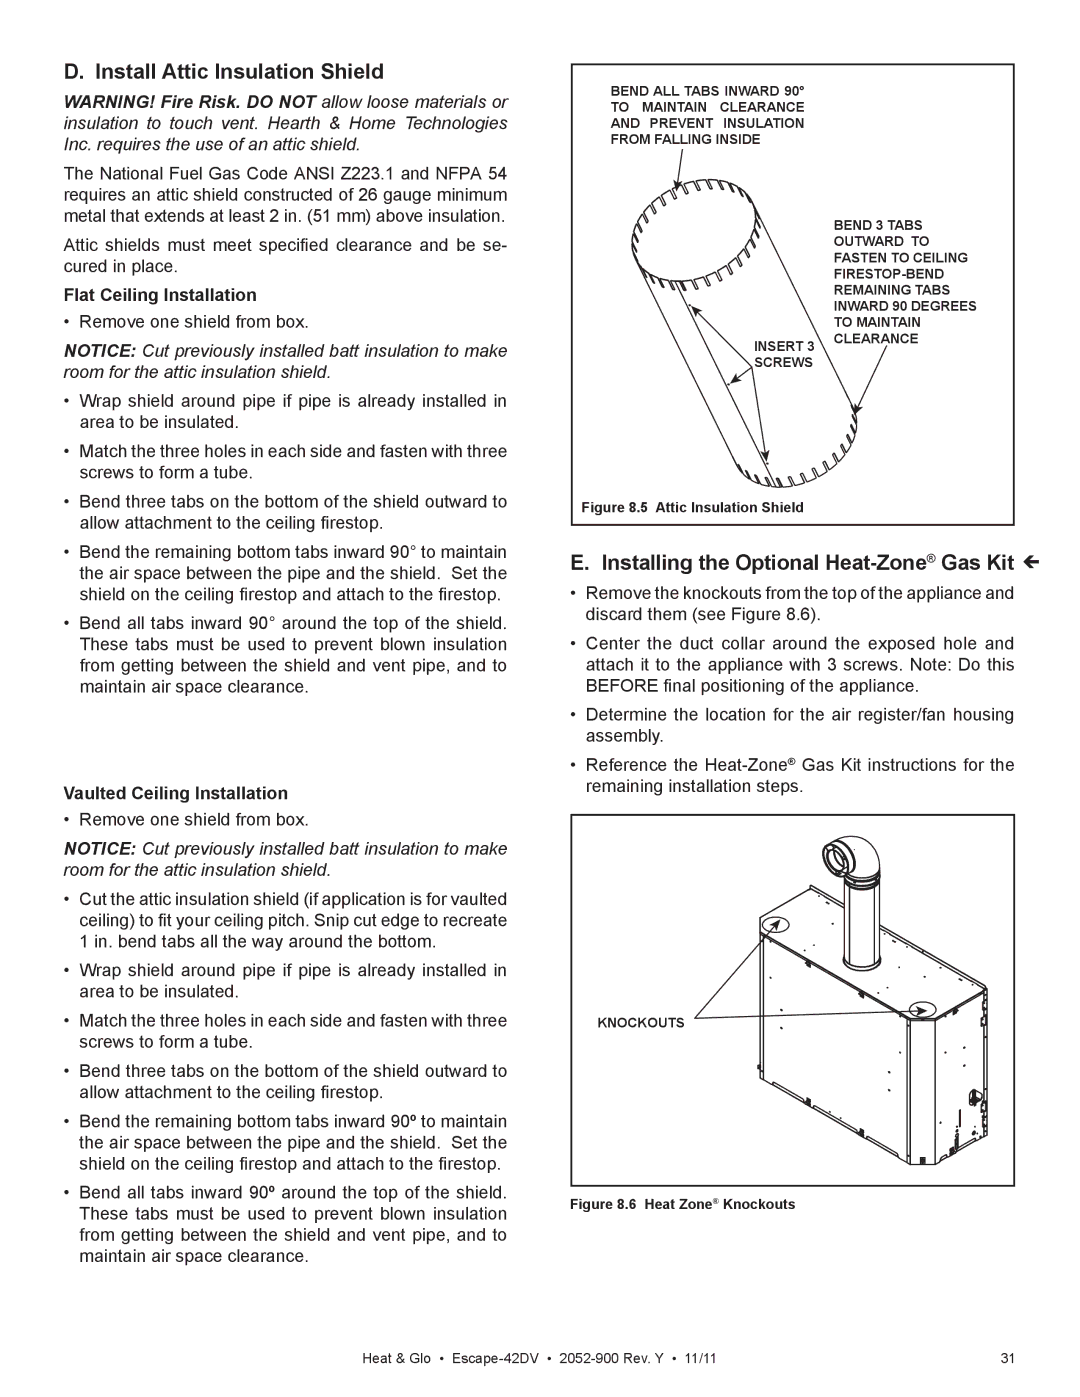
Match the three holes in each side and fasten with three screws to form a tube.

Bend three tabs on the bottom of the shield outward to allow attachment to the ceiling fi restop.

Bend the remaining bottom tabs inward 90° to maintain the air space between the pipe and the shield. Set the shield on the ceiling fi restop and attach to the fi restop.

Bend all tabs inward 90° around the top of the shield. These tabs must be used to prevent blown insulation from getting between the shield and vent pipe, and to maintain air space clearance.

Vaulted Ceiling Installation

• Remove one shield from box.

NOTICE: Cut previously installed batt insulation to make room for the attic insulation shield.

Cut the attic insulation shield (if application is for vaulted ceiling) to fi t your ceiling pitch. Snip cut edge to recreate 1 in. bend tabs all the way around the bottom.

Wrap shield around pipe if pipe is already installed in area to be insulated.

Match the three holes in each side and fasten with three screws to form a tube.

Bend three tabs on the bottom of the shield outward to allow attachment to the ceiling fi restop.

Bend the remaining bottom tabs inward 90º to maintain the air space between the pipe and the shield. Set the shield on the ceiling fi restop and attach to the fi restop.

Bend all tabs inward 90º around the top of the shield. These tabs must be used to prevent blown insulation from getting between the shield and vent pipe, and to maintain air space clearance.

BEND ALL TABS INWARD 90°

TO MAINTAIN CLEARANCE

AND PREVENT INSULATION

FROM FALLING INSIDE


BEND 3 TABS


OUTWARD TO


FASTEN TO CEILING


FIRESTOP-BEND


REMAINING TABS


INWARD 90 DEGREES


TO MAINTAIN

INSERT 3

CLEARANCE


SCREWS


Figure 8.5 Attic Insulation Shield

E. Installing the Optional Heat-Zone®Gas Kit

Remove the knockouts from the top of the appliance and discard them (see Figure 8.6).

Center the duct collar around the exposed hole and attach it to the appliance with 3 screws. Note: Do this BEFORE fi nal positioning of the appliance.

Determine the location for the air register/fan housing assembly.

Reference the Heat-Zone®Gas Kit instructions for the remaining installation steps.

KNOCKOUTS

Figure 8.6 Heat Zone® Knockouts

Heat & Glo • Escape-42DV2052-900 Rev. Y • 11/11

31

Page 31
Image 31
Heat & Glo LifeStyle Escape-42DVLP owner manual Install Attic Insulation Shield, Installing the Optional Heat-ZoneGas Kit 

Escape-42DVLP, Escape-42DV specifications

The Heat & Glo LifeStyle Escape-42DV and Escape-42DVLP are innovative direct vent gas fireplaces designed to enhance the ambiance of any living space while providing efficient heating. These models represent the perfect blend of modern technology, aesthetic appeal, and user-friendly features, making them popular choices for homeowners seeking a stylish and functional heating solution.

One of the standout features of the Heat & Glo LifeStyle Escape-42DV is its impressive design. With a large viewing area, the fireplace allows for a mesmerizing display of flames, creating a focal point in any room. The clean, contemporary lines of the unit fit seamlessly into various décor styles, whether modern, traditional, or transitional. Furthermore, the Escape-42DVLP version, designed for those desiring a low-profile option, ensures that homeowners can enjoy the aesthetics of a fireplace without overwhelming the space.

Both models boast advanced technologies that enhance performance and usability. The Direct Vent System allows for efficient combustion by drawing air from outside the home and expelling exhaust gases through a sealed vent. This ensures optimal efficiency and makes them suitable for tight, energy-efficient homes. Additionally, these fireplaces include a Status Light feature that indicates when the fireplace is operating, ensuring peace of mind for users.

The LifeStyle Escape series also excels in customizability. Homeowners can choose from various log sets, decorative media, and tile surrounds, allowing them to tailor their fireplace to match personal styles and preferences. The IntelliFire app provides a convenient way to control the fireplace from a smartphone, featuring options for remote ignition, programmable timers, and flame height adjustments, putting users in complete control of their heating experience.

Safety is paramount, and the Heat & Glo LifeStyle Escape models come equipped with an advanced safety barrier to prevent accidental contact with the hot glass surface, making them family-friendly options. Moreover, their low emissions and high-efficiency ratings contribute to environmentally responsible heating.

In summary, the Heat & Glo LifeStyle Escape-42DV and Escape-42DVLP models combine striking aesthetics, efficient heating technologies, and user-centric features. They offer a modern solution for anyone looking to elevate their home's warmth and sophistication, making them a smart investment for comfort and style.