7

Installation of Fireplace


1. Cut a 6 in. (152 mm) hole in outside wall to accommodate

Caution! Risk of Cuts/Abrasions. Wear protective

air piping. See Figure 7.3 on page 40.

gloves and safety glasses during installation. Sheet metal

2. Use 6 in. (152 mm) metal flex or rigid piping (not

edges are sharp.

A. Install the Outside Air Kit

supplied) to directly connect outside air to fireplace

intake. Insulate the pipe to prevent frost condensation.

This fireplace will operate correctly only if adequate ven-

3. Use the supplied termination cap.

tilation is provided to allow proper draft to the fireplace

4. Seal between the wall and the pipe with silicone to

system. See Section 6.

An outside air kit must be used for combustion to mini-

prevent moisture penetration and air leaks.

5. Seal between the termination cap and the house with

mize the effects of negative pressure within the structure.

We recommend you utilize the shortest duct run to opti-

silicone to prevent air infiltration.

mize the performance of the outside air kit. The outside

NOTE: A control knob allows you control of the outside air

air kit inlet should be positioned in a manner that will not

allow snow, leaves, etc. to block the inlet. In some instal-

inlet. Use of outside air for combustion is required to

lations the air duct may need to be run vertically. In such

conserve heated air within the structure and to provide

an installation, a 3 ft (914 mm) height difference must be

make up air to keep the fireplace venting properly.

maintained from the top of the uppermost chimney sec-

IMPORTANT! Outside air control considerations

tion to the outside combustion air inlet. See Figure 7.2

Turn counter-clockwise to “OPEN” positions

on page 40.

Outside air knob must be in the “OPEN” position to oper-

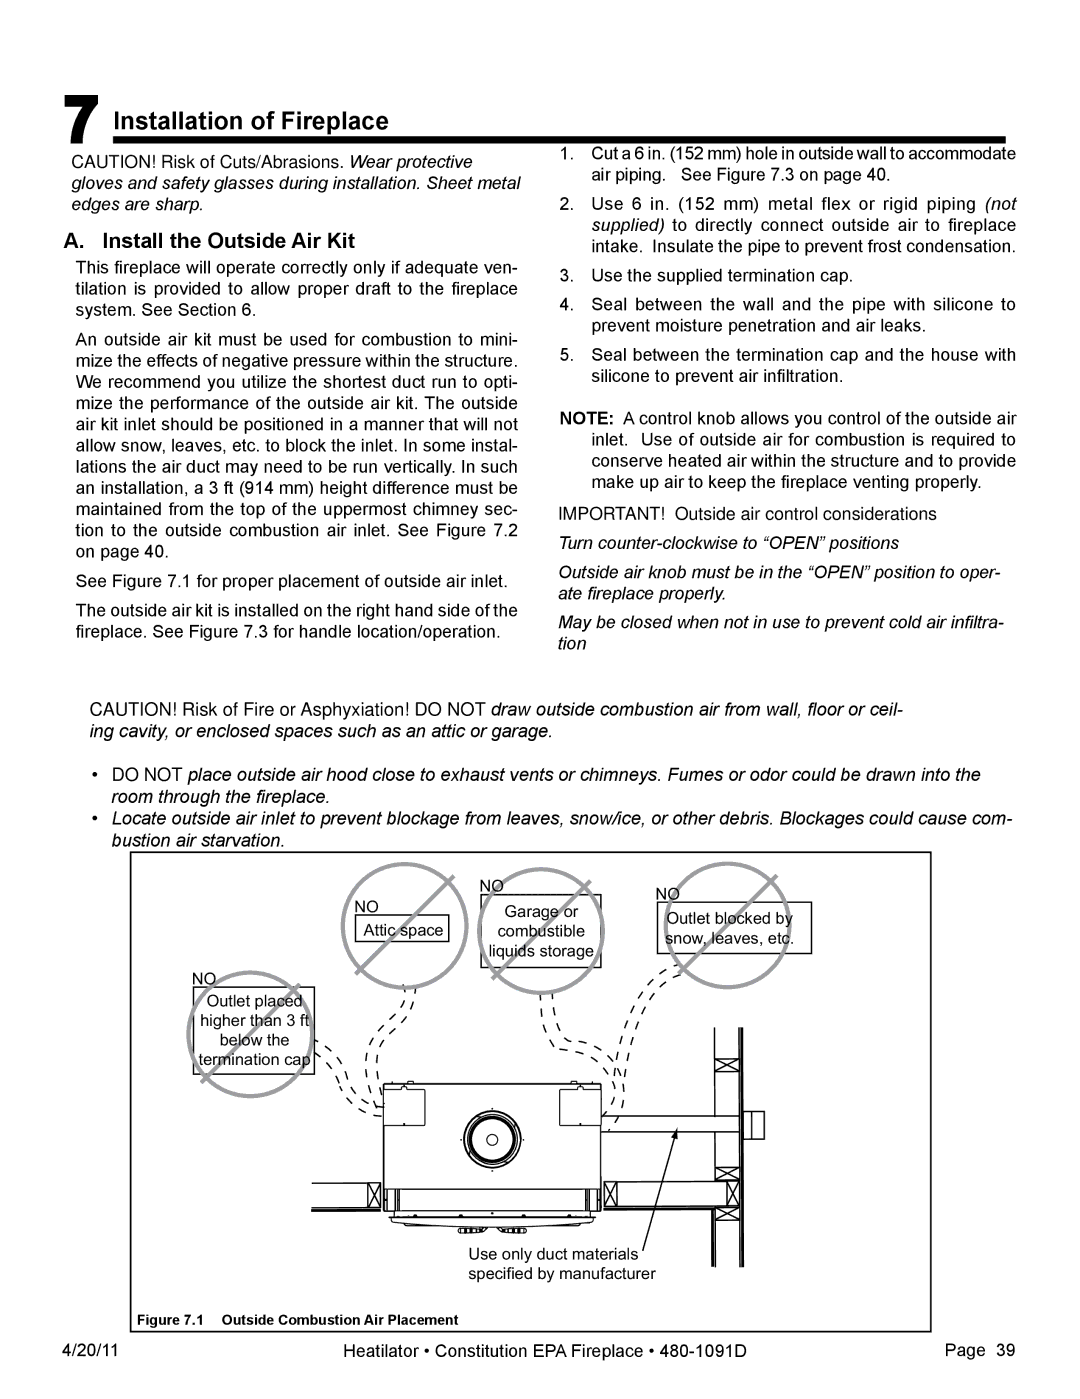
See Figure 7.1 for proper placement of outside air inlet.

ate fireplace properly.

The outside air kit is installed on the right hand side of the

May be closed when not in use to prevent cold air infiltra-

fireplace. See Figure 7.3 for handle location/operation.

tion


Caution! Risk of Fire or Asphyxiation! Do not draw outside combustion air from wall, floor or ceil- ing cavity, or enclosed spaces such as an attic or garage.

Do not place outside air hood close to exhaust vents or chimneys. Fumes or odor could be drawn into the room through the fireplace.

Locate outside air inlet to prevent blockage from leaves, snow/ice, or other debris. Blockages could cause com- bustion air starvation.

NO

Attic space

NO

Outlet placed

higher than 3 ft

below the

termination cap

NO

Garage or

combustible

liquids storage

NO

Outlet blocked by snow, leaves, etc.

Use only duct materials specified by manufacturer

Figure 7.1 Outside Combustion Air Placement

4/20/11

Heatilator • Constitution EPA Fireplace • 480-1091D

Page 39

Page 39
Image 39
Heatiator C40 owner manual Installation of Fireplace

C40 specifications

The Heatiator C40 is an innovative heating solution designed to optimize comfort and energy efficiency in residential and commercial spaces. This advanced heating unit combines modern technology with user-friendly features, making it an excellent choice for anyone looking to improve their heating systems.

One of the standout features of the Heatiator C40 is its powerful heating capacity. With an output of up to 40,000 BTUs, this unit is capable of efficiently warming large areas, ensuring that no space is left cold. The C40 utilizes high-efficiency burners that maximize heat output while minimizing fuel consumption. This not only translates to lower energy bills for the consumer but also contributes to a reduced carbon footprint.

The Heatiator C40 is equipped with advanced smart technology, allowing users to control their heating environment remotely. With the Heatiator mobile app, users can adjust the temperature settings, set schedules, and monitor energy usage from their smartphones. This level of control ensures that comfort is maintained without unnecessary energy waste.

Another notable characteristic of the C40 is its versatile design. The unit can be easily installed in various configurations, including wall-mounted, freestanding, or built-in options, making it suitable for any room layout or decor. Its sleek, compact design also ensures that it blends seamlessly into any environment, providing users with both functionality and aesthetic appeal.

Safety is a priority in the design of the Heatiator C40. The unit is equipped with multiple safety features, including overheat protection, a flame failure device, and an automatic shut-off system. These safety measures provide peace of mind, allowing users to enjoy their heating without worry.

Furthermore, the Heatiator C40 operates quietly, making it an ideal choice for bedrooms and living areas where noise can be a distraction. The noise-reduction technology incorporated into the unit ensures that the heating process is unobtrusive, allowing for a peaceful environment.

In summary, the Heatiator C40 is a cutting-edge heating solution that stands out due to its powerful performance, energy efficiency, and user-friendly technology. With its stylish design, safety features, and advanced controls, the C40 is an excellent investment for anyone looking to enhance their heating system while enjoying the comfort of a warm, inviting space. Whether for homes or businesses, the Heatiator C40 promises reliable performance and satisfaction.