Manuals
/
Heatiator
/
Household Appliance
/
Stove
Heatiator
ECO-ADV-WS22 Service Parts Replacement, A. Glass Replacement, B. Snap Disc Replacement
Models:
ECO-ADV-WS22
1
21
48
48
Download
48 pages
5.78 Kb
18
19
20
21
22
23
24
25
Troubleshooting
Specification
Install
FAQ
Warranty
Dimension
Symptoms of Over-Firing
Accessories
Chimney Connector
D. Door Handle Assembly
Page 21
Image 21
Page 20
Page 22
Page 21
Image 21
Page 20
Page 22
Contents
DO DIS NOT C AR D
WS22
Model ECO-ADV-WS22 Wood Burning Stove
Congratulations
SAMPLE OF SERIAL NUMBER / SAFETY LABEL
LOCATION Back of Appliance
Test Lab and
Installer’s Guide
TABLE OF CONTENTS
Safety Alert Key
User’s Guide
HEATILATOR ECO-CHOICEWARRANTY
Warranty Policy
WARRANTY COVERAGE
WARRANTY PERIOD
This warranty is void if
WARRANTY EXCLUSIONS
WARRANTY COVERAGE
WARRANTY EXCLUSIONS
C. Glass Specifications
D. BTU & Efficiency Specifications
1 Listing and Code Approvals
A. Appliance Certification
2 Operating Instructions
User Guide
A. Your Wood Appliance - General Operating Parts
Hot glass will cause burns
D. Combustible/Non-combustibleMaterials
B. Fire Safety
C. Overfiring
E. Seasoned Wood
1. Kindling or First Stage
G. Burning Process
2. Second Stage
3. Final Stage
I. Burn Rates and Operating Efficiency
H.Burn Rate Air Control
Figure 10.1 - Burn Rate Air Control
For maximum operating efficiency
Ceramic Blanket
J. Correct Baffle & Blanket Placement
Back of Firebox
Baffle Board
Do NOT
K. Building A Fire
WARNING! Risk of Fire
L.Wood Fuel
Soft woods
Hard woods
N. Clear Space
M. Blower Operating Instructions
Figure 14.2 - Snap Disc Location
7.Snap Disc Location
ISSUES
P. Frequently Asked Questions
SOLUTIONS
O. Opacity Smoke
Q. Quick Start Guide
The stove is ready for normal operation
LOAD WOOD
ADD NEWSPAPER
A. Disposal of Ashes
3 Maintenance and Service
C. Appliance Inspection - Routine
WARNING! Risk of Fire
D. Glass Cleaning
E. Firebrick Inspection
Frequency As desired
F. Quick Reference Maintenance Guide
Start Fire Problems
4 Troubleshooting Guide
Solution
Possible Cause
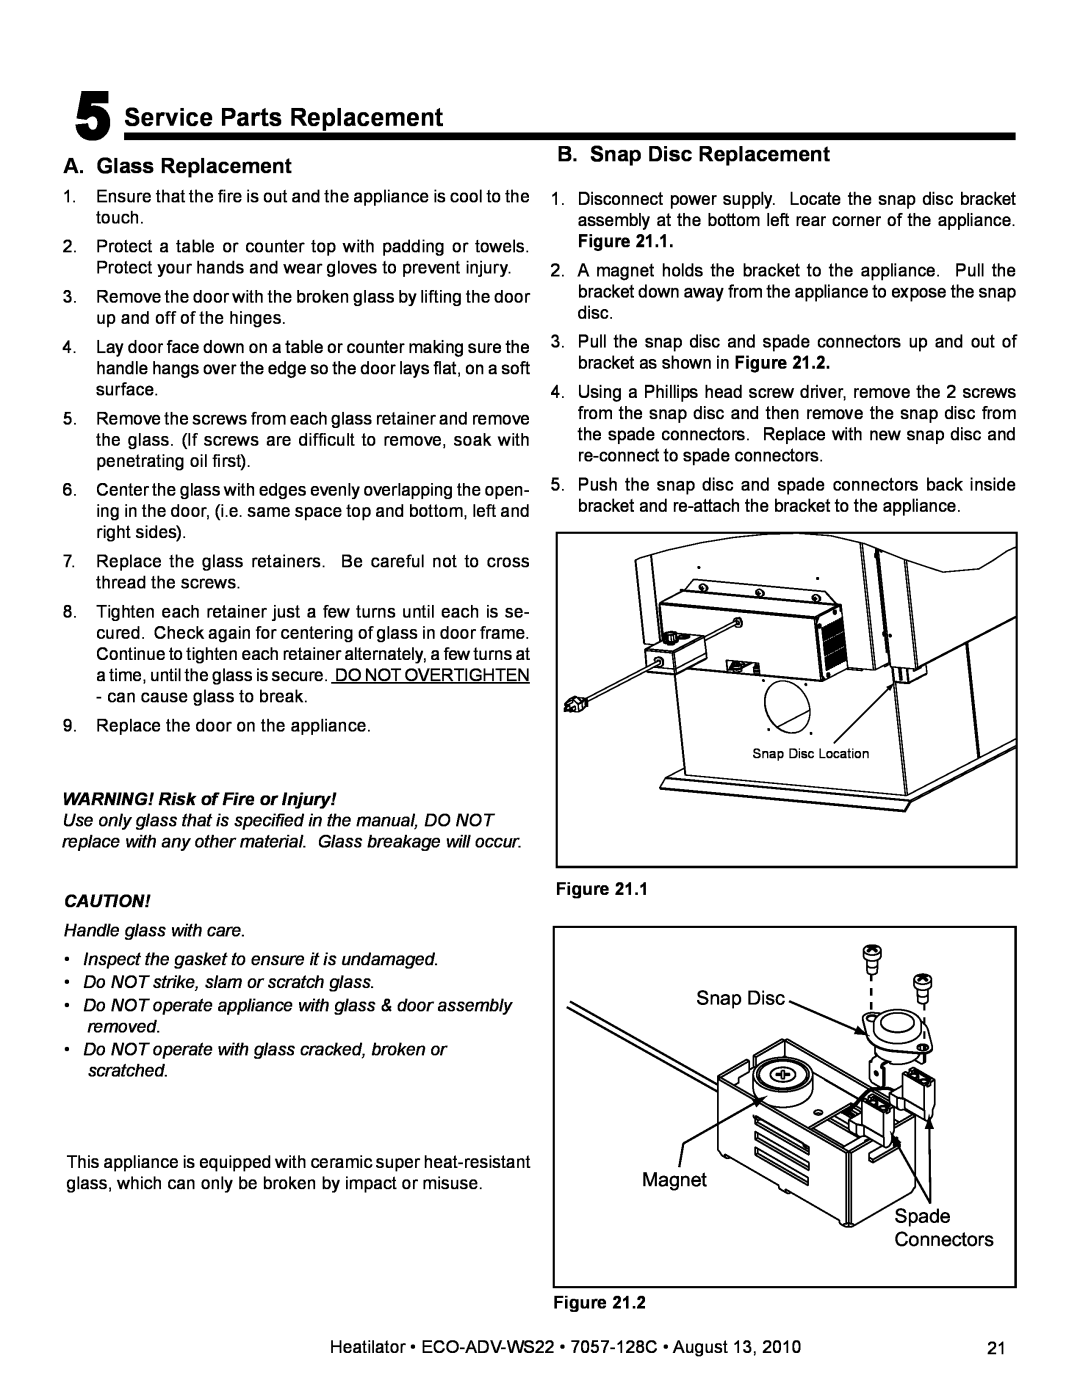
A. Glass Replacement
5 Service Parts Replacement
B. Snap Disc Replacement
WARNING! Risk of Fire or Injury
Figure Figure 22.1 - Baffle
C.Baffle Removal
D. Door Handle Assembly
Removing Tube Channel Assembly
E. Tube Channel Assembly Replacement
Replacing Tube Channel Assembly
NOTE Service Space
A. Design and Installation Considerations
Installer’s Guide
6 Getting Started
B. Draft
E. Chimney Termination Requirements
D. Locating Your Stove & Chimney
Flat Roof
F. 2-10-3Rule
G. Tools And Supplies Needed
H. Fire Safety
I.Inspect Appliance and Components
WARNING! Risk of Fire
A. Appliance Dimensions
7 Dimensions and Clearances
Figure 29.1 - Front View
Figure 29.2 -TopView
SEE PIPE MANUFACTURERS CLEARANCES - NOT TESTED
B. Clearances to Combustibles UL and ULC
CANADA
C. Hearth Protection Requirements
FLOOR PROTECTION
See Figure
Thermal Resistance R value
Thermal Conductivity k value
Converting k to R
Converting R to k
A. Venting Systems
8 Venting and Chimney Systems
B. Inspections
C. Larger Chimneys
F.Factory-BuiltChimney
E. Chimney Height / Rise and Run
S629M, STANDARD FOR 650oC FACTORY-BUILTCHIMNEYS
WARNING! Risk of Fire
G. Masonry Chimney
H. Masonry Chimney Liner
J. Thimble
I.Air Clearances
Solid Pack Chimney with Metal Supports
as a Thimble
Solid Pack Chimney with Metal Supports
as a Thimble Cont’d
WARNING! Risk of Fire
Heatilator ECO-ADV-WS22 7057-128C August
9 Appliance Set-up
A. Outside Air Kit Installation
Items Needed for Installation not supplied
Figure 39.2 - Alternate Floor Installation
WARNING! Risk of Asphyxiation
B. Mobile Home Installation
C. Blower Installation Optional
D. Adjusting the Blower Speed Control
CAUTION! Risk of Shock
14 Door Assembly
13 Inlet Assembly
Reference Materials
A. Exploded View
B. Service Parts & Accessories
Brick Assembly
HOW TO ORDER
DESCRIPTION
HOW TO ORDER
B. Service Parts & Accessories Cont’d
Accessories
DESCRIPTION
Date of Service
C. Service And Maintenance Log
Description of Service
Performed By
Date of Service
C. Service And Maintenance Log Cont’d
Description of Service
Performed By
Heatilator ECO-ADV-WS22 7057-128C August
D.Homeowner’s Notes
Hearth & Home Technologies 1445 North Highway
E. Contact Information
Colville, WA Division of HNI INDUSTRIES
DO DIS NOT C AR D
Top
Page
Image
Contents