Mode d’emploi
Manual de instrucciones
Precautions
For Your Safety
Identifications of caution marks
English
Important Safety Instructions
Save the data recorded on HDD
Handle the liquid crystal display LCD with care
Be careful of ambient temperature
Liquid crystal display LCD and viewfinder
Hold the DVD video camera/recorder correctly
Do not subject the DVD video camera/recorder to impact
Do not use a generally available 8 cm CD lens cleaner
Do not use the DVD video camera/recorder near corrosive gas
Do not expose the DVD video camera/recorder to insecticide
Be careful of moisture condensation
ACCESS/PC indicator
Suggestions and Restrictions
Make a trial recording
Copyright
This could cause malfunctions
Cleaning
Handling Discs
Disc Cleaning
Read This First
Quick Index
Quick index for the information you use most often
Notation of cancel button
About This Manual
Displays in this manual
HDD , 1, , , 2, /and 3marks beside headings
Introduction
You can capture photos from videos p
You can immediately play back desired recorded scenes p
Use Disc Navigation to create your original movie p
Table of Contents
Setting Up Record Functions
Disc Navigation
Connecting to PC
Subsidiary Information
Checking Provided Accessories
Model DZ-ACS3
Recording indicator p , 41
Red indicator will light during recording
To adjust the zoom or volume
Hand strap attachment bracket p Stereo microphone
ACCESS/PC indicator p
DVD insertion block p Battery Eject button p
Power switch p Hand strap p
Viewfinder p Diopter control p
Speaker p Reset button p
Card Access indicator p Quick Menu button p
Full Auto button p
Focus button p
Setting Up the DVD Video Camera/Recorder
Demonstration Function
Holding DVD Video CAMERA/RECORDER
Attaching Shoulder Strap
Attaching Lens CAP
HDD/DVD/Cards
Media Function
To edit image p
DVD recorders p
HDD, Discs
Information on DVD-R
Available Cards
Handling card
Preparations for Power Supply
Using DVD Video CAMERA/RECORDER with AC ADAPTER/CHARGER
Setting Up the Battery
Charging Battery
Battery charged status
Attaching Battery to DVD Video CAMERA/RECORDER
Removing Battery
Charge status Charge indicator
With DZ-BP07PW provided/DZ-BP7SW optional
With DZ-BP14SW optional
Battery Remaining Level Indicator
Efficient USE of Battery
Battery life
Power save and discharge of battery
Turning DVD Video Camera/Recorder On and Off
Set to OFF
Set to SD
Set to HDD
Range where the LCD monitor can be moved
Viewing Images
Viewing Image on LCD Monitor Screen
Viewing Subject Through Viewfinder
Setting Date and Time
Changing Display Format of Date and Time
Switching Operating Sound on or OFF Beep
Initial Settings
Changing Display Language Language
Changing Setting of Demonstration
Resetting Menu Settings to Defaults Reset
Turning Record LED on or OFF Record LED
LCD/EVF Setup
EVF Brightness
Adjusting Color Density Color Level
Always Displaying Image in Viewfinder
Press the Menu
Button, use the f
Inserting and Removing Disc
Push the shaded portion Pickup lens
When recording on this DVD video camera/recorder
When using brand-new DVD-RW/+RW
When recording data from PC
Inserting and Removing Card
Recording Movie
RW/DVD-R/+RW into this DVD video camera/recorder
Recording Stills
Swift Restart of Recording SLEEP/RESTART button
Setting to the sleep/restart standby status
Restoring from sleep/restart standby status
Information Display During Recording
On-Screen Information
See the next page for details
White balance p
Movie recording quality only in movie recording mode p
Switching the information display mode
Display when recording an image of yourself
Screen Display Description Symbol
Checking Flow of Menu
Operating Menu
Camera Functions Setup
Record Functions Setup
LCD/EVF Setup
Initial Setup
Zooming
Macro Recording
Conversion lens Step-up ring Attach
Focusing During Recording
Manually Focusing Subject
Focusing range
Glass with Water Droplets, dirt On it
Adjusting Brightness of Image to be recorded Exposure
Compensating for Backlight
Press the BLC button during recording
Backlight correction icon will appear
Using Full Auto Function
Function When setting Reference
Focus
Off
See page 49 for how to set
Setting Up Camera Functions
Before You Begin
Adjusting Color White Balance
Recording Dark Subjects Using LCD Monitor Light
Mode Setting content On-screen display
Setting white balance manually
Press the Cbutton to end the setting
Using the Electronic Image Stabilizer EIS
Recording Subject Using Large Magnification Digital Zoom
See page 51 for setting on digital zoom
Reducing Wind Noise During Recording MIC.FILTER
Setting Up Record Functions
Switching Movie Quality Video Mode
Setting to Wide TV Screen Mode 169 Mode
Display in viewfinder
Switching Quality of Still Image Quality
You can switch the still recording quality
Setting Content On-screen display
Receiving Image from Another Device Input Source
SELF-TIMER
Switching External Input Recording Method Photo Input
Recording Details of setting On-screen display
Setting ON-SCREEN Display Output on or OFF OSD Output
Drop Detection HDD Protection
Using Disc Navigation
When using card Set the power switch to SD
Starting or Terminating Disc Navigation
Turn the DVD video camera/recorder on p
Icons to be displayed on thumbnail Dubbed mark p
Fade-in p Skip p Fade-out p Lock p
Adjusting Volume During Playback
When playback ends
Playing Back from Disc Navigation Screen
Playing back photos
Playing Back Latest Recorded Scene
Deleting Last Recorded Scene
Search Playback of Movie
Capturing Photo
Frame ADVANCE/FRAME BACK/SLOW Playback of Movie
When using DVD-RAM
When using card
Skip Playback of Movie
Playing Back Stills
Jumping to Specified Point GO to
Specifying the point to view
When using HDD/DVD
Information Display During Playback
Selecting Multiple Scenes
Selecting Consecutive Scenes Together
Cursor Bar graph Status of scenes
Light blue
Functions Available with Disc Navigation
Contents
Available
When using HDD
Understanding Flow of Disc Navigation Menu
When using DVD-RAM/DVD-RW VR-mode
Scene Play list Program Others
When using DVD-RW VF-mode/DVD-R/+RW
When using card
Dubbing on DVD
List of dubbing possible/impossible
Disc to be Videos on HDD
VR-mode
FIRST-TIME NEW Dubbing
Menu screen, choose
New and press
If no DVD is loaded
Dubbing Scenes Recoded on Same DAY Collectively Date Dubbing
Dubbing ALL Scenes Recorded on HDD Dubbing ALL
Dubbing, Mark
Turning OFF Dubbed Mark from Thumbnail Mark OFF
Off, and then press
Scene
Deleting Scenes Edit Delete
Editing using submenu
Dividing Movies Edit Divide
Combining Multiple Scenes Edit Combine
Arranging Order of Scenes Edit Move
Directing Scenes Effectively Effect Fade
White Wipe
Playing Back by Skipping Scenes Effect Skip
Releasing Skip
Changing Images for Thumbnails Effect Thumbnail
Copying Stills on DVD-RAM to Card Copy
Locking Scenes on Card Lock
To unlock the scene
Selecting Scenes Using Menu Screen Select
Deselecting selected scenes
Proceed with step End or All and then
Deselecting scenes one by one
Displaying Information Using Menu Screen Detail
When using HDD/DVD
Switching to Thumbnail Display of Specific Date Select
What is PROGRAM?
Program
Playing Back Program Play
Changing Title of Program Title
Whose title you want to Change, and then press
Screen of the selected program will appear
Characters available for entering title
If you press the Cbutton on the screen for verifying
Play List
What is Play LIST?
Creating NEW Play List Create
Editing on play list
Switching to Display of Each Play List Select
Playing Back a Play List Play
100
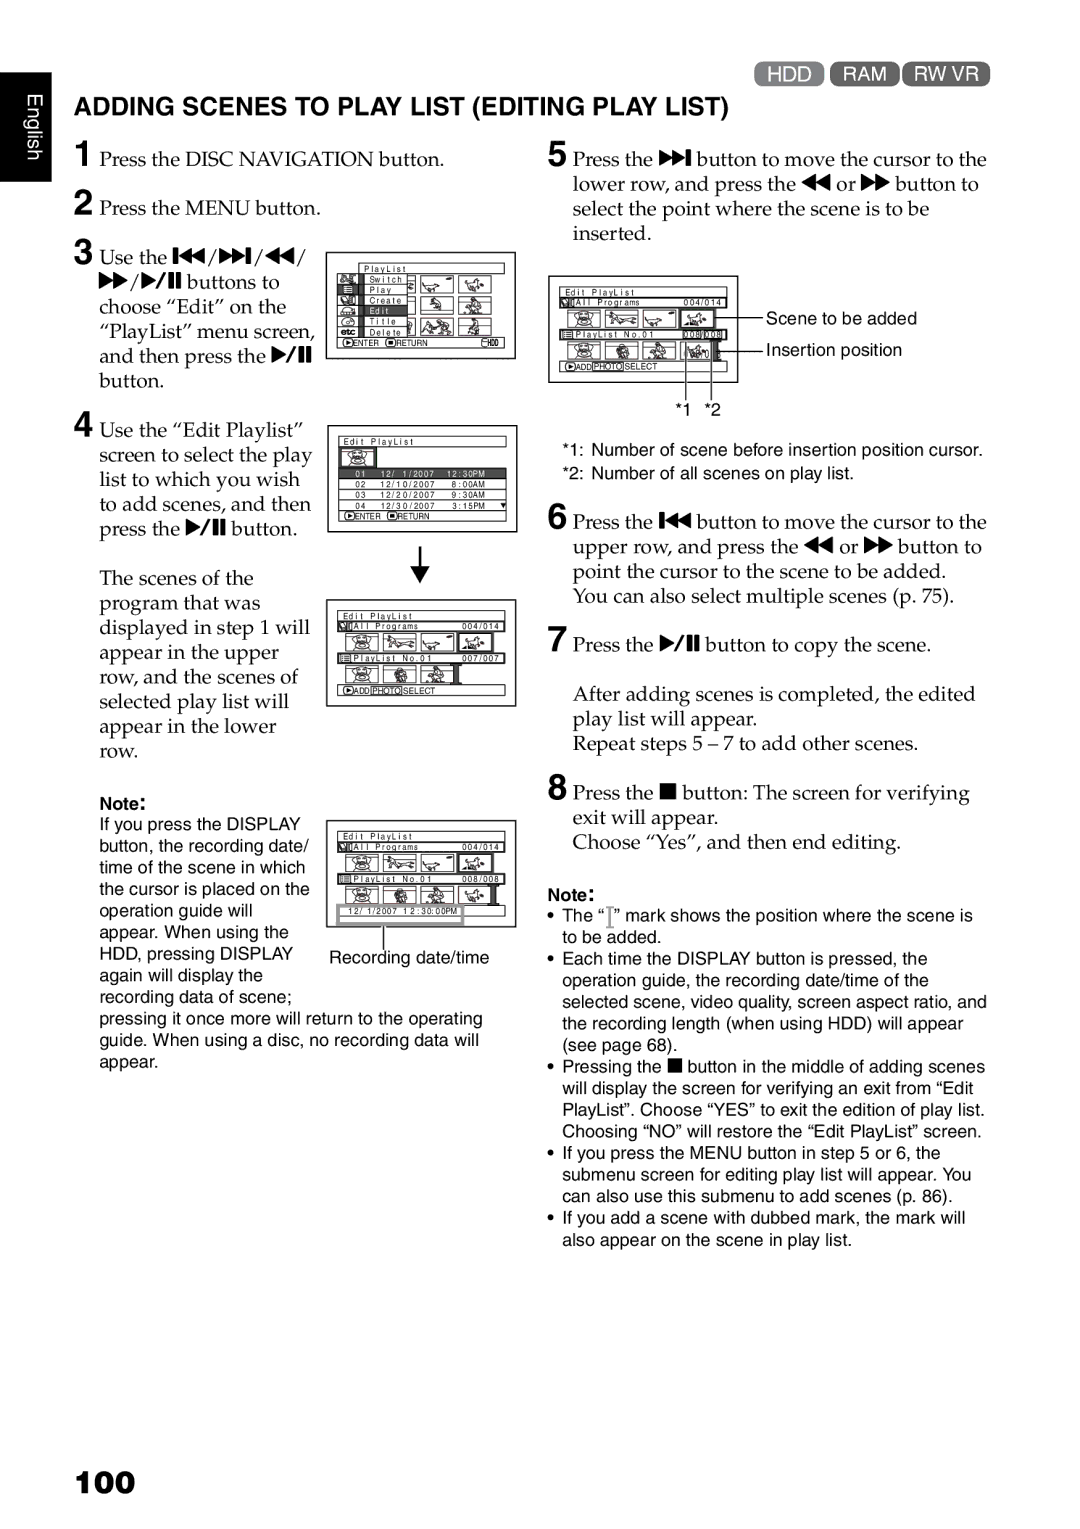
Adding Scenes to Play List Editing Play List
101
Adding Scenes Using Submenu for Editing Editing Play List
Deleting Scenes from Play List Editing Play List
Deleting Scenes Using Submenu for Editing Editing Play List
102
Arranging Order of Scenes Move
103
Press the Disc Navigation button Move the mark to
Changing Title of Play List Title
104
Deleting Play List Delete
Go To
HDD/DVD/Card Management
105
Moving to Beginning END of HDD/DVD/CARD
Protection
106
Verifying Remaining Free Space on Disc or Card Capacity
Deleting Data on HDD Full Format
107
Message for
108
Using Finalize button to finalize a disc
Finalizing DVD-RW/DVD-R/+RW Finalize DVD
109
Others
110
Displaying DUBBED/UNDUBBED Scenes in List Category
Displaying Movies or Stills Independently Category
111
Playing Back Scenes Repeatedly Repeat Play
Playing Back WIDE-MODE Images on 43 Display TV TV Type
Slide Show Continuous Playback of Stills
Viewing on TV Screen
Connecting to a TV
112
113
Viewing on TV Screen
Playback on DVD Recorder/Player
114
Playing Back DVD-RAM/DVD-RW VR-MODE
Playing Back DVD-RW VF-MODE/DVD-R/+RW
115
Recording Dubbing Images
Recording Dubbing Images from Other Video Device
116
Camera/recorder to Line L
117
Recording Dubbing Images on Other Video Devices
Software Provided
118
Windows
Macintosh
When using Windows
When using Macintosh
Requirements of available PC
119
ImageMixer 3 installation screen will appear Click Next
Installing Software
120
121
122
Connecting to PC via PC Connection Cable
123
124
Handling photos
When removing disc
When removing SD memory card
Using Disc in DVD Drive Built Into PC
125
126
Viewing Images Recorded on HDD/DISC Using PC
Using ImageMixer 3 for Windows
127
128
Creating DVD-VIDEO Using Images Recorded on HDD/DISC
Click Create New DVD
129
130
Viewing Images Recorded on HDD/DISC Using Macintosh
Using ImageMixer 3 Mac Edition for Dvdcam
131
132
Importing Images Recorded on HDD/DISC Into Macintosh
133
134
Uninstalling Software
Contact The Following
135
Pixela PC Software Support Center
136
Introduction to Optional Accessories
Camera Accessories
Power Supply
Battery DZ-BP7SW Battery DZ-BP14SW
Trouble Messages
Message Cause & Troubleshooting Reference
138
Maximum number of selectable scenes is Scenes
139
DVD video camera/recorder can enter the sleep/restart
140
141
142
143
144
Troubleshooting
Power supplies
Symptom Cause and Correction Reference
145
146
During recording
Symptom Cause and Correction
Clean the disc
147
During playback
When the DVD video camera/recorder is connected to PC
148
Poor playback picture
DVD video camera/recorder to PC
149
150
Miscellaneous
151
System Reset
List of setting items
Default Setting
152
Major Specifications
153
154
Movie
Conforming to DVD video format Dolby Digital
Movie DVD+RW video format Dolby Digital
155
Storage Capacity of HDD/DVD/CARD
Recordable Time On HDD*1
Recordable Time On Disc
156
Recordable Stills Photos on Card
With external input
Size And Quality Of Photos
To Order in the United States
To Order in the Canada
157
By Phone
Index
158
159
103
160
License Agreement
Warranty Limitations
Only
Year Parts Except Battery
Days Labor Carry-in
Hitachi
Or mail this portion to the following address
Page
Video Product
Model No. / N de modèle Serial No. / N de série
Mississauga on L5N 6C3
Service Direct 1-800-HITACHI
169
Ubiquitous Platform Systems Digital Media Division
Printed on recycled paper