INSTALLATION INSTRUCTIONS

(continued)

9 INSTALLING THE 2-PIECE ANTI-TIP DEVICE

WARNING:

Range must be secured with an approved Anti-Tip device.

Unless properly installed, the range could be tipped by you or a child standing, sitting or leaning on an open door.

After installing the Anti-Tip device, verify that it is in place by carefully attempting to tilt the range forward.

This range has been designed to meet all recognized industry tip standards for all normal conditions.

The use of this device does not preclude tipping of the range when not properly installed.

If the range is ever moved to a different location, the Anti-Tip device must also be moved and installed with the range.

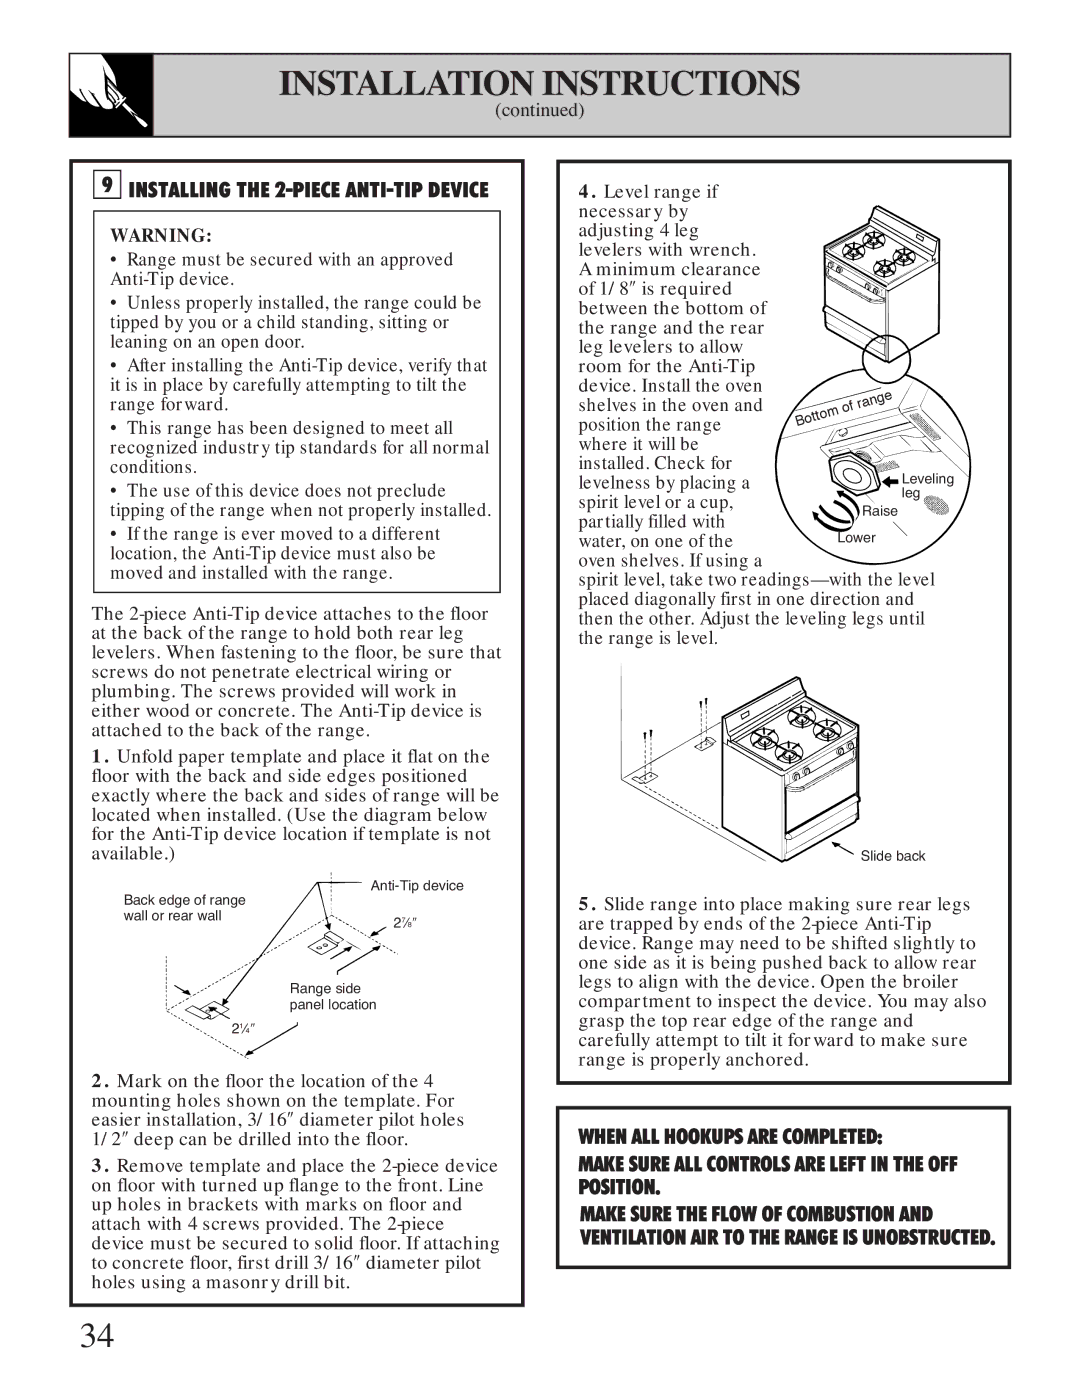
The 2-piece Anti-Tip device attaches to the floor at the back of the range to hold both rear leg levelers. When fastening to the floor, be sure that screws do not penetrate electrical wiring or plumbing. The screws provided will work in either wood or concrete. The Anti-Tip device is attached to the back of the range.

1.Unfold paper template and place it flat on the floor with the back and side edges positioned exactly where the back and sides of range will be located when installed. (Use the diagram below for the Anti-Tip device location if template is not available.)

Back edge of range

Anti-Tip device


wall or rear wall

27Ú8

Range side panel location

21Ú4

2.Mark on the floor the location of the 4 mounting holes shown on the template. For easier installation, 3/16″ diameter pilot holes 1/2″ deep can be drilled into the floor.

3.Remove template and place the 2-piece device on floor with turned up flange to the front. Line up holes in brackets with marks on floor and attach with 4 screws provided. The 2-piece device must be secured to solid floor. If attaching to concrete floor, first drill 3/16″ diameter pilot holes using a masonry drill bit.

4.Level range if

necessary by


adjusting 4 leg


levelers with wrench.


A minimum clearance


of 1/8″ is required


between the bottom of


the range and the rear


leg levelers to allow


room for the Anti-Tip


device. Install the oven


shelves in the oven and


position the range


where it will be


installed. Check for


levelness by placing a

Leveling

spirit level or a cup,

leg

Raise

partially filled with


water, on one of the

Lower

oven shelves. If using a


spirit level, take two readings—with the level placed diagonally first in one direction and then the other. Adjust the leveling legs until the range is level.

Slide back

5.Slide range into place making sure rear legs are trapped by ends of the 2-piece Anti-Tip device. Range may need to be shifted slightly to one side as it is being pushed back to allow rear legs to align with the device. Open the broiler compartment to inspect the device. You may also grasp the top rear edge of the range and carefully attempt to tilt it forward to make sure range is properly anchored.

WHEN ALL HOOKUPS ARE COMPLETED:

MAKE SURE ALL CONTROLS ARE LEFT IN THE OFF POSITION.

MAKE SURE THE FLOW OF COMBUSTION AND VENTILATION AIR TO THE RANGE IS UNOBSTRUCTED.

34

Page 34
Image 34
Hotpoint RGB506 installation instructions Installing the 2-PIECE ANTI-TIP Device

RGB506 specifications

The Hotpoint RGB506 is a standout choice for consumers seeking a reliable and efficient range cooker that combines both style and functionality. This appliance epitomizes modern kitchen design while ensuring cooking needs are met with ease.

One of the key features of the Hotpoint RGB506 is its double oven design, offering a total capacity that accommodates family meals and entertaining guests effortlessly. The primary oven boasts a generous space of 70 liters, providing ample room for roasts, casseroles, and other culinary creations. The secondary oven adds an additional 38 liters of cooking space, ideal for baking or keeping dishes warm without occupying the main oven’s area.

In terms of cooking technology, the Hotpoint RGB506 is equipped with fan-assisted cooking, ensuring even distribution of heat throughout the oven. This technology allows users to cook multiple dishes at once without worrying about flavors mixing or uneven cooking results. Additionally, the double oven setup allows for multiple cooking methods; the main oven can be utilized for traditional cooking while the other can function as a grill, broadening culinary possibilities.

Another remarkable feature is the hob area, which includes four gas burners. These burners come with various power outputs, allowing for precise temperature control suited to different cooking styles, from gentle simmering to rapid boiling. The cast iron supports on the burners ensure durability and stability, providing a professional touch to home cooking.

Safety and convenience are paramount, and the RGB506 addresses these with its flame failure safety device. This feature automatically cuts off the gas supply if the flame goes out, offering peace of mind. The oven is also fitted with an easy-to-clean enamel interior, which simplifies maintenance and enhances the longevity of the appliance.

For those who appreciate design, the Hotpoint RGB506 features a sleek and modern aesthetic that can complement a variety of kitchen styles. Its clean lines, stainless steel finish, and ergonomic controls create a sophisticated yet accessible cooking environment.

In summary, the Hotpoint RGB506 is a versatile and efficient range cooker that combines ample cooking space, advanced technology, and a commitment to safety and ease of use. Its thoughtful design and functionality make it an excellent addition to any kitchen, whether for everyday cooking or special occasions.