Dedicated phone line

Use this section if you plan on using the following type of phone line for the fax:

Dedicated phone line (no other devices, such as a phone or answering machine, share the line).

Dedicated phone line without devices sharing the line but with a subscription to a distinctive ring service.

Private Branch Exchange (PBX) or an Integrated Services Digital Network (ISDN) line. For more information about PBX and ISDN lines, see the electronic user guide available on the computer after installing the software.

1.Unplug any telephone devices from the phone jack where you are connecting the HP Officejet/Officejet Pro device.

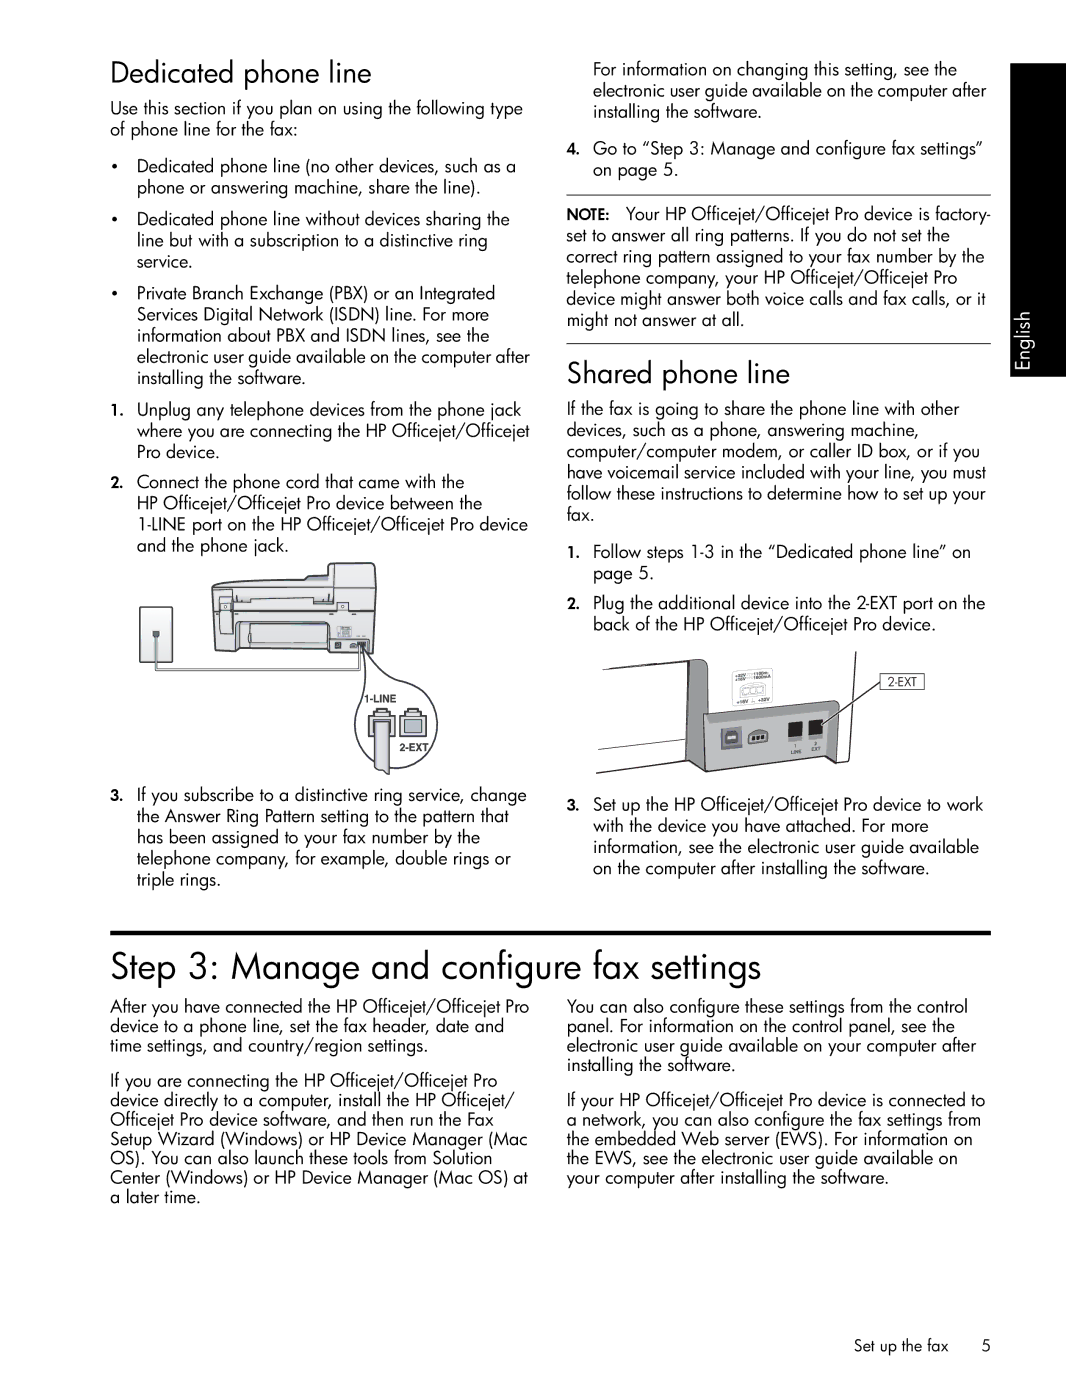
2.Connect the phone cord that came with the HP Officejet/Officejet Pro device between the

1-LINE port on the HP Officejet/Officejet Pro device and the phone jack.

3.If you subscribe to a distinctive ring service, change the Answer Ring Pattern setting to the pattern that has been assigned to your fax number by the telephone company, for example, double rings or triple rings.

For information on changing this setting, see the electronic user guide available on the computer after installing the software.

4.Go to “Step 3: Manage and configure fax settings” on page 5.

NOTE: Your HP Officejet/Officejet Pro device is factory- set to answer all ring patterns. If you do not set the correct ring pattern assigned to your fax number by the telephone company, your HP Officejet/Officejet Pro device might answer both voice calls and fax calls, or it might not answer at all.

Shared phone line

If the fax is going to share the phone line with other devices, such as a phone, answering machine, computer/computer modem, or caller ID box, or if you have voicemail service included with your line, you must follow these instructions to determine how to set up your fax.

1.Follow steps 1-3 in the “Dedicated phone line” on page 5.

2.Plug the additional device into the 2-EXT port on the back of the HP Officejet/Officejet Pro device.

2-EXT

3.Set up the HP Officejet/Officejet Pro device to work with the device you have attached. For more information, see the electronic user guide available on the computer after installing the software.

English

Step 3: Manage and configure fax settings

After you have connected the HP Officejet/Officejet Pro device to a phone line, set the fax header, date and time settings, and country/region settings.

If you are connecting the HP Officejet/Officejet Pro device directly to a computer, install the HP Officejet/ Officejet Pro device software, and then run the Fax Setup Wizard (Windows) or HP Device Manager (Mac OS). You can also launch these tools from Solution Center (Windows) or HP Device Manager (Mac OS) at a later time.

You can also configure these settings from the control panel. For information on the control panel, see the electronic user guide available on your computer after installing the software.

If your HP Officejet/Officejet Pro device is connected to a network, you can also configure the fax settings from the embedded Web server (EWS). For information on the EWS, see the electronic user guide available on your computer after installing the software.

Set up the fax

5

Page 5
Image 5
HP J4580, J6480, J6413, J4680c, J4660, J4540 Manage and configure fax settings, Dedicated phone line, Shared phone line

J4540, J6413, J4680c, J6480, J4580 specifications

The HP J4580 and J4500 series printers are versatile all-in-one devices that cater to both home and small office environments. Designed to deliver high-quality printing, scanning, copying, and faxing capabilities, these models combine functionality with ease of use.

The HP J4580 model stands out with its compact design, making it an ideal choice for users with limited space. One of its main features is the ability to print in color and black-and-white at speeds up to 28 pages per minute (ppm). Additionally, the J4580 boasts a maximum print resolution of 4800 x 1200 optimized dpi, ensuring that both text and images look sharp and vibrant.

The J4500 model, while similar in design, introduces enhanced features suitable for slightly larger workloads. It offers a slightly higher performance, handling printing tasks with even greater efficiency. The J4500 can also print at impressive speeds, providing users with fast output without sacrificing quality.

Both models come equipped with advanced scanner technology, featuring a flatbed scanner that allows for high-resolution scanning to digital formats. The J4580 and J4500 are capable of scanning documents up to 1200 dpi, making it easy to capture intricate details from photos and pages. Moreover, users can copy documents quickly with a one-touch button that simplifies the copying process.

One of the standout characteristics is the built-in fax functionality. The fax modem included in both models can transmit documents at speeds of up to 33.6 kbps, ensuring that important information is sent swiftly. Additionally, they feature a 50-sheet automatic document feeder (ADF) for quicker faxing and scanning of multi-page documents.

Connectivity options are also essential for modern office needs, and both the J4580 and J4500 support USB and Ethernet connections, allowing users to print and share documents seamlessly over a network. Furthermore, wireless connectivity options enable quick access from mobile devices.

Overall, the HP J4580 and J4500 series printers provide comprehensive solutions for daily printing, scanning, copying, and faxing tasks. With their combination of speed, quality, and multifunction capabilities, these all-in-one printers are reliable assets for enhancing productivity in any workspace.