Operating Instructions and Parts Manual | HVLP Gravity Feed Spray Gun |
Manual de Instrucciones y Lista de Piezas | Pistola Pulverizadora HVLP Alimentada por Gravedad |
Limited Warranty - Husky Spray Guns by Campbell Hausfeld
1.DURATION: From the date of purchase by the original purchaser as follows: Standard Duty Products - One Year.
2.WHO GIVES THIS WARRANTY (WARRANTOR): Campbell Hausfeld / Scott Fetzer Company, 100 Production Drive,
Harrison, Ohio, 45030, Telephone: (800)
3.WHO RECEIVES THIS WARRANTY (PURCHASER): The original purchaser (other than for purposes of resale) of the Campbell Hausfeld product.
4.WHAT PRODUCTS ARE COVERED BY THIS WARRANTY: Any Campbell Hausfeld nailer, stapler, air tool, spray gun, infla- tor or air accessory supplied or manufactured by Warrantor.
5.WHAT IS COVERED UNDER THIS WARRANTY: Substantial defects in material and workmanship which occur within the duration of the warranty period.
6.WHAT IS NOT COVERED UNDER THIS WARRANTY:
A.Implied warranties, including those of merchantability and FITNESS FOR A PARTICULAR PURPOSE ARE LIMITED FROM THE DATE OF ORIGINAL PURCHASE AS STATED IN THE DURATION. If this product is used for commercial, industrial or rental purposes, the warranty will apply for ninety (90) days from the date of purchase. Some States do not allow limitation on how long an implied warranty lasts, so the above limitations may not apply to you.
B.ANY INCIDENTAL, INDIRECT, OR CONSEQUENTIAL LOSS, DAMAGE, OR EXPENSE THAT MAY RESULT FROM ANY DEFECT, FAILURE, OR MALFUNCTION OF THE CAMPBELL HAUSFELD PRODUCT. Some States do not allow the exclu- sion or limitation of incidental or consequential damages, so the above limitation or exclusion may not apply to you.
C.Any failure that results from an accident, purchaser’s abuse, neglect or failure to operate products in accordance with instructions provided in the owner’s manual(s) supplied with product. Accident, purchaser's abuse, neglect or failure to operate products in accordance with instructions shall also include the removal or alteration of any safety devices. If such safety devices are removed or altered, this warranty is void.
D.Normal adjustments which are explained in the owner’s manual(s) provided with the product.
E.Items or service that are normally required to maintain the product, i.e.
7.RESPONSIBILITIES OF WARRANTOR UNDER THIS WARRANTY: Repair or replace, at Warrantor’s option, products or com- ponents which are defective, have malfunctioned and/or failed to conform within duration of the warranty period.
8.RESPONSIBILITIES OF PURCHASER UNDER THIS WARRANTY:
A.Provide dated proof of purchase and maintenance records.
B.Deliver or ship the Campbell Hausfeld product or component to the nearest Campbell Hausfeld Authorized Service Center. Freight costs, if any, must be borne by the purchaser.
C.Use reasonable care in the operation and maintenance of the products as described in the owner’s manual(s).
9.WHEN WARRANTOR WILL PERFORM REPAIR OR REPLACEMENT UNDER THIS WARRANTY: Repair or replacement will be scheduled and serviced according to the normal work flow at the servicing location, and depending on the availability of replacement parts.
This Limited Warranty applies in the United States, Canada and Mexico only and gives you specific legal rights. You may also have other rights which vary from state to state or country to country.
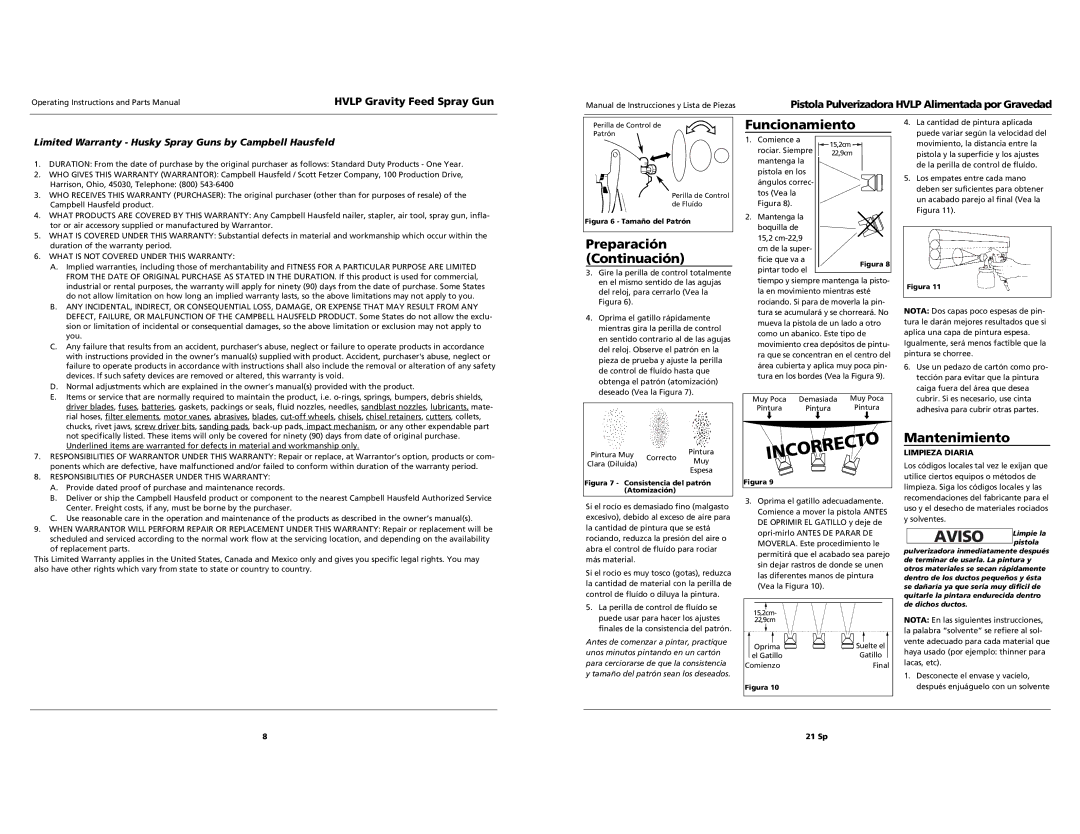
Perilla de Control de
Patrón
Perilla de Control de Fluído
Figura 6 - Tamaño del Patrón
Preparación
(Continuación)
3.Gire la perilla de control totalmente en el mismo sentido de las agujas del reloj, para cerrarlo (Vea la Figura 6).
4.Oprima el gatillo rápidamente mientras gira la perilla de control en sentido contrario al de las agujas del reloj. Observe el patrón en la pieza de prueba y ajuste la perilla de control de fluído hasta que obtenga el patrón (atomización) deseado (Vea la Figura 7).
Pintura Muy | Correcto | Pintura | |
Muy | |||
Clara (Diluida) | |||
| |||
| Espesa | ||
|
|
Figura 7 - Consistencia del patrón (Atomización)
Si el rocío es demasiado fino (malgasto excesivo), debido al exceso de aire para la cantidad de pintura que se está rociando, reduzca la presión del aire o abra el control de fluído para rociar más material.
Si el rocio es muy tosco (gotas), reduzca la cantidad de material con la perilla de control de fluído o diluya la pintura.
5.La perilla de control de fluído se puede usar para hacer los ajustes finales de la consistencia del patrón.
Antes de comenzar a pintar, practique unos minutos pintando en un cartón para cerciorarse de que la consistencia y tamaño del patrón sean los deseados.
Funcionamiento
1. Comience a |
| 15,2cm - |
rociar. Siempre |
| |
| 22,9cm | |
mantenga la |
|
|
pistola en los |
|
|
ángulos correc- |
|
|
tos (Vea la |
|
|
Figura 8). |
|
|
2. Mantenga la |
|
boquilla de |
|
15,2 |
|
cm de la super- |
|
ficie que va a | Figura 8 |
|
pintar todo el
tiempo y siempre mantenga la pisto- la en movimiento mientras esté rociando. Si para de moverla la pin- tura se acumulará y se chorreará. No mueva la pistola de un lado a otro como un abanico. Este tipo de movimiento crea depósitos de pintu- ra que se concentran en el centro del área cubierta y aplica muy poca pin- tura en los bordes (Vea la Figura 9).
Muy Poca | Demasiada | Muy Poca |
Pintura | Pintura | Pintura |
Figura 9
3.Oprima el gatillo adecuadamente. Comience a mover la pistola ANTES DE OPRIMIR EL GATILLO y deje de
15,2cm- |
|
22,9cm |
|
Oprima | Suelte el |
el Gatillo | Gatillo |
Comienzo | Final |
Figura 10 |
|
4.La cantidad de pintura aplicada puede variar según la velocidad del movimiento, la distancia entre la pistola y la superficie y los ajustes de la perilla de control de fluído.
5.Los empates entre cada mano deben ser suficientes para obtener un acabado parejo al final (Vea la Figura 11).
Figura 11
NOTA: Dos capas poco espesas de pin- tura le darán mejores resultados que si aplica una capa de pintura espesa.
Igualmente, será menos factible que la pintura se chorree.
6.Use un pedazo de cartón como pro- tección para evitar que la pintura caiga fuera del área que desea cubrir. Si es necesario, use cinta adhesiva para cubrir otras partes.
Mantenimiento
LIMPIEZA DIARIA
Los códigos locales tal vez le exijan que utilice ciertos equipos o métodos de limpieza. Siga los códigos locales y las recomendaciones del fabricante para el uso y el desecho de materiales rociados y solventes.
AVISO Limpie la pistola
pulverizadora inmediatamente después de terminar de usarla. La pintura y otros materiales se secan rápidamente dentro de los ductos pequeños y ésta se dañaría ya que sería muy dificil de quitarle la pintara endurecida dentro de dichos ductos.
NOTA: En las siguientes instrucciones, la palabra “solvente” se refiere al sol- vente adecuado para cada material que haya usado (por ejemplo: thinner para lacas, etc).
1.Desconecte el envase y vacíelo, después enjuáguelo con un solvente
8 | 21 Sp |