DTR-4.6
Important Safety Instructions
Avis
Precautions
Power
Supplied Accessories
Make sure you have the following accessories
Speaker cable labels
Contents
Features
Before Using the AV receiver
Installing the Batteries
Using the Remote Controller
Getting to Know the AV Receiver
Front Panel
Getting to Know the AV Receiver
Display
XM antenna
Rear Panel
Component Video in 1, 2,
IR in A/B and OUT
Video 1 IN/OUT and Video 2 IN/OUT
These terminal posts are for connecting speakers in Zone
This jack is for connecting a powered subwoofer
FRONT, CENTER, and Surround Speakers
Remote Controller
About the Remote Controller Modes
Receiver/Tape Mode
Remote Controller
DVD Mode
CD, MD, and CDR Modes
HDD Mode
Connecting Your Speakers
Enjoying Home Theater
Connecting Your Speakers
Connecting Your Speakers
Speaker Connection Precautions
Connecting the Speaker Cables
Strip about 5/8
Connecting the Indoor FM Antenna
Connecting Antenna
Connecting the AM Loop Antenna
Attach the FM antenna, as shown
Connecting an Outdoor AM Antenna
Connecting Antenna
Connecting an Outdoor FM Antenna
Using a TV/FM Antenna Splitter
Optical Digital Jacks
Connecting Your Components
About AV Connections
AV Connection Color Coding
Which Connections Should I Use?
Connecting Your Components
Connecting Audio and Video Signals to the AV Receiver
Video Connection Formats
Audio Connection
Connecting a TV or Projector
Video Connection
Hint
Connecting a DVD player
Or the other
Hooking Up the Multichannel DVD Input
Connecting a VCR or DVD Recorder for Playback
DVD recorder
Connecting a VCR or DVD Recorder for Recording
Satellite, cable, set-top box, etc
Connecting a CD Player
Step
CD player
Connecting a Turntable
Turntable without a Built-in Phono Preamp
Phono preamp
Connecting a Cassette, CDR, MiniDisc, or DAT Recorder
Remote Control
Connecting Components
Auto Power On/Standby
Direct Change
Connecting the Power Cord
Connecting the Power Cords of Other Components
Connecting the RS232 Port
Standby indicator lights up
Turning On and Standby
Do the speaker setup-this is essential
Turning On the AV Receiver
Smooth Operation in a Few Easy Steps
Speaker Setup menu appears
First Time Setup
Speaker Setup
Main menu appears onscreen
Crossover
First Time Setup
Subwoofer Mode
Speaker Distance
Test tone from each
Repeat so that the volume
Speaker Level Calibration
Speaker is the same
Input selector Default assignment
Component Video Setup
Lowed by the Setup button
Press the Receiver button, fol
Input, and then press Enter
Digital Audio Input Setup
Buttons to select 2. Digital
Digital Input menu appears
Changing the Input Display
Playing Your AV Components
Select a listening mode and enjoy
See Using the Listening Modes on
Basic AV Receiver Operation
Listening to AM/FM Stations
Tuning into AM/FM Radio Stations
Listening to the Radio
Displaying AM/FM Radio Information
Listening to XM Satellite Radio
Connecting the XM Antenna
Listening to the Radio
Signing Up for XM Satellite Radio
Selecting XM Radio Channels
Channel Search mode
Channels cannot be selected while Indicator
Use the Up and Down Buttons to select a channel
Nel
Displaying XM Radio Information
Buttons to select a chan
Displaying XM Information on Your TV
Positioning the XM Antenna
XM Radio Messages
Deleting Presets
Presetting AM/FM Stations
Selecting Presets
XM Channels
Multichannel DVD Input Settings
Using the Multichannel DVD Input
Using the Multichannel DVD Input
Subwoofer Sensitivity
Common Functions
Adjusting Speaker Levels
Setting the Display Brightness
Muting the AV Receiver
Common Functions
Using the Sleep Timer
Using Headphones
Displaying Source Information
Selecting the Listening Modes
Using the Listening Modes
Selecting with the Remote Controller
Selecting on the AV Receiver
Using the Listening Modes
DSP
About the Listening Modes
Use this mode with any stereo or TV, DVD, VHS
Use this mode with any stereo movie e.g., TV, DVD, VHS
Onkyo Original DSP Modes
Recording
Recording Audio and Video from Separate Sources
Recording the Input Source
Onscreen Setup Menus
About the Onscreen Setup Menus
Submenu Main menu
Using the Cine Filter Function
Adjusting the Listening Modes
Audio Adjust Menu
Adjust, and then press Enter
PL II and Neo6 Settings PL II Music 2 ch only
Adjusting the Listening Modes
Tone Control Settings
Neo6 Music
LFE Level Setting
Dolby Digital Settings
Mono/Multiplex Settings
Multiplex
Mode Preset, and then press
Default Listening Modes
Listening Mode Preset menu Appears
Use the Up and Down Buttons to select 5. Listening
Advanced Setup
Input Setup
Delay
Volume Setup
Advanced Setup
IntelliVolume
Preferences
Lock Setup
OSD Setup
12V Trigger A/B/C Setup
OSD Position
Changing the Remote Controller’s ID
Remote IDs
Changing the AV Receiver’s Remote ID
Digital Input Signal Formats
That’s assigned to a digital input
Opt or coax, and then press
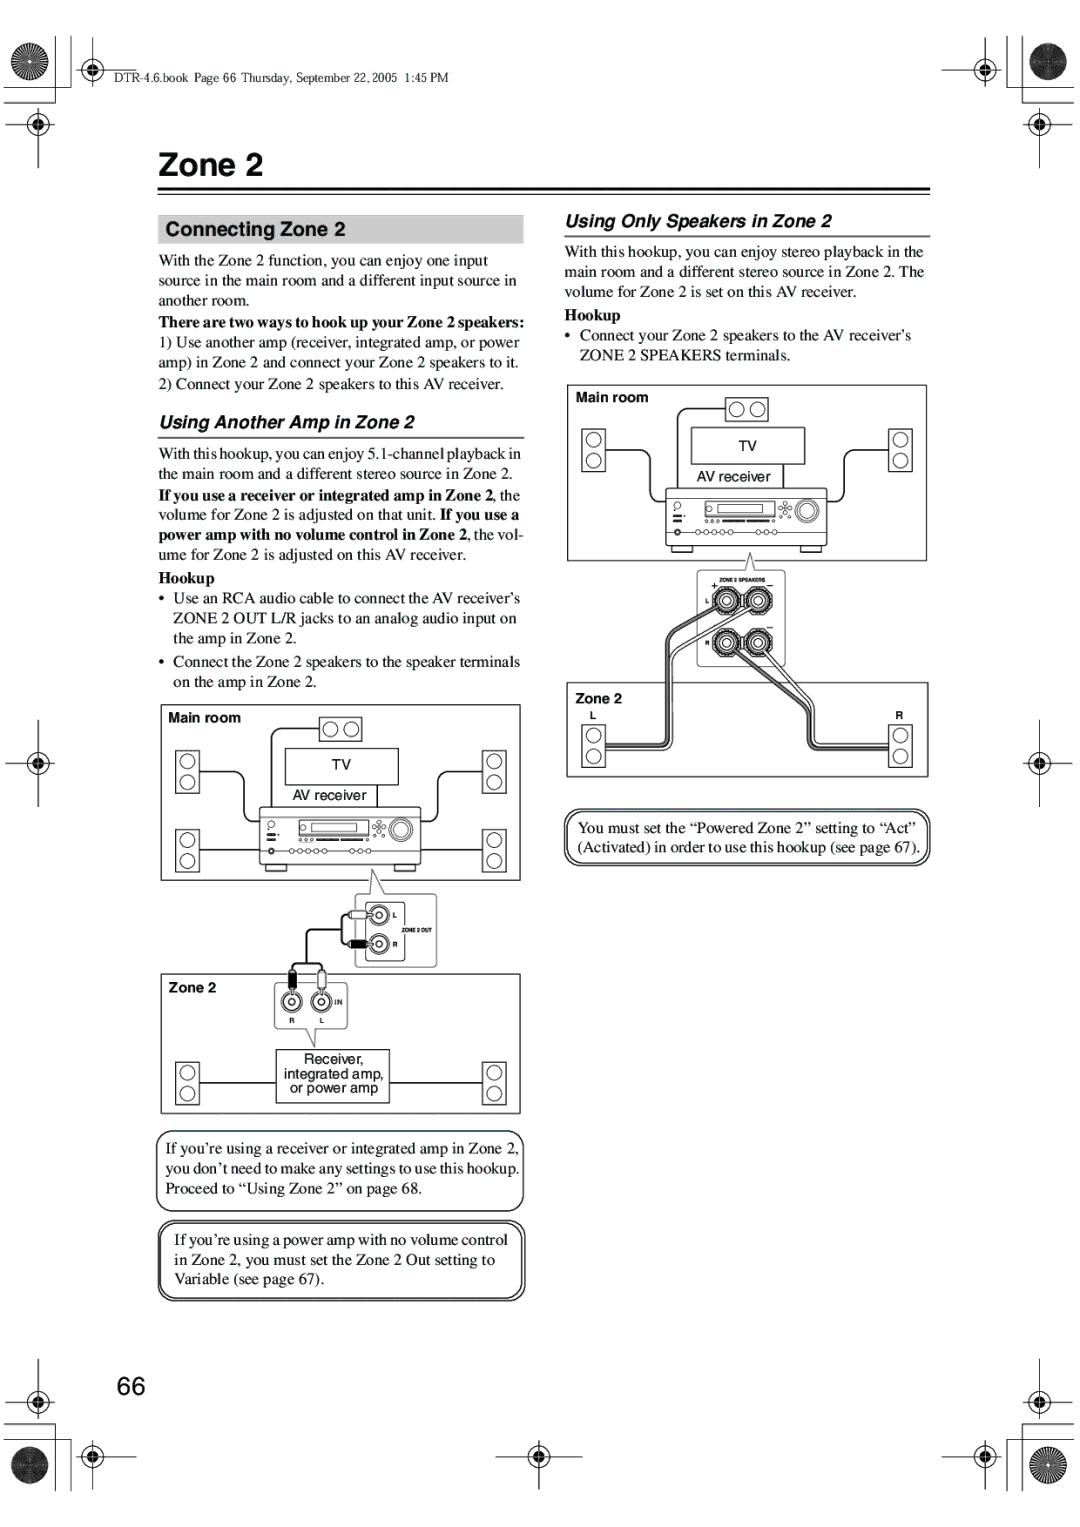
Using Only Speakers in Zone
Connecting Zone
Using Another Amp in Zone
Zone
Powered Zone 2 Setting
Zone 2 Out Setting
Using Zone
Controlling Zone 2 with the Remote Controller
Controlling Zone 2 from the AV Receiver
To adjust
On the remote controller, press
Zone 2 Remote Mode but
Ton, and then use the Level
Delay
Using the 12V Triggers in Zone 2 and the Main Room
Repeat this step as necessary for each setting
12V Trigger Setting for Each Input Source
Using a Multiroom Kit with a Cabinet
Using a Multiroom Kit with Zone
Using a Multiroom Kit with Other Components
Entering Remote Control Codes
Controlling Other Components
Resetting the Remote Mode Buttons
Resetting the Remote Controller
Remote Control Codes for Integra Components Connected via
Controlling Other Components
Prev CH
On, Standby, TV
CH +/-, TV CH +
TV Input
Learning Commands from Other Remote Controllers
Running Macros
Using Macros
Making Macros
Deleting Macros
Troubleshooting
Troubleshooting
Sound changes when I connect my head- phones
Remote controller doesn’t work
Can’t learn commands from another remote controller
Can’t control other components
General
Specification
Amplifier Section
Video Section