SEAT AND BACK | PROCEDURE 3 |
|
|
Washers | Back Upholstery |
|
Phillips Screws | Washers |
|
FIGURE 3 - REPLACING SCREW-ON BACK
UPHOLSTERY
REPLACING SEAT UPHOLSTERY (FIGURE 4)
1.Remove the eight (8) phillips screws and washers that secure the existing seat upholstery to the crossbraces.
2.Remove the existing seat upholstery from the crossbraces.
3.Ensure positioning of seat positioning strap (if used). Refer to INSTALLING THE SEAT POSITIONING STRAP in PROCEDURE 9 of this manual.
4.Install new seat upholstery by reversing STEPS
Phillips Screws
Seat Upholstery
FIGURE 4 - REPLACING SEAT UPHOLSTERY
ADJUSTING SEAT DEPTH (FIGURE 5)
1.Remove the existing seat upholstery from the wheel- chair. Refer to REPLACING THE SEAT UPHOL- STERY in this section of the manual.
NOTE: If adjusting the seat depth of the wheelchair, the seat upholstery MUST be changed as well.
2.Remove the two (2) plug buttons from the ends of the crossbraces that are towards the front of the wheelchair.
NOTE: The two (2) plug buttons will be used in the ends of the seat extensions.
3.Install the two (2) seat extension tubes into the ends on the crossbraces. Line up the second mounting hole from the rear of the seat extension tube with the mounting hole in the crossbrace.
4.Install the two (2) seat extension spacers onto the two (2) seat extension tubes.
5.Install the new seat upholstery onto the wheelchair. Make sure to line up the mounting holes in the seat extension tubes and seat extension spacers with the new seat upholstery. Refer to REPLACING THE SEAT UPHOLSTERY in this section of the manual.
6.Install plug buttons into the ends of the seat exten- sion spacers.
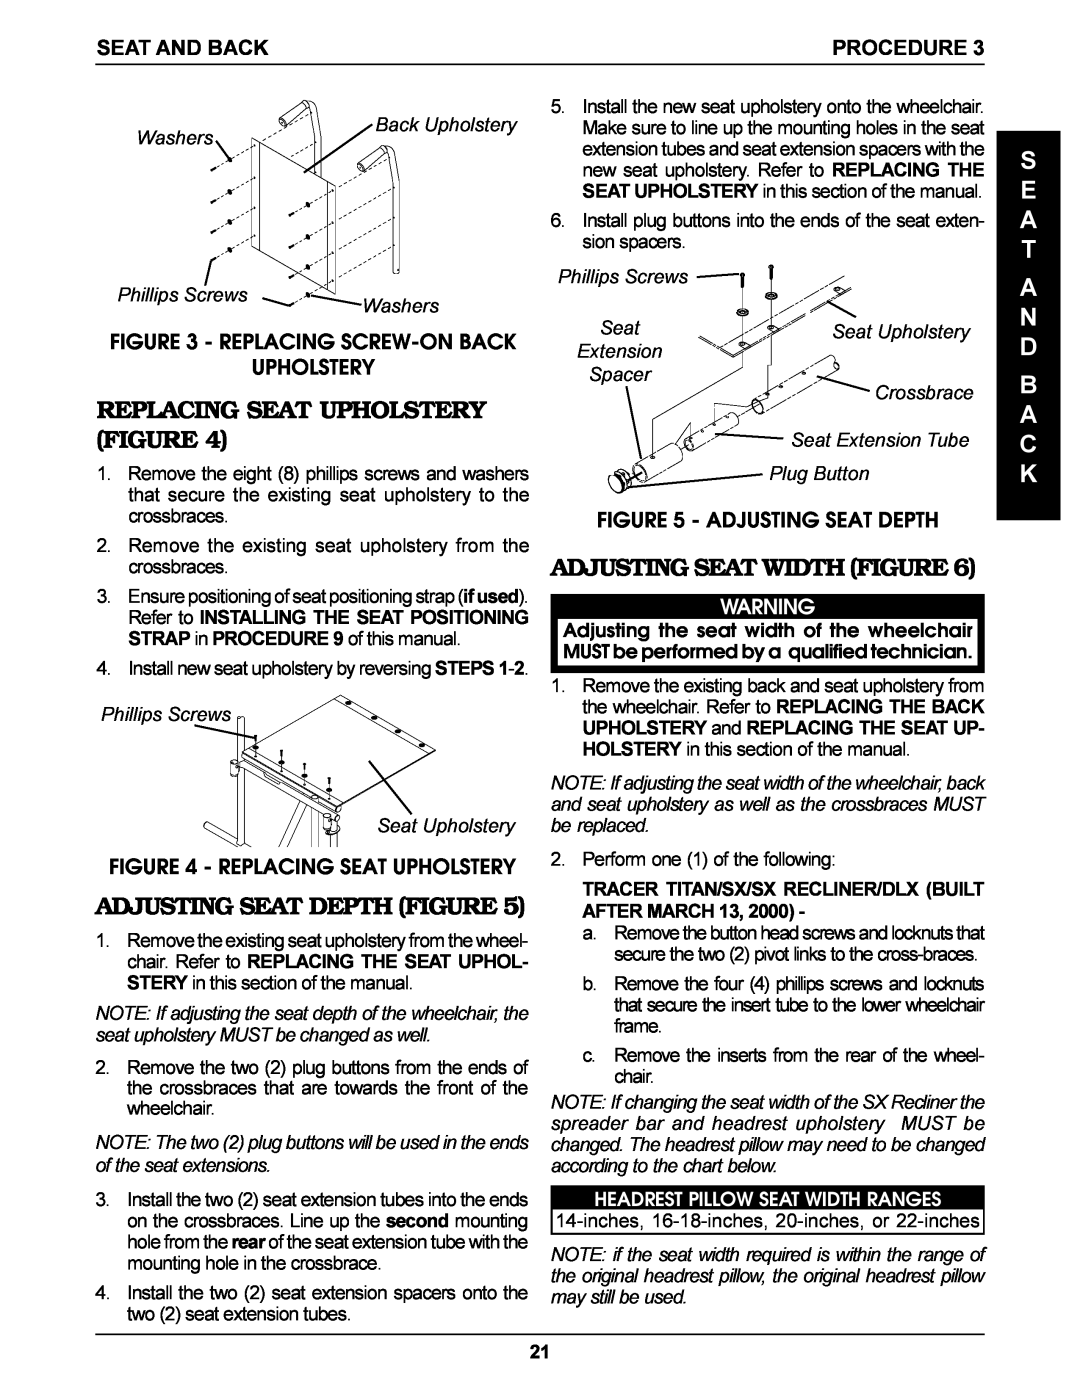
Phillips Screws
Seat | Seat Upholstery |
Extension
Spacer
Crossbrace
Seat Extension Tube
Plug Button
FIGURE 5 - ADJUSTING SEAT DEPTH
ADJUSTING SEAT WIDTH (FIGURE 6)
WARNING
Adjusting the seat width of the wheelchair MUST be performed by a qualified technician.
1.Remove the existing back and seat upholstery from the wheelchair. Refer to REPLACING THE BACK UPHOLSTERY and REPLACING THE SEAT UP- HOLSTERY in this section of the manual.
NOTE: If adjusting the seat width of the wheelchair, back and seat upholstery as well as the crossbraces MUST be replaced.
2.Perform one (1) of the following:
TRACER TITAN/SX/SX RECLINER/DLX (BUILT AFTER MARCH 13, 2000) -
a.Remove the button head screws and locknuts that secure the two (2) pivot links to the
b.Remove the four (4) phillips screws and locknuts that secure the insert tube to the lower wheelchair frame.
c.Remove the inserts from the rear of the wheel- chair.
NOTE: If changing the seat width of the SX Recliner the spreader bar and headrest upholstery MUST be changed. The headrest pillow may need to be changed according to the chart below.
HEADREST PILLOW SEAT WIDTH RANGESNOTE: if the seat width required is within the range of the original headrest pillow, the original headrest pillow may still be used.
S E A T
A N D
B A C K
21