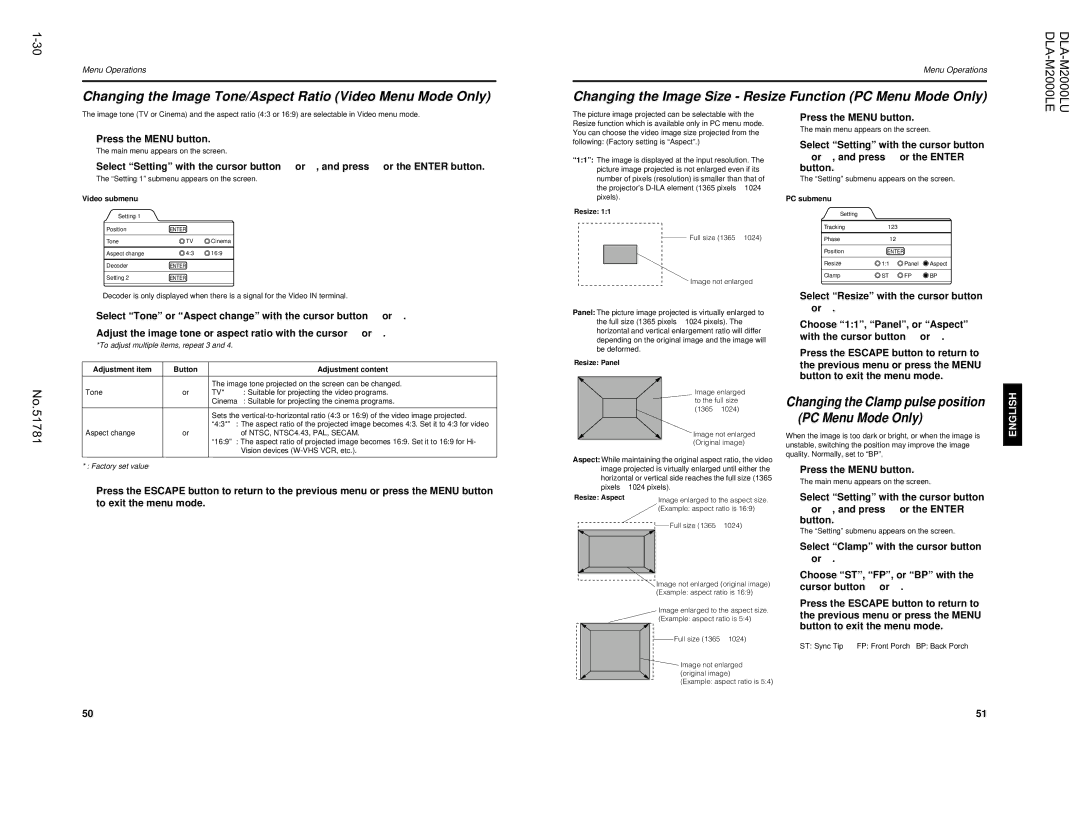
JVC DLA-M2000LU manual Changing the Image Tone/Aspect Ratio Video Menu Mode Only, Resize Panel

Models: DLA-M2000LU

1 40
Download 40 pages 47.53 Kb
Page 30
Image 30
The main menu appears on the screen.

1-30

Menu Operations

Changing the Image Tone/Aspect Ratio (Video Menu Mode Only)

Menu Operations

Changing the Image Size - Resize Function (PC Menu Mode Only)

DLA-M2000LU DLA-M2000LE

The image tone (TV or Cinema) and the aspect ratio (4:3 or 16:9) are selectable in Video menu mode.

1Press the MENU button.

The main menu appears on the screen.

2Select “Setting” with the cursor button 5 or , and press 3 or the ENTER button.

The “Setting 1” submenu appears on the screen.

Video submenu

Setting 1

Position

ENTER


Tone

TV

Cinema

Aspect change

4:3

16:9

Decoder

ENTER


Setting 2

ENTER


Decoder is only displayed when there is a signal for the Video IN terminal.

3Select “Tone” or “Aspect change” with the cursor button 5 or .

4Adjust the image tone or aspect ratio with the cursor 2 or 3.

*To adjust multiple items, repeat 3 and 4.


Adjustment item

Button


Adjustment content


The image tone projected on the screen can be changed.

No

Tone

2 or 3

TV*

: Suitable for projecting the video programs.


Cinema

: Suitable for projecting the cinema programs.

.


51781


“16:9” : The aspect ratio of projected image becomes 16:9. Set it to 16:9 for Hi-


Sets the vertical-to-horizontal ratio (4:3 or 16:9) of the video image projected.


“4:3*” : The aspect ratio of the projected image becomes 4:3. Set it to 4:3 for video


Aspect change

2 or 3


of NTSC, NTSC4.43, PAL, SECAM.


Vision devices (W-VHS VCR, etc.).


* : Factory set value


5Press the ESCAPE button to return to the previous menu or press the MENU button to exit the menu mode.

The picture image projected can be selectable with the Resize function which is available only in PC menu mode. You can choose the video image size projected from the following: (Factory setting is “Aspect”.)

“1:1”: The image is displayed at the input resolution. The picture image projected is not enlarged even if its number of pixels (resolution) is smaller than that of the projector’s D-ILA element (1365 pixels 1024 pixels).

Resize: 1:1

Full size (1365 1024)

Image not enlarged

Panel: The picture image projected is virtually enlarged to the full size (1365 pixels 1024 pixels). The horizontal and vertical enlargement ratio will differ depending on the original image and the image will be deformed.

Resize: Panel

Image enlarged to the full size (1365 1024)

Image not enlarged (Original image)

Aspect: While maintaining the original aspect ratio, the video image projected is virtually enlarged until either the horizontal or vertical side reaches the full size (1365 pixels 1024 pixels).

Resize: Aspect

Image enlarged to the aspect size.


(Example: aspect ratio is 16:9)


Full size (1365 1024)


Image not enlarged (original image)


(Example: aspect ratio is 16:9)


Image enlarged to the aspect size.


(Example: aspect ratio is 5:4)


Full size (1365 1024)


Image not enlarged

(original image)

(Example: aspect ratio is 5:4)

1Press the MENU button.

The main menu appears on the screen.

2Select “Setting” with the cursor button 5 or , and press 3 or the ENTER

button.

The “Setting” submenu appears on the screen.

PC submenu

Setting

Tracking

123


Phase

12


Position

ENTER


Resize

1:1

Panel

Aspect

Clamp

ST

FP

BP

3Select “Resize” with the cursor button 5 or .

4Choose “1:1”, “Panel”, or “Aspect” with the cursor button 2 or 3.

5Press the ESCAPE button to return to the previous menu or press the MENU button to exit the menu mode.

Changing the Clamp pulse position (PC Menu Mode Only)

When the image is too dark or bright, or when the image is unstable, switching the position may improve the image quality. Normally, set to “BP”.

1Press the MENU button.

2Select “Setting” with the cursor button 5 or , and press 3 or the ENTER

button.

The “Setting” submenu appears on the screen.

3Select “Clamp” with the cursor button 5 or .

4Choose “ST”, “FP”, or “BP” with the cursor button 2 or 3.

5Press the ESCAPE button to return to the previous menu or press the MENU button to exit the menu mode.

ST: Sync Tip

FP: Front Porch BP: Back Porch

ESPAÑ OL ITALIANO FRANÇ AIS DEUTSH ENGLISH

50

51

Page 30
Image 30
JVC DLA-M2000LU manual Changing the Image Tone/Aspect Ratio Video Menu Mode Only, Resize Panel, Resize Aspect

DLA-M2000LU specifications

The JVC DLA-M2000LU is a cutting-edge projector that epitomizes the advancement in home theater technology. Designed with professional users in mind, the DLA-M2000LU delivers exceptional image quality, making it ideal for commercial venues, screening rooms, and high-end home theaters.

One of the standout features of the DLA-M2000LU is its native 4K resolution, which allows for breathtaking detail and clarity. With a resolution of 4096 x 2160 pixels, this projector excels at rendering intricate textures and vibrant colors with remarkable fidelity. The 4K output is complemented by JVC’s e-Shift technology, which enhances the quality of lower resolution content, upscaling it to near 4K quality. This feature ensures that every viewing experience, whether it’s a blockbuster movie or a sports event, is lifelike and immersive.

The DLA-M2000LU is equipped with JVC’s proprietary D-ILA (Direct-Drive Image Light Amplifier) technology. This innovative technology allows for deeper blacks and superior contrast ratios, providing a more dynamic picture. With a contrast ratio of 100,000:1, users can enjoy rich shadow details and bright highlights, enhancing the overall cinematic experience.

Color reproduction is further enhanced thanks to the projector’s wide color gamut. The DLA-M2000LU supports HDR (High Dynamic Range) content, allowing for a greater range of colors and luminance levels. This capability means that viewers can appreciate the subtleties of color in every scene, which is particularly important for filmmakers aiming to convey their artistic vision.

Another notable characteristic of the DLA-M2000LU is its robust connectivity options. The projector features multiple HDMI inputs, allowing for seamless integration with various media devices. Additionally, it supports various video formats, including DCI-P3, ensuring compatibility with today’s media standards.

In terms of installation, the JVC DLA-M2000LU offers a range of lens options, making it versatile for different room sizes and layouts. The motorized lens shift, zoom, and focus capabilities ensure that users can achieve the optimal screen position with ease.

With its stunning image quality, advanced technologies, and professional grade features, the JVC DLA-M2000LU stands as a premier choice for anyone seeking to enhance their visual experience. Whether it’s for a commercial application or a dedicated home cinema, this projector promises to deliver unparalleled performance and satisfaction.