| 1-36 | | | | |
| | Troubleshooting | | | |
| | | | | |
| | | | | |
| | Symptom | Probable cause | Corrective action | Page |
| | | | | |
| | Color is poor or | • Is picture quality (color density, etc.) | • Adjust picture quality on the menu. | 47 |
| | unstable. | adjusted correctly? | | |
| | | | | |
| | | • Is the correct color system selected? | • Set the color system to AUTO or to the | 44 |
| | | | correct dedicated color system. | |
| | | | | |
| | | • Are signals (scanning frequency, etc.) | • Check if the signal is appropriate (scanning | 22 |
| | | of the connected devices appropriate? | frequency, etc.), and input the appropriate | |
| | | | signal. | |
| | | | | |
| | | • Is the PC2 input terminal being used? | • When the PC2 input terminal is being use, | 11, 52 |
| | | | “PC 2(BNC)” must be selected from the | |
| | | | menu options. Set it correctly with the input | |
| | | | signal. | |
| | | | | |
| | The upper part of the | • While computer system signal is input, | • Input separate sync signals for vertical sync | 11, 28 |
| | video image bows or | isn’t a sync signal for composite sync | (V) and horizontal sync (H) signals. | |
| | distorts. | (Cs) or G on sync being input? | | |
| | | | | |
| | | • Isn’t signal with much jitter or skew | • Input signals with little jitter or distortion. | – |
| | | distortion being input from a video | Use a TBC or a device with a built-in TBC. | |
| | | deck? | | |
| | | | | |
| | Video image and | • Are video picture and audio turned off | • Turn on video picture and audio by pressing | 10, 13, |
| | audio sound | by pressing the HIDE button? | the HIDE button. | 34 |
| | suddenly go out. | | | |
| | | | | |
| | Remote control unit | • Are batteries installed correctly? | • Match the polarities of batteries correctly (+ | 14 |
| | does not work. | | to + and – to –). | |
| | | | | |
| | | • Are batteries exhausted? | • Replace with new batteries. | 14 |
| | | | | |
| | | • Is there a shielding object between the | • Remove any shielding objects. | 20 |
| | | remote control unit and the remote | | |
| | | sensor? | | |
| | | | | |
| | | • Is the distance too long? | • Use the remote control unit at a nearer | 20 |
| | | | point. | |
| | | | | |
| | | • Is either side of remote cable | • Firmly insert the remote cable when using | 20 |
| No | | disconnected? | the remote control unit as the wired one. | |
| | | | |
| * This device uses a computer. External noise may cause it to malfunction. If this happens, turn the power off, remove the |
| . |
| 51781 | electric plug from the wall outlet. Then insert the electric plug back into the wall outlet, turn the power back on and check the |
| |
operation.
■ When warning indication is shown by the blinking indicators:
The warning status will be notified by the combination lighting of the projector’s indicators.
For the warning contents and the action to be taken, refer to “Warning Indication” on page 63.
■Maintenance
•Stains on the cabinet
These should be wiped off with a soft cloth. If the cabinet is heavily stained, wipe it with a cloth soaked in water-diluted neutral detergent and wring well, then wipe clean with a dry cloth.
•Since the cabinet may deteriorate in quality, become damaged, or show paint peeled, note the following:
–Do not wipe with rough cloth.
–Do not wipe vigorously.
–Do not wipe with thinner or benzene.
–Do not apply any volatile substance such as insecticides.
–Do not allow any rubber or vinyl article to remain in contact with the cabinet for a long time.
•Stains on the lens
These should be cleaned off with commercially available lens blowers or lens cleaning paper (for cleaning glasses and cameras).
Do not use liquid cleaning agents. This could cause the surface coating to be removed. Do not rub, scratch or hit the lens as its surface is prone to damage.
62
Warning Indication
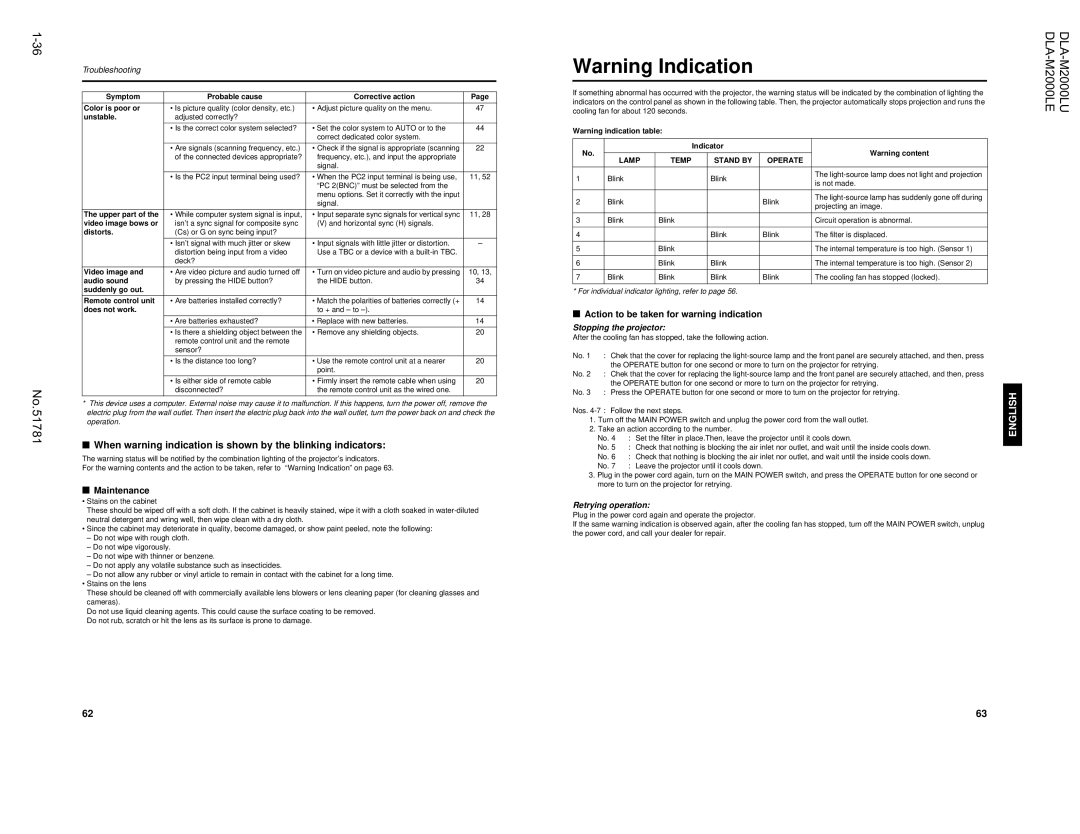
If something abnormal has occurred with the projector, the warning status will be indicated by the combination of lighting the indicators on the control panel as shown in the following table. Then, the projector automatically stops projection and runs the cooling fan for about 120 seconds.
Warning indication table:
| No. | | | Indicator | | Warning content |
| | | | | |
| | LAMP | TEMP | | STAND BY | OPERATE | |
| | | | | | | |
1 | | Blink | | | Blink | | The light-source lamp does not light and projection |
| | | | is not made. |
| | | | | | |
| | | | | | | |
2 | | Blink | | | | Blink | The light-source lamp has suddenly gone off during |
| | | | projecting an image. |
| | | | | | |
| | | | | | | |
3 | | Blink | Blink | | | | Circuit operation is abnormal. |
| | | | | | | |
4 | | | | | Blink | Blink | The filter is displaced. |
| | | | | | | |
5 | | | Blink | | | | The internal temperature is too high. (Sensor 1) |
| | | | | | | |
6 | | | Blink | | Blink | | The internal temperature is too high. (Sensor 2) |
| | | | | | | |
7 | | Blink | Blink | | Blink | Blink | The cooling fan has stopped (locked). |
| | | | | | | |
* For individual indicator lighting, refer to page 56.
■Action to be taken for warning indication
Stopping the projector:
After the cooling fan has stopped, take the following action.
No. 1 : Chek that the cover for replacing the light-source lamp and the front panel are securely attached, and then, press the OPERATE button for one second or more to turn on the projector for retrying.
No. 2 : Chek that the cover for replacing the light-source lamp and the front panel are securely attached, and then, press the OPERATE button for one second or more to turn on the projector for retrying.
No. 3 : Press the OPERATE button for one second or more to turn on the projector for retrying.
Nos. 4-7 : Follow the next steps.
1.Turn off the MAIN POWER switch and unplug the power cord from the wall outlet.
2.Take an action according to the number.
No. 4 : Set the filter in place.Then, leave the projector until it cools down.
No. 5 : Check that nothing is blocking the air inlet nor outlet, and wait until the inside cools down.
No. 6 : Check that nothing is blocking the air inlet nor outlet, and wait until the inside cools down.
No. 7 : Leave the projector until it cools down.
3.Plug in the power cord again, turn on the MAIN POWER switch, and press the OPERATE button for one second or more to turn on the projector for retrying.
Retrying operation:
Plug in the power cord again and operate the projector.
If the same warning indication is observed again, after the cooling fan has stopped, turn off the MAIN POWER switch, unplug the power cord, and call your dealer for repair.
63