Menu Configuration—MAIN MENU
For the operation procedure, see page 7.
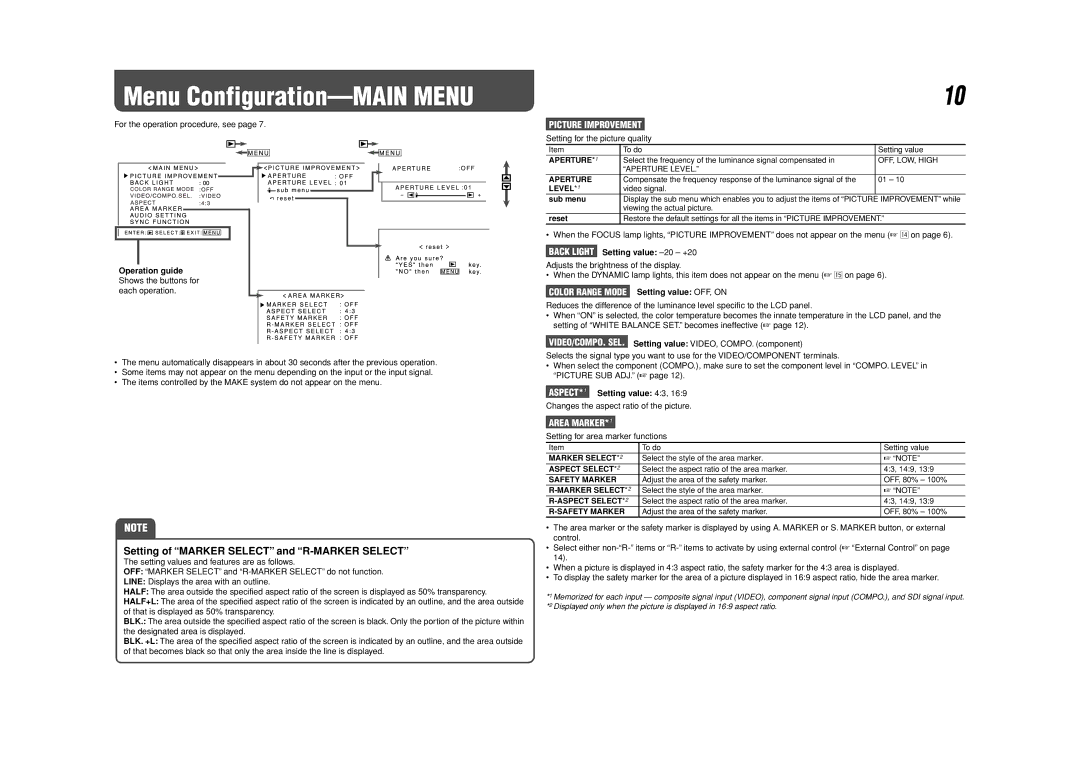
Operation guide Shows the buttons for each operation.
•The menu automatically disappears in about 30 seconds after the previous operation.
•Some items may not appear on the menu depending on the input or the input signal.
•The items controlled by the MAKE system do not appear on the menu.
NOTE
Setting of “MARKER SELECT” and “R-MARKER SELECT”
The setting values and features are as follows.
OFF: “MARKER SELECT” and
LINE: Displays the area with an outline.
HALF: The area outside the specified aspect ratio of the screen is displayed as 50% transparency.
HALF+L: The area of the specified aspect ratio of the screen is indicated by an outline, and the area outside of that is displayed as 50% transparency.
BLK.: The area outside the specified aspect ratio of the screen is black. Only the portion of the picture within the designated area is displayed.
BLK. +L: The area of the specified aspect ratio of the screen is indicated by an outline, and the area outside of that becomes black so that only the area inside the line is displayed.
10
PICTURE IMPROVEMENT
Setting for the picture quality
Item | To do | Setting value |
APERTURE*1 | Select the frequency of the luminance signal compensated in | OFF, LOW, HIGH |
| “APERTURE LEVEL.” |
|
APERTURE | Compensate the frequency response of the luminance signal of the | 01 – 10 |
LEVEL*1 | video signal. |
|
sub menu | Display the sub menu which enables you to adjust the items of “PICTURE IMPROVEMENT” while | |
| viewing the actual picture. |
|
reset | Restore the default settings for all the items in “PICTURE IMPROVEMENT.” | |
• When the FOCUS lamp lights, “PICTURE IMPROVEMENT” does not appear on the menu (☞ r on page 6).
BACK LIGHT Setting value: –20 – +20
Adjusts the brightness of the display.
• When the DYNAMIC lamp lights, this item does not appear on the menu (☞ t on page 6).
COLOR RANGE MODE Setting value: OFF, ON
Reduces the difference of the luminance level specific to the LCD panel.
•When “ON” is selected, the color temperature becomes the innate temperature in the LCD panel, and the setting of “WHITE BALANCE SET.” becomes ineffective (☞ page 12).
VIDEO/COMPO. SEL. Setting value: VIDEO, COMPO. (component)
Selects the signal type you want to use for the VIDEO/COMPONENT terminals.
•When select the component (COMPO.), make sure to set the component level in “COMPO. LEVEL” in “PICTURE SUB ADJ.” (☞ page 12).
ASPECT*1 Setting value: 4:3, 16:9
Changes the aspect ratio of the picture.
AREA MARKER*1
Setting for area marker functions
Item | To do | Setting value |
MARKER SELECT*2 | Select the style of the area marker. | ☞ “NOTE” |
ASPECT SELECT*2 | Select the aspect ratio of the area marker. | 4:3, 14:9, 13:9 |
SAFETY MARKER | Adjust the area of the safety marker. | OFF, 80% – 100% |
Select the style of the area marker. | ☞ “NOTE” | |
Select the aspect ratio of the area marker. | 4:3, 14:9, 13:9 | |
Adjust the area of the safety marker. | OFF, 80% – 100% |
•The area marker or the safety marker is displayed by using A. MARKER or S. MARKER button, or external control.
•Select either
•When a picture is displayed in 4:3 aspect ratio, the safety marker for the 4:3 area is displayed.
•To display the safety marker for the area of a picture displayed in 16:9 aspect ratio, hide the area marker.
*1 Memorized for each input — composite signal input (VIDEO), component signal input (COMPO.), and SDI signal input. *2 Displayed only when the picture is displayed in 16:9 aspect ratio.