INSTALLATION (IN-DASH MOUNTING)
The following illustration shows a typical installation. If you have any questions or require information regarding installation kits, consult your JVC car audio dealer or a company supplying kits.
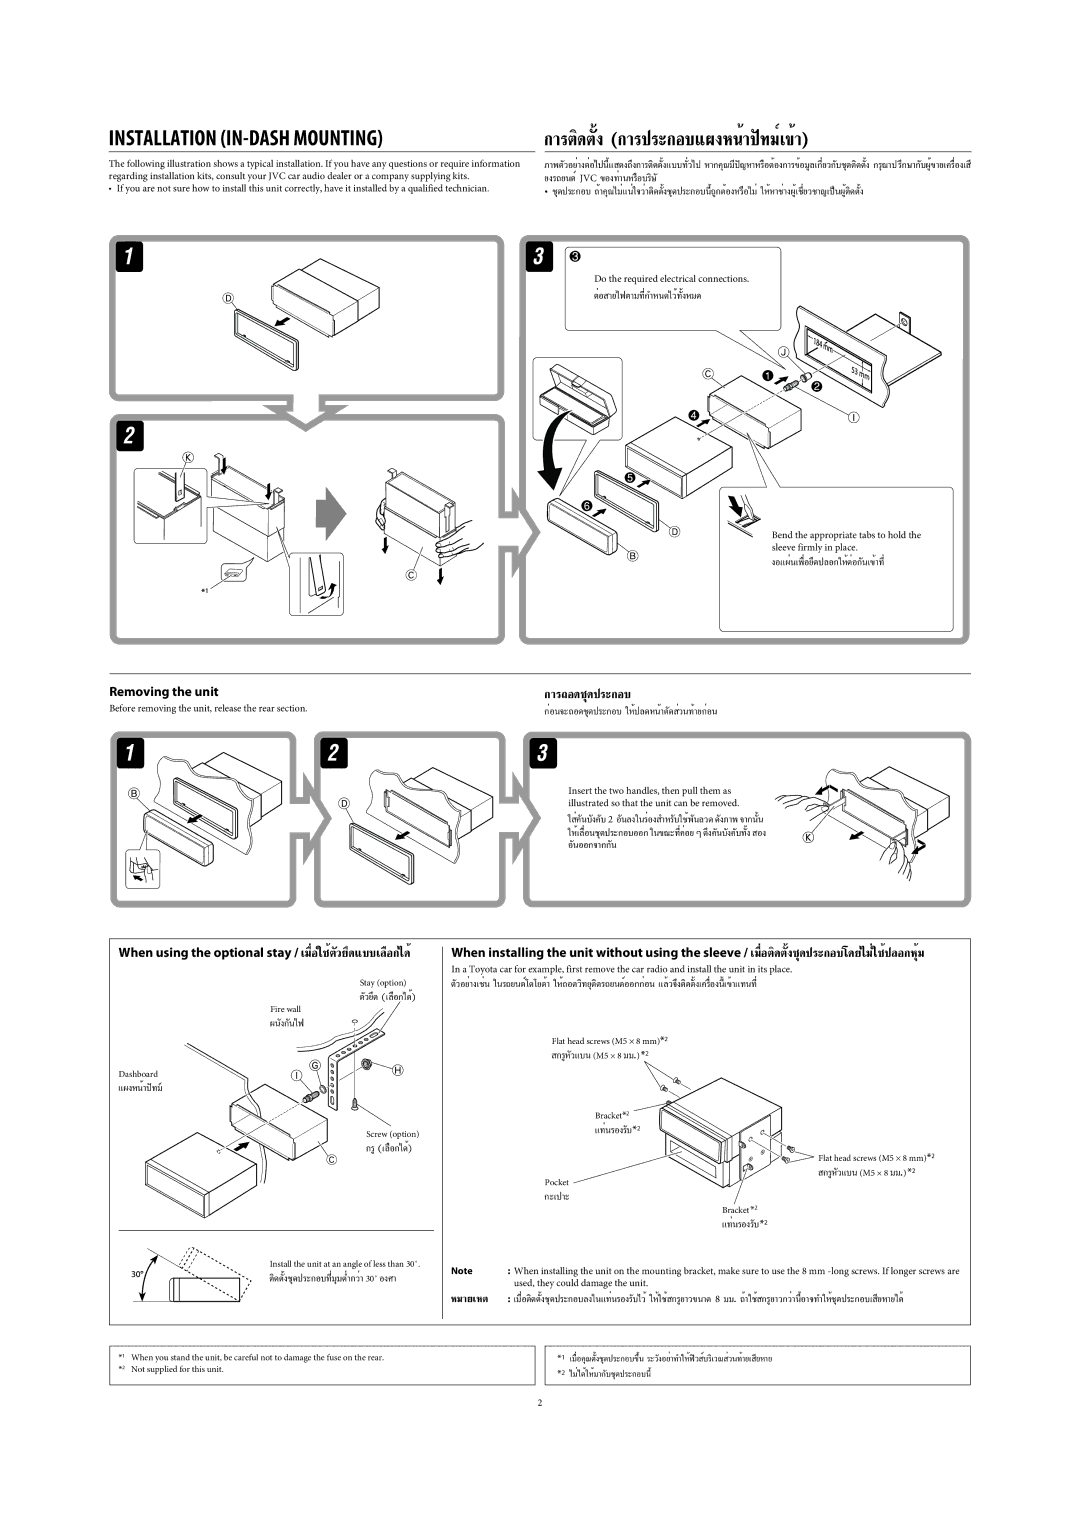
•If you are not sure how to install this unit correctly, have it installed by a qualified technician.
°“√µ‘¥µßÈ— (°“√ª√–°Õ∫·ºßÀπÈ“ªí∑¡Ï‡¢È“)
¿“浫լ˓ߵËÕ‰ªπ’È·—
•
Do the required electrical connections.
µËÕ “¬‰øµ“¡∑’Ë°”À𥉫È∑ßÀ¡È— ¥
Bend the appropriate tabs to hold the sleeve firmly in place.
ßÕ·ºËπ‡æ◊ËÕ¬÷¥ª≈Õ°„ÀȵËÕ°π‡— ¢È“∑’Ë
Removing the unit
Before removing the unit, release the rear section.
°“√∂Õ¥™ÿ¥ª√–°Õ∫
°ËÕπ®–∂Õ¥™ÿ¥ª√–°Õ∫ „ÀȪ≈¥ÀπÈ“µ¥— «π∑È“¬°ËÕπË
Insert the two handles, then pull them as illustrated so that the unit can be removed.
„
When using the optional stay / ‡¡◊ËÕ„™Èµ«¬÷— ¥·∫∫‡≈◊Õ°‰¥È
Stay (option)
µ«¬÷— ¥ (‡≈◊Õ°‰¥È)
Fire wall
Dashboard
·ºßÀπÈ“ªí∑¡á
Screw (option)
°√Ÿ(‡≈◊Õ°‰¥È)
Install the unit at an angle of less than 30˚.
µ‘¥µß™ÿÈ—
When installing the unit without using the sleeve / ‡¡◊ËÕµ‘¥µß™ÿÈ—
In a Toyota car for example, first remove the car radio and install the unit in its place.
µ«Õ¬Ë“߇™Ëπ— „π√∂¬πµÏ‚µ‚¬µÈ“ „ÀÈ∂Õ¥«‘∑¬ÿµ‘¥√∂¬πµÏÕÕ°°ËÕπ ·≈ô«®÷ßµ‘¥µíô߇§√◊ËÕßπ’ô‡¢ô“·∑π∑’Ë
Flat head screws (M5 ⋅ 8 mm)*2
°√ŸÀ«·∫π— (M5 × 8 ¡¡.) *2
Bracket*2
Flat head screws (M5 ⋅ 8 mm)*2
°√ŸÀ«·∫π— (M5 × 8 ¡¡.) *2
Bracket *2
Note | : When installing the unit on the mounting bracket, make sure to use the 8 mm | |
| used, they could damage the unit. |
|
À¡“¬‡Àµ | : ‡¡◊ËÕµ‘¥µß™ÿÈ— | ¥ô |
*1 | When you stand the unit, be careful not to damage the fuse on the rear. |
*2 | Not supplied for this unit. |
|
|
*1
*2 ‰¡Ë‰¥È„ÀÈ¡“°∫™ÿ—
2