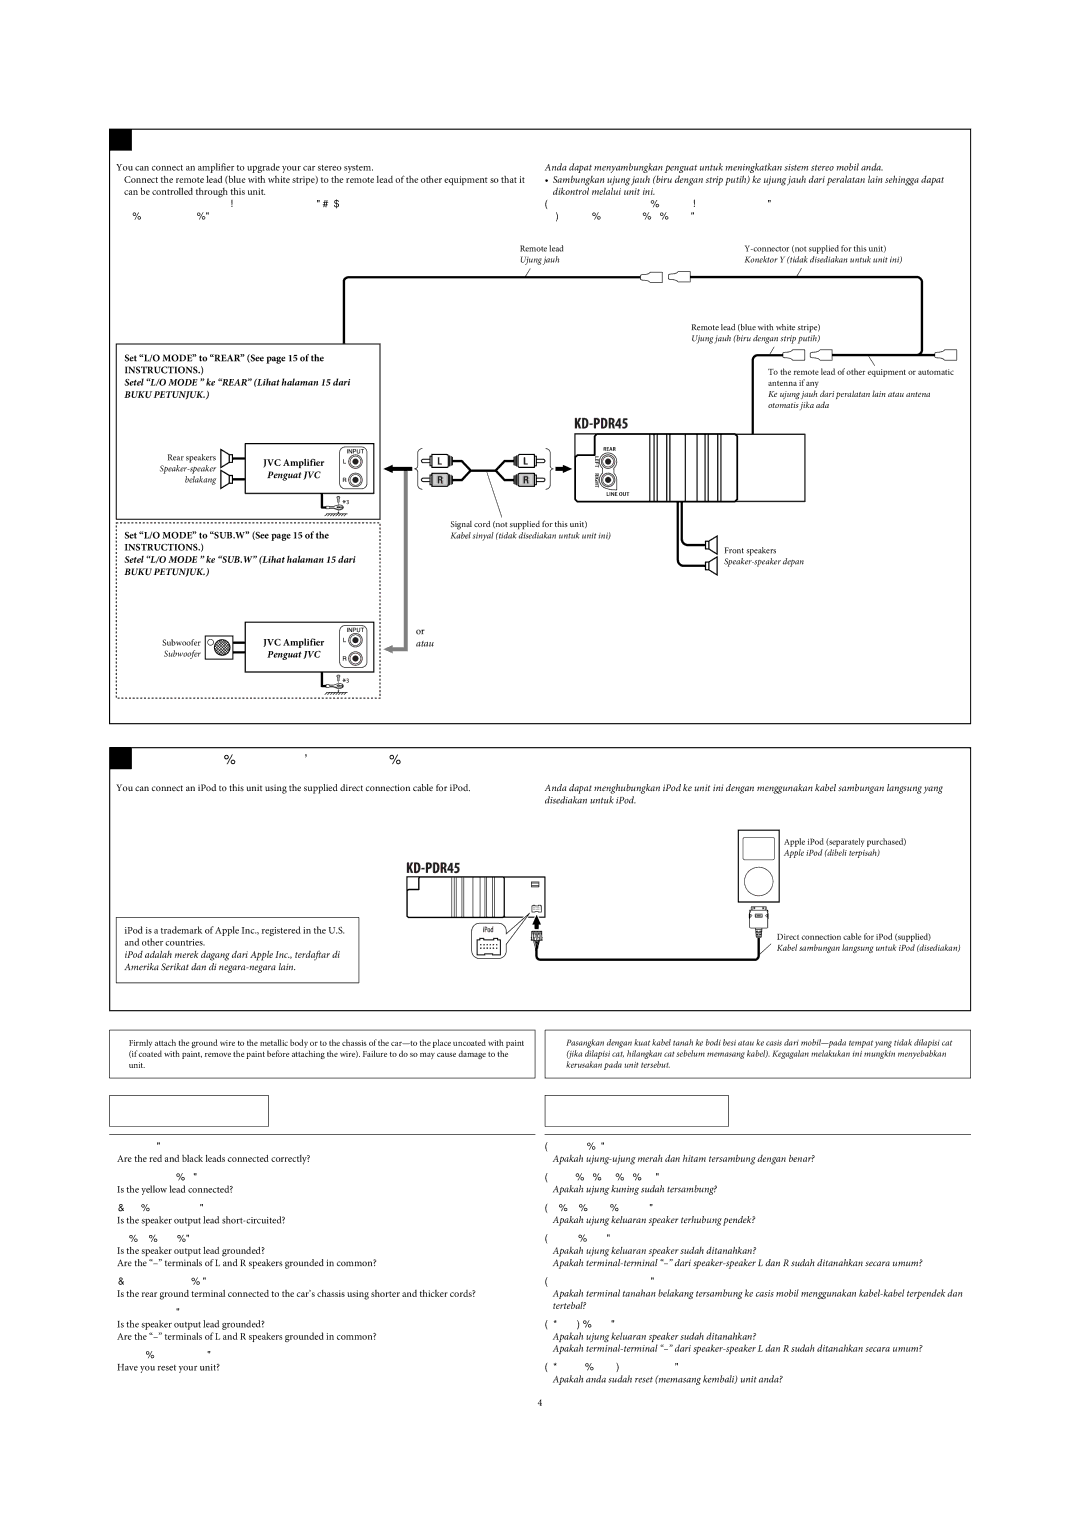
BConnecting the external amplifier or subwoofer / Penyambungan penguat eksternal atau subwoofer
You can connect an amplifier to upgrade your car stereo system.
•Connect the remote lead (blue with white stripe) to the remote lead of the other equipment so that it can be controlled through this unit.
•Disconnect the speakers from this unit, connect them to the amplifier. Leave the speaker leads of this unit unused.
Anda dapat menyambungkan penguat untuk meningkatkan sistem stereo mobil anda.
•Sambungkan ujung jauh (biru dengan strip putih) ke ujung jauh dari peralatan lain sehingga dapat dikontrol melalui unit ini.
•Putuskan sambungan
Remote lead | |
Ujung jauh | Konektor Y (tidak disediakan untuk unit ini) |
Remote lead (blue with white stripe)
Ujung jauh (biru dengan strip putih)
Set “L/O MODE” to “REAR” (See page 15 of the
INSTRUCTIONS.)
Setel “L/O MODE ” ke “REAR” (Lihat halaman 15 dari
BUKU PETUNJUK.)
Rear speakers |
| JVC Amplifier |
|
|
|
| |||
|
|
|
|
| |||||
|
|
|
|
| |||||
|
|
|
|
| |||||
|
|
|
|
| |||||
| Penguat JVC |
|
|
|
| ||||
belakang |
|
|
|
|
|
| |||
|
|
|
|
|
|
|
|
| |
|
|
|
|
|
|
|
|
|
|
|
|
|
|
|
|
|
|
|
|
|
|
|
|
|
|
|
|
|
|
Set “L/O MODE” to “SUB.W” (See page 15 of the
INSTRUCTIONS.)
Setel “L/O MODE ” ke “SUB.W” (Lihat halaman 15 dari
BUKU PETUNJUK.)
Subwoofer | JVC Amplifier |
Subwoofer | Penguat JVC |
To the remote lead of other equipment or automatic antenna if any
Ke ujung jauh dari peralatan lain atau antena otomatis jika ada
Signal cord (not supplied for this unit)
Kabel sinyal (tidak disediakan untuk unit ini)
Front speakers
or atau
CConnecting an Apple iPod / Menghubungkan Apple iPod
You can connect an iPod to this unit using the supplied direct connection cable for iPod.
iPod is a trademark of Apple Inc., registered in the U.S. and other countries.
iPod adalah merek dagang dari Apple Inc., terdaftar di Amerika Serikat dan di
Anda dapat menghubungkan iPod ke unit ini dengan menggunakan kabel sambungan langsung yang disediakan untuk iPod.
Apple iPod (separately purchased)
Apple iPod (dibeli terpisah)
Direct connection cable for iPod (supplied)
Kabel sambungan langsung untuk iPod (disediakan)
*3 Firmly attach the ground wire to the metallic body or to the chassis of the
*3 Pasangkan dengan kuat kabel tanah ke bodi besi atau ke casis dari
TROUBLESHOOTING
•The fuse blows.
*Are the red and black leads connected correctly?
•Power cannot be turned on. * Is the yellow lead connected?
•No sound from the speakers.
*Is the speaker output lead
•Sound is distorted.
*Is the speaker output lead grounded?
*Are the
•Noise interfere with sounds.
*Is the rear ground terminal connected to the car’s chassis using shorter and thicker cords?
•This unit becomes hot.
*Is the speaker output lead grounded?
*Are the
•This unit does not work at all. * Have you reset your unit?
PEMECAHAN MASALAH
• Sekring meledak.
*Apakah
• Power tidak dapat dihidupkan.
*Apakah ujung kuning sudah tersambung?
• Tidak ada suara dari speaker.
*Apakah ujung keluaran speaker terhubung pendek?
• Suara terdistorsi.
*Apakah ujung keluaran speaker sudah ditanahkan?
*Apakah
• Berisik yang mengganggu suara-suara.
*Apakah terminal tanahan belakang tersambung ke casis mobil menggunakan
• Unit menjadi panas.
*Apakah ujung keluaran speaker sudah ditanahkan?
*Apakah
• Unit ini tidak bekerja secara keseluruhan.
*Apakah anda sudah reset (memasang kembali) unit anda?
4
