|
|
| Open the | |
Open the cover. |
| cover. | ||
|
| |||
To J | To Video |
| To | |
output and |
| |||
terminal | Audio |
| output | |
(JLIP) | output |
| connector | |
| connectors |
|
| |
|
|
| ||
| Audio/Video |
| (provided) | |
|
|
| ||
| (A/V) cable |
|
| |
| (provided) |
|
| |
Editing cable | To AUDIO (L/ | |||
(optional, ø3.5 | ||||
MONO), VIDEO | ||||
and | ||||
|
| |||
|
| connectors | ||
If your VCR |
|
| ||
has the SCART |
|
| ||
connector, use |
| “Y/C”/“CVBS” | ||
the provided |
| |||
cable adapter. |
| video out select | ||
|
|
| switch | |
To Remote
PAUSE
VCR
To
TV |
![]()
![]()
![]()
![]()
![]()
![]()
![]()
![]()
![]()
![]()
![]()
![]()
![]()
![]()
![]()
![]()
![]()
![]()
![]()
![]()
![]()
![]()
![]()
![]()
![]()
![]()
![]()
![]()
![]()
![]()
![]()
![]()
![]()
![]()
![]()
![]()
![]()
![]()
![]()
![]()
![]()
![]()
![]()
![]()
![]()
![]()
![]()
![]()
![]()
![]()
![]()
![]()
![]()
![]()
![]()
![]()
![]()
![]()
![]() EN43
EN43![]()
![]()
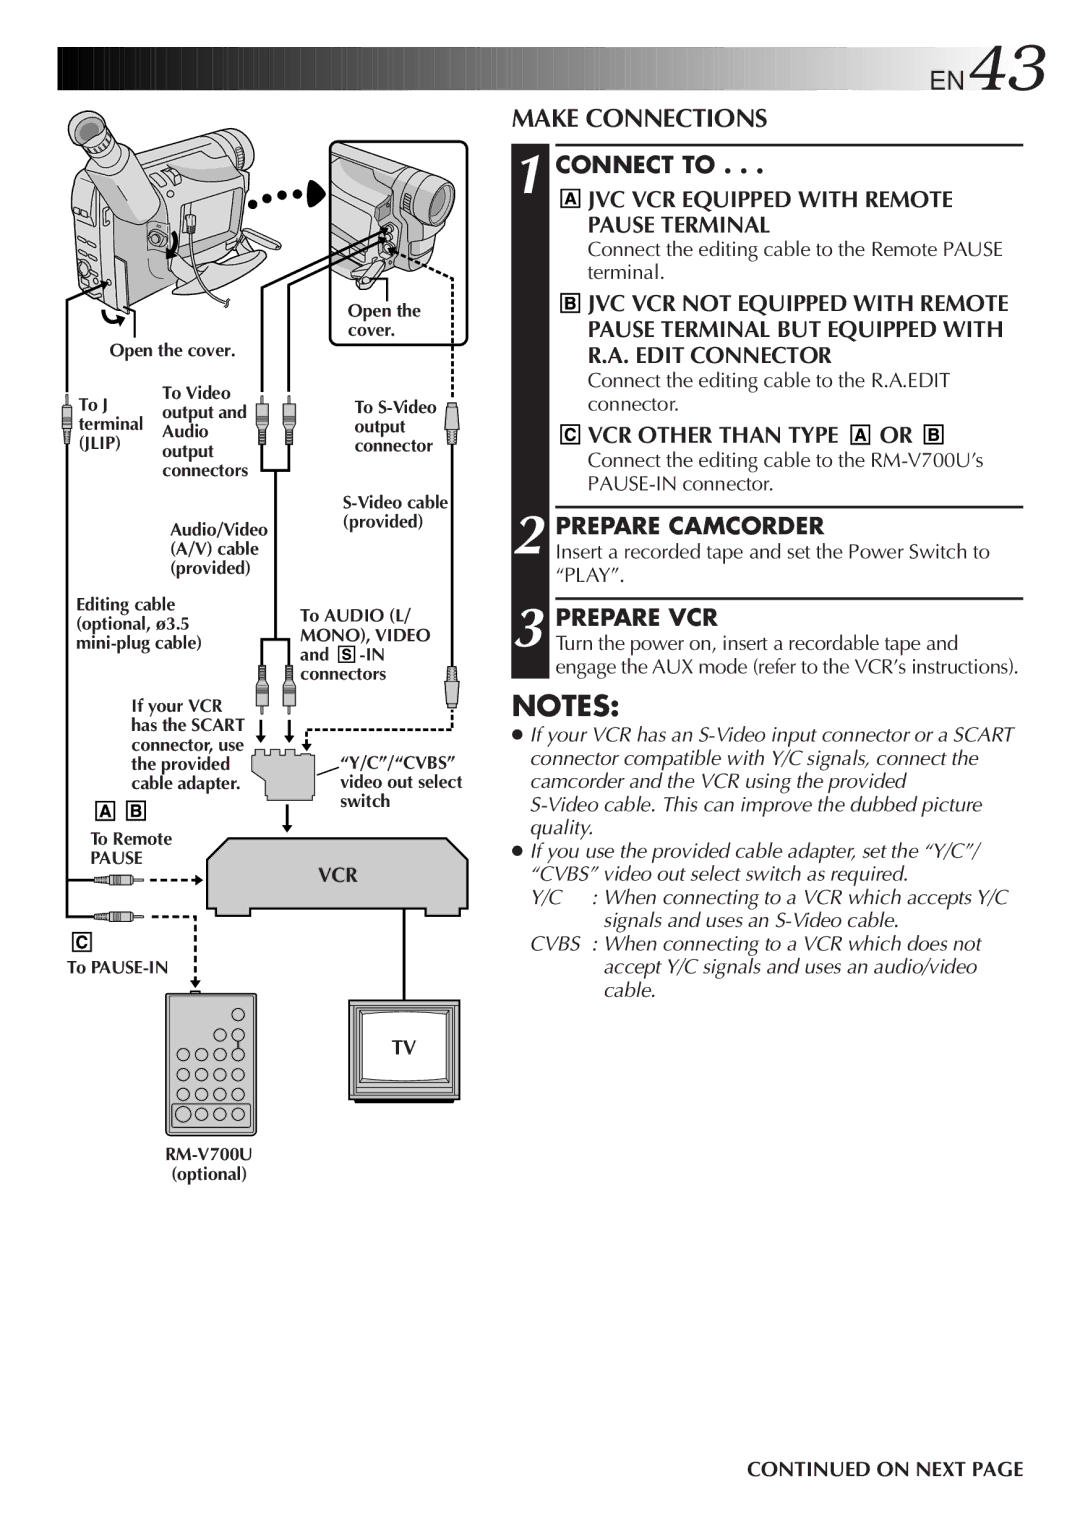
MAKE CONNECTIONS
1 CONNECT TO . . .
 JVC VCR EQUIPPED WITH REMOTE
PAUSE TERMINAL
Connect the editing cable to the Remote PAUSE terminal.
![]()
![]()
![]() JVC VCR NOT EQUIPPED WITH REMOTE PAUSE TERMINAL BUT EQUIPPED WITH R.A. EDIT CONNECTOR
JVC VCR NOT EQUIPPED WITH REMOTE PAUSE TERMINAL BUT EQUIPPED WITH R.A. EDIT CONNECTOR
Connect the editing cable to the R.A.EDIT connector.


 VCR OTHER THAN TYPE
  OR
OR 


Connect the editing cable to the
2 PREPARE CAMCORDER
Insert a recorded tape and set the Power Switch to “PLAY”.
3 PREPARE VCR
Turn the power on, insert a recordable tape and engage the AUX mode (refer to the VCR’s instructions).
NOTES:
●If your VCR has an
S-Video cable. This can improve the dubbed picture quality.
●If you use the provided cable adapter, set the “Y/C”/ “CVBS” video out select switch as required.
Y/C | : When connecting to a VCR which accepts Y/C |
| signals and uses an |
CVBS | : When connecting to a VCR which does not |
| accept Y/C signals and uses an audio/video |
| cable. |
CONTINUED ON NEXT PAGE