EX215/GZ-EX250
LYT2431-037A
Table of Contents
Creating a Disc Using a Connected Blu-ray Recorder
Dubbing Files to a Disc by Connecting to a DVD Recorder
Dubbing Files to a VHS Tape by Connecting to a VCR
Backing Up Files Without Using Provided Software
Maintenance Specifications
Charging
Recording
Playback
Shooting Tips
Holiday Season/Christmas
Wedding
Travel
Battery Charger
Using Pan at the Places of Interest
Tripod
Recording the Excitement Before Departure
Amusement Park
Taking Videos or Still Images According to the Attraction
Capturing the Best Moment in a Video as a Still Image
Scenarios suitable for taking still images photos
Advanced Operation with Backlight Compensation
Without backlight compensation With backlight compensation
Wi-Fi Capabilities
Name of Function Capability
Video TRANSFER・STILL Image
Transfer
Precautions on Using Wi-Fi
Operating Environment
Necessary Settings
Wi-Fi Protected Setup WPS
Image Monitoring via Direct Connection
Exporting/Bringing the Unit Overseas
Search and Connect
Tap WPS Operation on this camera
Operation Method Smartphone Android / iPhone Memo
Computer Windows
Recording the Location Information
Smartphone
Operation Method
Tap Outside MONITORING. Operation on this camera
Image Monitoring via the Internet Outside Monitoring
Tap Camera Network INFO.. Operation on this camera
URLLANhttp URLWANhttp
Enter the confirmed URL WAN directly
Selecting the Recipient’s E-mail Address
Tap DETECT/MAIL. Operation on this camera
Tap DETECT/MAIL SETTING. Operation on this camera
Tap Recipients EMAIL. Operation on this camera
Record and Send Videos via E-mail Video Mail Attn
Tap Video Mail ATTN.. Operation on this camera
Changing the Settings
Menu Settings
Setting Details
Setting the Password OUT Monitoring SET
Setting the UPnP of this Camera OUT Monitoring SET
Setting Dynamic DNS Ddns on this Camera OUT
Tap Ddns SETTING. Operation on this camera
Obtaining a Dynamic DNS Ddns Account
Monitoring SET
Setting the Sender’s E-mail Address
Tap the desired Authenticate Method
Enter the password and tap SET
Enter the Smtp server and tap SET
Change the Smtp port number if necessary and tap SET
Authenticate
Password
Senders Email
Smtp Server
Enter the recipient’s e-mail address
Registering the Recipient’s E-mail Address
Tap ADD Operation on this camera
Tap Detection METHOD. Operation on this camera
Tap Detection INTERVAL. Operation on this camera
Setting Self Recording on this Camera DETECT/MAIL Setting
Registering the Access Points to Connect Access Points
Wi-Fi Protected Setup WPS Registration
WPS PIN
Tap EZ Registration WPS. Operation on this camera
Tap Access POINTS. Operation on this camera
Search and Register
Tap MANUAL. Operation on this camera
Manual Registration
Tap SEARCH. Operation on this camera
WPS PIN Registration
Editing LAN Settings of Access Points Wireless LAN Router
Setting the Password Direct Monitoring
Tap Wi-Fi Direct SETTING. Operation on this camera
Setting the Enforced Group Owner Direct Monitoring
Checking the MAC Address of this Camera
Tap Enforced Group OWNER. Operation on this camera
Tap MAC ADDRESS. Operation on this camera
Protecting the Network Settings with a Password
Initializing the Network Settings
Tap Lock SETTINGS. Operation on this camera
Tap INITIALIZATION. Operation on this camera
Using Smartphone Applications
To exit the application, press the Home button
Transferring Videos
Tap on the thumbnail to transfer
Transferring Still Images
Using Wi-Fi
Changing the Settings
IPhone
Background Color Length of Video
Using the Wi-Fi Function from a Web Browser
Indications on the Screen Recording Screen
DETECT/MAIL Setting Screen
To download a still image, click on the thumbnail
To exit, tap Quit
Making Camera Settings from a Web Browser
Tap SET from WEB BROWSER. Operation on this camera
Click Access Points Click on a registered access point
To add Access Points manually
To change or delete an Access Points registration
Wi-Fi Direct Setting To change Wi-Fi Direct Setting
Mail Setting
To change Senders Email settings
OUT Monitoring SET
Enter the necessary information, and click REG Click OK
To add a Recipients Email
To change or delete a Recipients Email
To change Video Mail Settings settings
To change DETECT/MAIL Setting
Troubleshooting
Access Point Wireless LAN Router
Direct Monitoring
Trouble Action
Outside Monitoring Connection in the House
Outside Monitoring Connection from the Internet
Confirming global IP address a p
Change the port number of the terminal
Can be used by the camera
Wi-Fi Specifications
Direct Monitoring / Outside Monitoring
Recipients Email
When Using Web Browser
Video Mail
CD-ROM
Verifying the Accessories
Illustration Description
Page
Approximate Battery Charging Time Using AC Adapter
Charging the Battery Pack
Detaching the Battery Pack
Grip Adjustment
Using as a Hand Strap
Adjust the length of the belt and loop it around your wrist
Inserting an SD Card
When your computer cannot recognize the Sdxc card
Removing the Card
Types of Usable SD Card
SD Card
Using the Touch Screen
Names of Buttons and Functions on the LCD Monitor
Recording Screen Video/Still Image
Playback Screen Video
Playback Screen Still Image
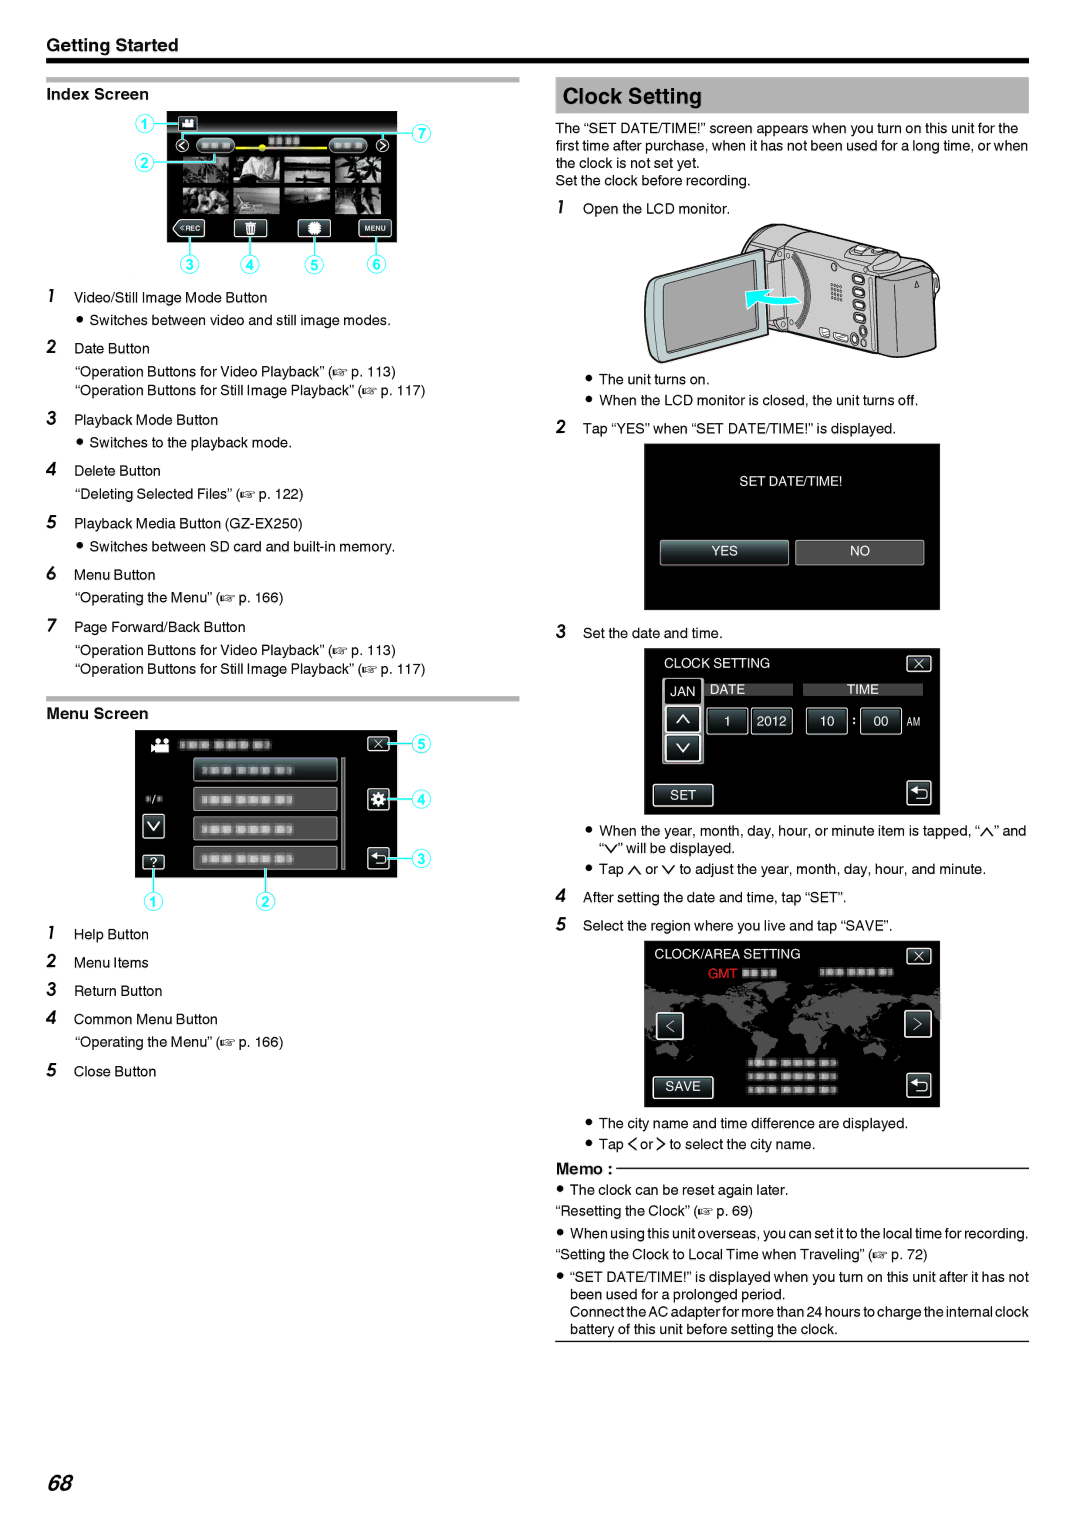
Clock Setting
Index Screen
Menu Screen
Set the date and time
Resetting the Clock
Set the clock with Clock Adjust from the menu Tap Menu
Changing the Display Language
Holding this Unit
Tripod Mounting
Language on the display can be changed Tap Menu
Reducing Camera Shake a p
Using this Unit Overseas
Charging the Battery Pack Overseas
Setting the Clock to Local Time when Traveling
Setting Daylight Saving Time
Select the area you are traveling to and tap Save
Tap on
Optional Accessories
Approximate Recording Time Using Battery
Battery Actual Recording Time Continuous Recording Pack
Product Name Description
Display Icon
Taking Videos in Auto Mode
Indications During Video Recording
Scenes of Intelligent Auto
Operation Buttons for Video Recording
Using the Silent Mode
Useful Settings for Recording
Zooming
Capturing Still Images During Video Recording
Taking Still Images in Auto Mode
Indications During Still Image Recording
Set the focus on the subject
Display Icon Description
Recording Mode Switches the recording mode
Operation Buttons for Still Image Recording
Halfway
Displays the various menus of still image
Zoom Button T/W
Manual mode
Manual settings are displayed only in the manual mode
Manual Recording
Tap the item to set manually
Name Description
Manual Recording Menu
Shooting According to Scene Subject
Setting Effect
Tap Focus
Adjusting Focus Manually
Adjust the focus
Adjusting Brightness
Adjust the brightness value
Tap Brightness Adjust
Compensation range during video recording -2.0 to +2.0
Setting White Balance
Using MWB
Tap Backlight Comp
Setting Backlight Compensation
After setting, the backlight icon l appears
Taking Close-up Shots
OFF
Type of Effect Description of Effect
Recording with Effects
Recording with Animation Effects
During Setting After Setting
Animation effect appears when
Smiles are detected
Screen is touched
Tap Stamp
Records videos with various decorative stamps
Tap Decorate Face Effect
Recording with Personal Handwriting
Tap Handwriting Effect
Recording
Capturing Subjects Clearly Touch Priority AE/AF
Capturing Smiles Automatically Smile Shot
Tap Smile Shot
Recording
Capturing Pets Automatically PET Shot
Tap PET Shot
Tap Face SUB-WINDOW
Tap on the frame of the face to magnify
Take note of the following when Face SUB-WINDOW is set
Registering Human Face Personal Authentication Information
Tap Face Registration
100
Tap OK to complete the registration
Tap SMILE%/NAME Display
Setting SMILE%/NAME Display
101
Displays only the frames when faces are detected
102
Are detected
Tap the person to edit
Canceling Deleting Registered Face Information
Tap the person to cancel registration
103
Tap YES
104
Reducing Camera Shake
Slow-motion High-speed Recording
Tap TIME-LAPSE Recording
Recording at Intervals TIME-LAPSE Recording
105
Time-Lapse Setting
106
Indications During Time-Lapse Recording
Display Description
Tap Auto REC
Recording Automatically by Sensing Movements Auto REC
107
Taking Group Shots Self-timer
Using the 2-/10-second Self-timer
Tap SELF-TIMER
108
Using the Face Detection Self-timer
109
Tap DATE/TIME Recording
Recording Videos with Date and Time
110
Checking the Remaining Recording Time
111
Approximate Number of Still Images Unit Number of Shots
112
Approximate Video Recording Time
REC
Playing Back Videos
113
Adjusting the Volume of Videos
114
During Video Playback
Checking the Recording Date and Other Information
Checking the Content of Videos Quickly Digest Playback
115
Tap Digest Playback
Tap to select a date for Digest Playback
Playing Back Still Images
116
Playing a Video with Defective Management Information
Tap Playback Other File
117
Searching for a Specific Video/Still Image by Date
118
Slideshow Playback
Tap a recording date, then tap Next
Connecting to and Viewing on TV
Connecting via the Hdmi Mini Connector
119
Unnatural Displays on TV
Connecting via the AV Connector
120
Operating in Conjunction with TV via Hdmi
Preparations
Playing Back Playlists
Playing Back a DVD or Blu-ray Disc Created on this Unit
121
Digest Playback on a Blu-ray or DVD Player
Deleting Unwanted Files
122
Deleting the Currently Displayed File
Deleting Selected Files
Tap PROTECT/CANCEL
Protecting Files
123
Grouped Files
Tap SET to complete the setting
124
Protecting/Releasing Protection of Selected Files
Protects or releases protection of the selected files
125
Capturing a Still Image in the Video During Playback
Combining Videos Recorded by Seamless Recording GZ-EX250
126
How to Enable Seamless Video Recording Again
Capturing a Required Part in the Video Trimming
Capturing Videos for Uploading to YouTube
127
128
Uploading Videos to YouTube
Creating Playlists with Selected Files
Creating Playlists from the Recorded Videos
129
130
Creating Playlists by Date
Tap L on each screen to exit the menu
Tap Create by Date
Tap on the playlist to edit, and tap Next
131
Editing Playlists
132
Deleting Playlists
Tap on the video upper row to arrange in the playlist
Tap Delete
Creating Discs with a DVD Writer
133
Preparing a DVD Writer CU-VD50
134
Preparing a DVD Writer CU-VD3
135
Creating a Disc
Copying All Files
ALL Scenes video/ALL Images still image
Tap Auto or by DATE. a mode only
136
Copying Files by Date
Tap Create by Date video or Save by Date still image
137
138
Copying Selected Playlists
Tap Create by Playlist
Tap on the playlist to copy to disc
139
Copying Selected Files
Tap Playback in the BACK-UP menu
140
Playing Back with a DVD Writer
Creating Discs with an External Blu-ray Drive
141
Compatible BD Writers External Blu-ray Drives
Preparing an External Blu-ray Drive Memo
142
143
144
145
146
147
148
Playing Back with an External Blu-ray Drive
Creating a Disc Using a Connected Blu-ray Recorder
Dubbing Files to a Disc by Connecting to a DVD Recorder
Tap on the media to configure. GZ-EX250
149
150
Dubbing Files to a VHS Tape by Connecting to a VCR
Copying Files with a USB External Hard Disk Drive
Consult your nearest service center
Backup starts when YES is tapped
151
Preparing a USB External Hard Disk Drive Memo
Tap on the folder to play back
152
Playing Back Files in the USB External Hard Disk Drive
Formatting the USB External Hard Disk Drive
153
Deleting Folders in the USB External Hard Disk Drive
SET is deactivated when no file is selected Tap YES
154
Tap USB HDDFBUILT-IN MEM or USB HDDFSD. GZ-EX250
Tap on the files to import
Copying Files to an SD Card GZ-EX250
155
Copying starts After copying, tap OK
Tap Copy
Moving Files to an SD Card GZ-EX250
156
Moving of files starts After moving, tap OK
Tap Move
Copying to Windows PC
157
Installing the Provided Software
158
159
Backing Up All Files
Organizing Files
Disconnecting this Unit from Computer
160
161
Recording Videos to Discs
162
Tap Playback on PC
Backing Up Files Without Using Provided Software
163
164
List of Files and Folders
IMovie and iPhoto
Copying to Mac Computer
165
Shortcut Menu During Video Recording Mode
Shortcut Menu During Still Image Recording Mode
Operating the Menu
166
Operating the Common Menu
167
Operating the Main Menu
168
Brightness Adjust
Recording Menu Video
169
Zoom MIC
170
Seamless Recording
171
172
Gain UP
Wind CUT
Auto Slow
173
Zoom
174
Video Quality
Zoom MIC
175
Seamless Recording GZ-EX250
Recording Menu Still Image
176
SELF-TIMER
Shutter Mode
177
Image Size
Lights up automatically when the surrounding is dark
178
SELF-TIMER
179
Shutter Mode
180
Record ONE
Shot Continuous
Ratio may be cut off when printed
181
Image Size
1920X10802M Takes still images with aspect ratio
Playback Menu Video
182
183
Search Date
Seamless REC Ctrl
K2 Technology
184
185
K2 Technology
Deactivates K2 Technology
Activates K2 Technology
Playback Menu Still Image
186
Slide Show Effects
Sets the transition effects in slideshow playback
187
Slide Show Effects
Common Menu
188
189
Clock Adjust
190
Date Display Style
Language
191
REC Media for Video GZ-EX250
REC Media for Image GZ-EX250
BUILT-IN
Operation Sound
Silent Mode
192
Quick Restart
Auto Power OFF
193
Demo Mode
Displaying Demo Mode
Touch Screen Adjust
194
Setting ends and returns to the menu screen
195
Display on TV
Does not display icons and date/time on TV
Hdmi Output
196
Video Output
Factory Preset
Update
197
Hdmi Control
Format SD Card
198
Format BUILT-IN MEM. GZ-EX250
199
Erase ALL Data GZ-EX250
Open Source Licenses
Mobile User Guide
200
Front
Rear
201
Bottom
Interior
LCD Monitor
202
Common Recording Indications
Video Recording
203
TIME-LAPSE RECORDING1SEC
Still Image Recording
204
When the unit is not working properly
Turning Off the Power
Still Image Playback
205
Battery Pack
206
Card
207
Editing/Copying
208
209
Computer
Screen/Image
210
Other Problems
Error Message?
211
Camcorder
Lens/LCD Monitor
212
Wipe this unit with a dry, soft cloth to remove any dirt
Camera
213
214
C2A 0212MYH-SW-VM