58![]()
![]()
![]() EN
EN![]()
![]()
![]()
![]()
![]()
![]()
![]()
![]()
![]()
![]()
![]()
![]()
![]()
![]()
![]()
![]()
![]()
![]()
![]()
![]()
![]()
![]()
![]()
![]()
![]()
![]()
![]()
![]()
![]()
![]()
![]()
![]()
![]()
![]()
![]()
![]()
![]()
![]()
![]()
![]()


 EDITING
 (cont.)


Insert Editing
Recorder | Your VCR |
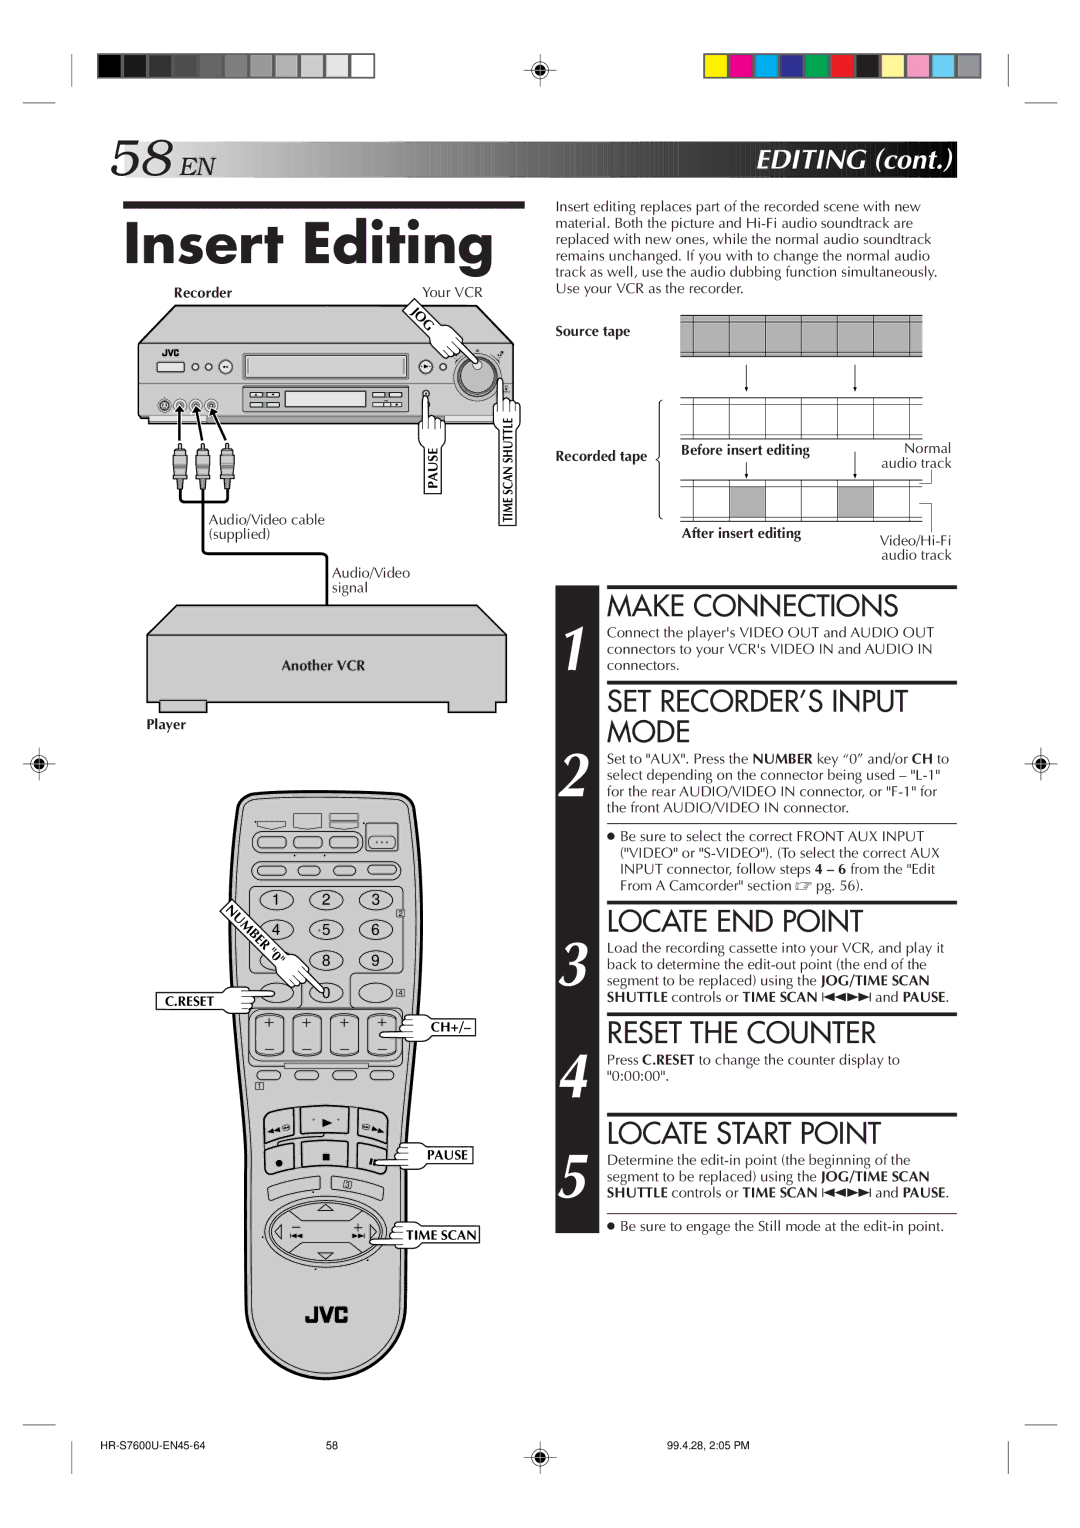
Insert editing replaces part of the recorded scene with new material. Both the picture and
OG
− | + |
PAUSE | SCAN SHUTTLE |
Audio/Video cable | TIME |
| |
(supplied) |
|
Audio/Video signal
Another VCR
Player
1 | 2 | 3 | |
UMBER |
| 2 | |
5 | 6 | ||
4 | |||
"0" | 8 | 9 | |
7 |
Source tape
Recorded tape | Before insert editing |
| Normal | ||||||||||
|
|
|
|
|
|
|
| audio track | |||||
|
|
|
|
|
|
|
|
| |||||
|
|
|
|
|
|
|
|
|
|
|
|
|
|
|
|
|
|
|
|
|
|
|
|
|
|
|
|
|
|
|
|
|
|
|
|
|
|
|
|
|
|
|
|
|
|
|
|
|
|
|
|
|
|
|
|
| After insert editing |
|
|
|
|
|
| ||||||
|
| ||||||||||||
|
|
|
|
|
|
|
|
| |||||
|
|
|
|
|
|
|
|
| audio track | ||||
MAKE CONNECTIONS |
Connect the player's VIDEO OUT and AUDIO OUT |
connectors to your VCR's VIDEO IN and AUDIO IN |
1 connectors. |
SET RECORDER’S INPUT |
MODE |
Set to "AUX". Press the NUMBER key “0” and/or CH to |
select depending on the connector being used – |
2 for the rear AUDIO/VIDEO IN connector, or |
the front AUDIO/VIDEO IN connector. |
● Be sure to select the correct FRONT AUX INPUT |
("VIDEO" or |
INPUT connector, follow steps 4 – 6 from the "Edit |
From A Camcorder" section ☞ pg. 56). |
LOCATE END POINT |
Load the recording cassette into your VCR, and play it |
back to determine the |
3 segment to be replaced) using the JOG/TIME SCAN |
C.RESET
0
4
CH+/–
| SHUTTLE controls or TIME SCAN 4¢ and PAUSE. |
4 | RESET THE COUNTER |
Press C.RESET to change the counter display to | |
"0:00:00". |
1
PAUSE
3
![]() TIME SCAN
TIME SCAN
5 | LOCATE START POINT |
Determine the | |
segment to be replaced) using the JOG/TIME SCAN | |
SHUTTLE controls or TIME SCAN 4¢ and PAUSE. | |
| |
| ● Be sure to engage the Still mode at the |
58 | 99.4.28, 2:05 PM |
