72

 EN
EN


 INDEX
INDEX (cont.)


REMOTE CONTROL
1 |
|
|
|
|
|
|
| & |
2 |
| CABLE/ MBR SET |
|
|
| * | ||
TV | DBS | A/B | POWER |
| ||||
3 |
|
|
|
|
|
|
| ( |
4 |
| TV/VCR ENTER/OSD DISPLAY |
| ) | ||||
|
|
|
| |||||
5 | 1 | 2 |
| 3 |
|
|
| q |
4 | 5 |
| 6 |
|
| 2 | w | |
6 |
|
|
|
| ||||
DBS | WEEKLY |
| e | |||||
7 | 7 | 8 |
| 9 |
|
|
| r |
C. RESET | AUX |
|
|
|
|
| ||
0 |
|
|
|
|
| |||
8 | CANCEL |
| TIMER | 4 | t | |||
|
|
| ||||||
9 | START | STOP | DATE | CH |
| y | ||
0 |
| EXPRESS PROGRAMMING |
|
|
| u | ||
1 PROG | PROG | SP/EP | SKIP SEARCH | i | ||||
! |
| CHECK |
|
|
|
|
| o |
REW | PLAY |
| FF |
|
|
| ||
|
|
|
|
| ||||
@ |
|
|
|
|
|
| ||
| STOP |
| PAUSE |
|
|
| p | |
# | REC |
|
|
|
| |||
|
|
|
|
|
| |||
|
|
|
|
|
|
| Q | |
$ | MENU TV CH + 3 | OK |
|
|
| |||
% |
| TIME |
|
|
|
| W | |
|
|
|
|
|
| |||
^ | V | SCAN | T |
|
|
|
| |
| T |
|
|
|
| + |
|
|
| V |
|
|
| L |
| E | |
| O |
|
| O |
|
| ||
| L |
|
|
|
|
| ||
| – |
|
| V |
|
|
| |
|
|
| V |
|
|
| ||
|
| TV CH | – |
|
|
|
| |
MULTI BRAND
REMOTE CONTROL UNIT
The
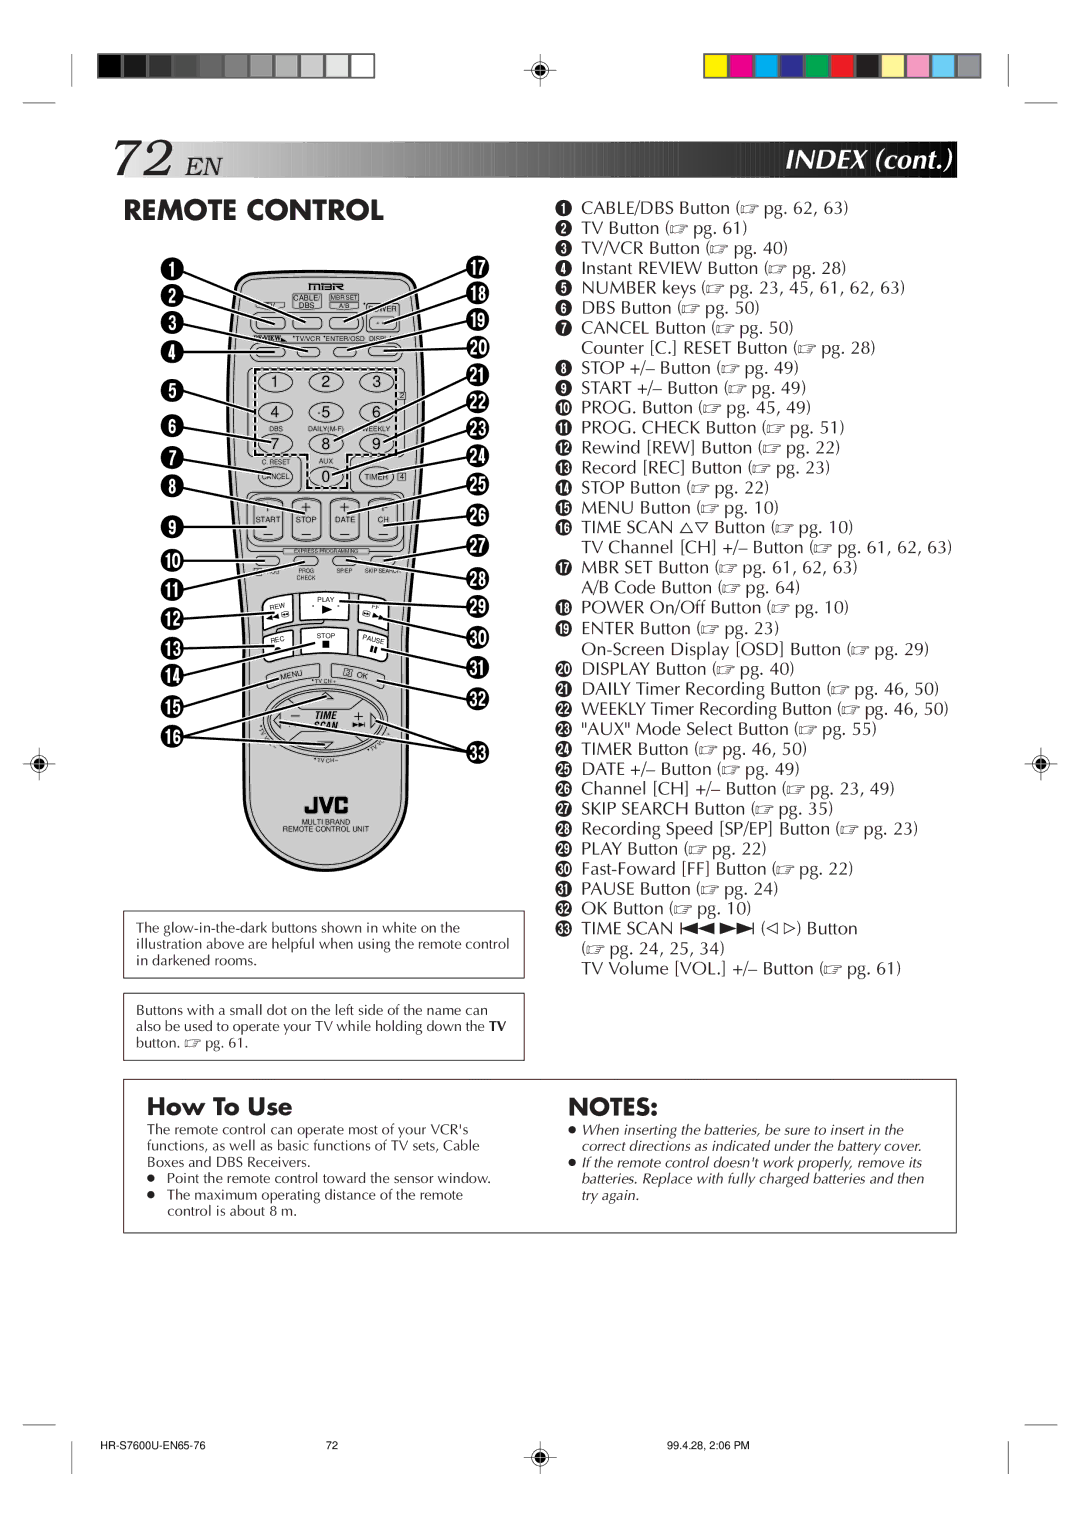
1CABLE/DBS Button (☞ pg. 62, 63)
2 TV Button (☞ pg. 61)
3 TV/VCR Button (☞ pg. 40)
4 Instant REVIEW Button (☞ pg. 28)
5 NUMBER keys (☞ pg. 23, 45, 61, 62, 63)
6 DBS Button (☞ pg. 50)
7 CANCEL Button (☞ pg. 50)
Counter [C.] RESET Button (☞ pg. 28)
8 STOP +/– Button (☞ pg. 49)
9 START +/– Button (☞ pg. 49)
0 PROG. Button (☞ pg. 45, 49)
! PROG. CHECK Button (☞ pg. 51) @ Rewind [REW] Button (☞ pg. 22)
# Record [REC] Button (☞ pg. 23) $ STOP Button (☞ pg. 22)
% MENU Button (☞ pg. 10)
^ TIME SCAN %Þ Button (☞ pg. 10)
TV Channel [CH] +/– Button (☞ pg. 61, 62, 63) & MBR SET Button (☞ pg. 61, 62, 63)
A/B Code Button (☞ pg. 64)
* POWER On/Off Button (☞ pg. 10) ( ENTER Button (☞ pg. 23)
q DAILY Timer Recording Button (☞ pg. 46, 50) w WEEKLY Timer Recording Button (☞ pg. 46, 50) e "AUX" Mode Select Button (☞ pg. 55)
r TIMER Button (☞ pg. 46, 50) t DATE +/– Button (☞ pg. 49)
y Channel [CH] +/– Button (☞ pg. 23, 49) u SKIP SEARCH Button (☞ pg. 35)
i Recording Speed [SP/EP] Button (☞ pg. 23) o PLAY Button (☞ pg. 22)
p
W OK Button (☞ pg. 10)
E TIME SCAN ª£(@#) Button (☞ pg. 24, 25, 34)
TV Volume [VOL.] +/– Button (☞ pg. 61)
Buttons with a small dot on the left side of the name can also be used to operate your TV while holding down the TV button. ☞ pg. 61.
How To Use
The remote control can operate most of your VCR's functions, as well as basic functions of TV sets, Cable Boxes and DBS Receivers.
●Point the remote control toward the sensor window.
●The maximum operating distance of the remote control is about 8 m.
NOTES:
●When inserting the batteries, be sure to insert in the correct directions as indicated under the battery cover.
●If the remote control doesn't work properly, remove its batteries. Replace with fully charged batteries and then try again.
72 | 99.4.28, 2:06 PM |
