56![]()
![]()
![]() EN
EN![]()
![]()
![]()
![]()
![]()
![]()
![]()
![]()
![]()
![]()
![]()
![]()
![]()
![]()
![]()
![]()
![]()
![]()
![]()
![]()
![]()
![]()
![]()
![]()
![]()
![]()
![]()
![]()
![]()
![]()
![]()
![]()
![]()
![]()
![]()
![]()
![]()
![]()
![]()
![]()
![]()
![]()
![]()
![]()
![]()
![]()
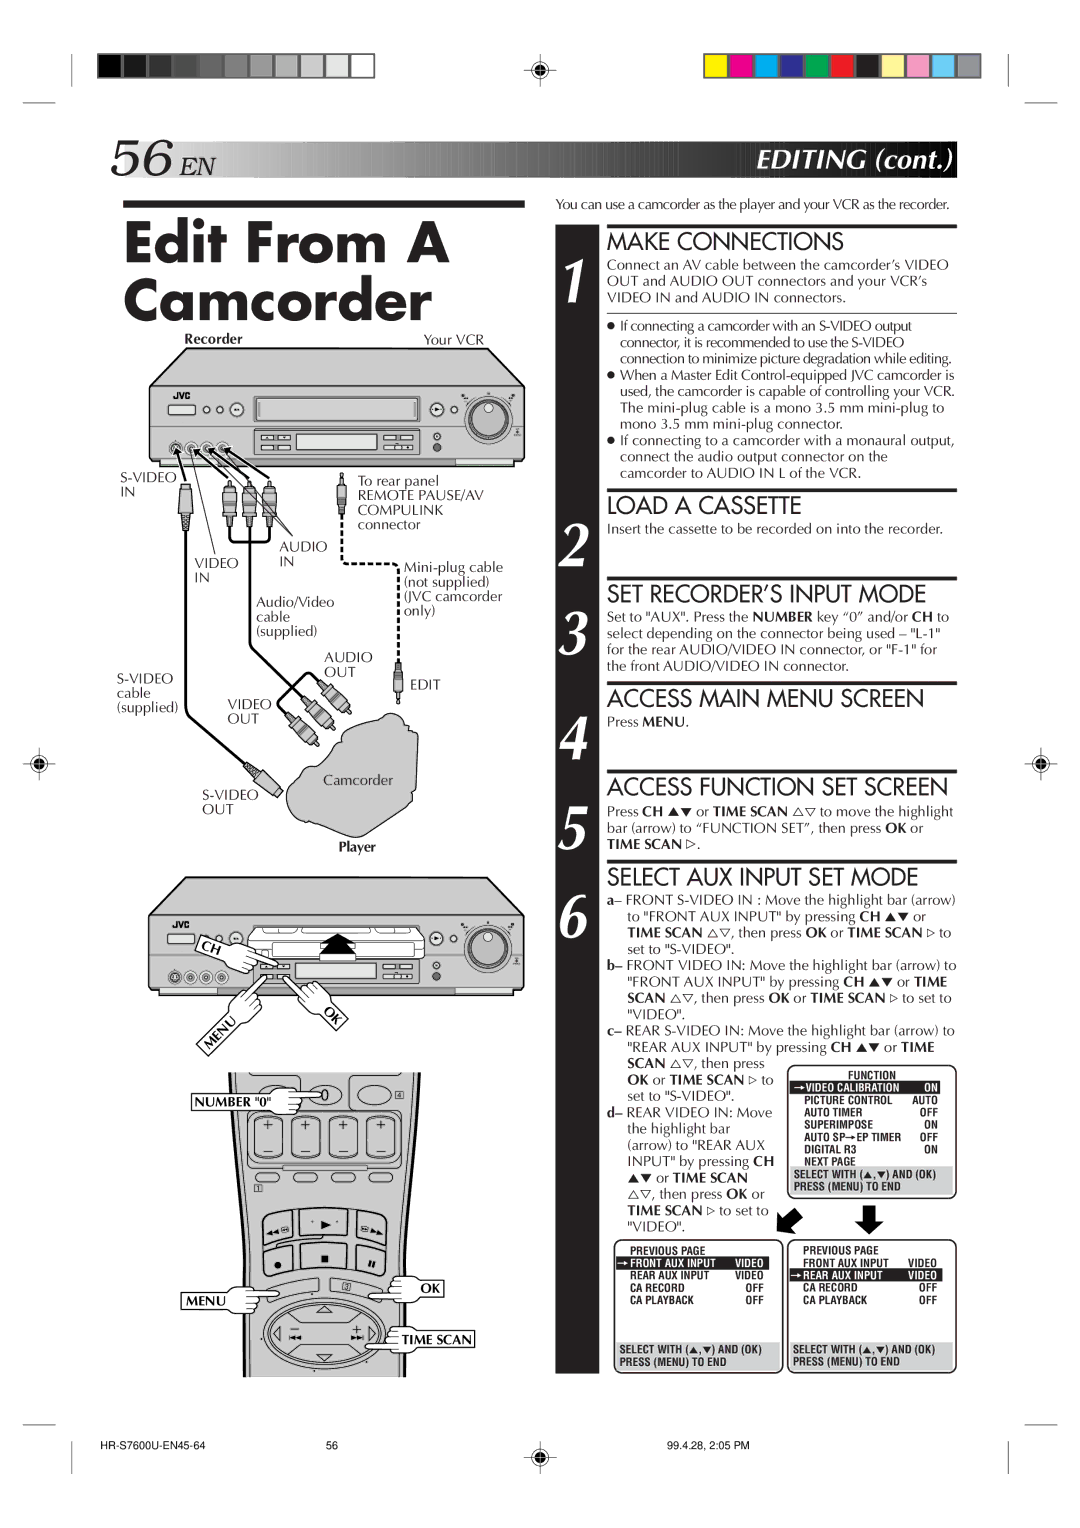
Edit From A
Camcorder
| Recorder |
| Your VCR |
|
|
|
| − | + |
|
| To rear panel |
| |
IN |
|
| REMOTE PAUSE/AV |
|
|
|
| COMPULINK |
|
|
|
| connector |
|
|
| AUDIO |
|
|
| VIDEO | IN |
| |
| IN |
| (not supplied) |
|
|
| Audio/Video | (JVC camcorder |
|
|
| only) |
| |
|
| cable |
| |
|
| (supplied) |
|
|
|
| AUDIO |
| |
| OUT | EDIT |
| |
|
|
| ||
cable |
|
|
| |
VIDEO |
|
| ||
(supplied) |
|
| ||
| OUT |
|
| |
Camcorder
OUT
Player
− | + |
CH
MENU | OK |
|
|
| |
NUMBER "0" | 0 | 4 |
|
|
1
3 | OK |
MENU
![]() TIME SCAN
TIME SCAN


 EDITING
 (cont.)


You can use a camcorder as the player and your VCR as the recorder.
1 |
| MAKE CONNECTIONS |
|
|
|
| ||||||
| Connect an AV cable between the camcorder’s VIDEO | |||||||||||
| OUT and AUDIO OUT connectors and your VCR’s | |||||||||||
| VIDEO IN and AUDIO IN connectors. |
|
|
|
| |||||||
|
| ● If connecting a camcorder with an | ||||||||||
|
|
| connector, it is recommended to use the |
|
|
|
| |||||
|
|
| connection to minimize picture degradation while editing. | |||||||||
|
| ● When a Master Edit | ||||||||||
|
|
| used, the camcorder is capable of controlling your VCR. | |||||||||
|
|
| The | |||||||||
|
|
| mono 3.5 mm |
|
|
|
| |||||
|
| ● If connecting to a camcorder with a monaural output, | ||||||||||
|
|
| connect the audio output connector on the |
|
|
|
| |||||
|
|
| camcorder to AUDIO IN L of the VCR. |
|
|
|
| |||||
|
|
|
|
|
|
|
|
|
|
| ||
2 |
| LOAD A CASSETTE |
|
|
|
| ||||||
| Insert the cassette to be recorded on into the recorder. | |||||||||||
3 |
| SET RECORDER’S INPUT MODE | ||||||||||
| Set to "AUX". Press the NUMBER key “0” and/or CH to | |||||||||||
| select depending on the connector being used – | |||||||||||
| for the rear AUDIO/VIDEO IN connector, or | |||||||||||
|
| the front AUDIO/VIDEO IN connector. |
|
|
|
| ||||||
|
|
|
|
|
|
|
|
|
| |||
4 |
| ACCESS MAIN MENU SCREEN | ||||||||||
| Press MENU. |
|
|
|
|
|
|
|
|
| ||
5 |
| ACCESS FUNCTION SET SCREEN | ||||||||||
| Press CH 5° or TIME SCAN %Þ to move the highlight | |||||||||||
| bar (arrow) to “FUNCTION SET”, then press OK or | |||||||||||
| TIME SCAN #. |
|
|
|
|
|
|
|
|
| ||
6 |
| SELECT AUX INPUT SET MODE | ||||||||||
| a– FRONT | |||||||||||
|
| to "FRONT AUX INPUT" by pressing CH 5° or | ||||||||||
|
| TIME SCAN %Þ, then press OK or TIME SCAN # to | ||||||||||
|
|
| set to |
|
|
|
|
|
|
|
|
|
|
| b– FRONT VIDEO IN: Move the highlight bar (arrow) to | ||||||||||
|
|
| "FRONT AUX INPUT" by pressing CH 5° or TIME | |||||||||
|
|
| SCAN %Þ, then press OK or TIME SCAN # to set to | |||||||||
|
|
| "VIDEO". |
|
|
|
|
|
|
|
|
|
|
| c– REAR | ||||||||||
|
|
| "REAR AUX INPUT" by pressing CH 5° or TIME | |||||||||
|
|
| SCAN %Þ, then press | FUNCTION |
|
|
|
| ||||
|
|
| OK or TIME SCAN # to |
|
|
|
|
| ||||
|
|
|
| =VIDEO CALIBRATION | ON |
|
| |||||
|
|
| set to |
|
|
|
| PICTURE CONTROL | AUTO |
|
| |
|
| d– REAR VIDEO IN: Move | AUTO TIMER | OFF | ||||||||
|
|
| the highlight bar |
|
|
|
| SUPERIMPOSE | ON | |||
|
|
| (arrow) to "REAR AUX | AUTO SP=EP TIMER | OFF | |||||||
|
|
| DIGITAL R3 | ON | ||||||||
|
|
| INPUT" by pressing CH | NEXT PAGE |
|
|
|
| ||||
|
|
| 5° or TIME SCAN | SELECT WITH (5,°) AND (OK) |
| |||||||
|
|
| %Þ, then press OK or | PRESS (MENU) TO END |
|
|
|
| ||||
|
|
|
|
|
|
|
| |||||
|
|
| TIME SCAN # to set to |
|
|
|
|
| ||||
|
|
| "VIDEO". |
|
|
|
|
|
|
|
|
|
|
|
| PREVIOUS PAGE |
|
|
|
| PREVIOUS PAGE |
|
|
|
|
|
|
| =FRONT AUX INPUT | VIDEO |
| FRONT AUX INPUT | VIDEO | |||||
|
|
| REAR AUX INPUT | VIDEO |
|
| =REAR AUX INPUT | VIDEO |
|
| ||
|
|
| CA RECORD | OFF |
| CA RECORD | OFF |
| ||||
|
|
| CA PLAYBACK | OFF | CA PLAYBACK | OFF | ||||||
|
|
|
|
|
|
|
|
| ||||
|
| SELECT WITH (5,°) AND (OK) | ||||||||||
|
|
| SELECT WITH (5,°) AND (OK) |
| ||||||||
|
|
| PRESS (MENU) TO END |
|
|
|
| PRESS (MENU) TO END |
|
|
|
|
|
|
|
|
|
|
|
|
|
|
|
|
|
56 | 99.4.28, 2:05 PM |