DVD/CD Player
Location of the required Marking
Risk of Electric Shock Do not Open
Power Sources
Cleaning
Accessories
POWER-CORD Protection
Replacement Parts
Power Lines
Damage Requiring Service
Safety Check
Laser Beam
Power source
To USE AC Power Source
Disc
VCR Section
Features
DVD/CD Player/Video Cassette Recorder
DVD Section
Contents
Parts and functions
Front
Rear
Explanation for On-Screen-Symbol DVD
Display
Display window
Remote control
Remote control basics
Remote control
Battery precautions
Inserting Batteries
TV multi-brand remote control
Preparation
Power Play
Control four JVC VCRs
Basic connections
Combination VHF/UHF Antenna with 75 ohm Coaxial Cable
Separate VHF and UHF Antennas
Basic connections
Ohm Coaxial Cable supplied Splitter
Converter
Catv Cable TV connections
Incoming Cable
Descrambler
Cable Descrambler
Switch
Catv Cable TV connections
Splitter Descrambler Incoming Converter CableDescrambler
Playback connections
Connect to a TV with Audio/Video Output
Connect to a TV with S-Video Output for DVD/CD playback
Connect to a Stereo Amplifier with Audio Output
Connecting the optical digital cable
Playback connections
Connect to an AV Amplifier with built-in digital surround
Setting the language
Setting the video channel/Setting the language
Setting the Video Channel
Enter
TV/CATV Selection
Tuner setting
Setting channels automatically
Memory
To ADD/DELETE channels/Noise elimination
To ADD/DELETE channels
Noise elimination
Press To select your Time
Press To select the System Setup menu, then Press Enter
Standard Time option, then
Zone, then press the Enter
Auto clock setting
Daylight Saving Time setting
Then press Enter button
Press or to select the Clock SET option, then press
Press or to set the month
To make corrections any time during the process
Loading and Unloading a cassette tape
To stop playback
Forward/Reverse picture search mode
Cassette tape playback
To rewind the tape or forward it rapidly
Special playback
Video Index Search system
Zero Return function/Video Index Search system
Zero Return function
DISPLAY-button
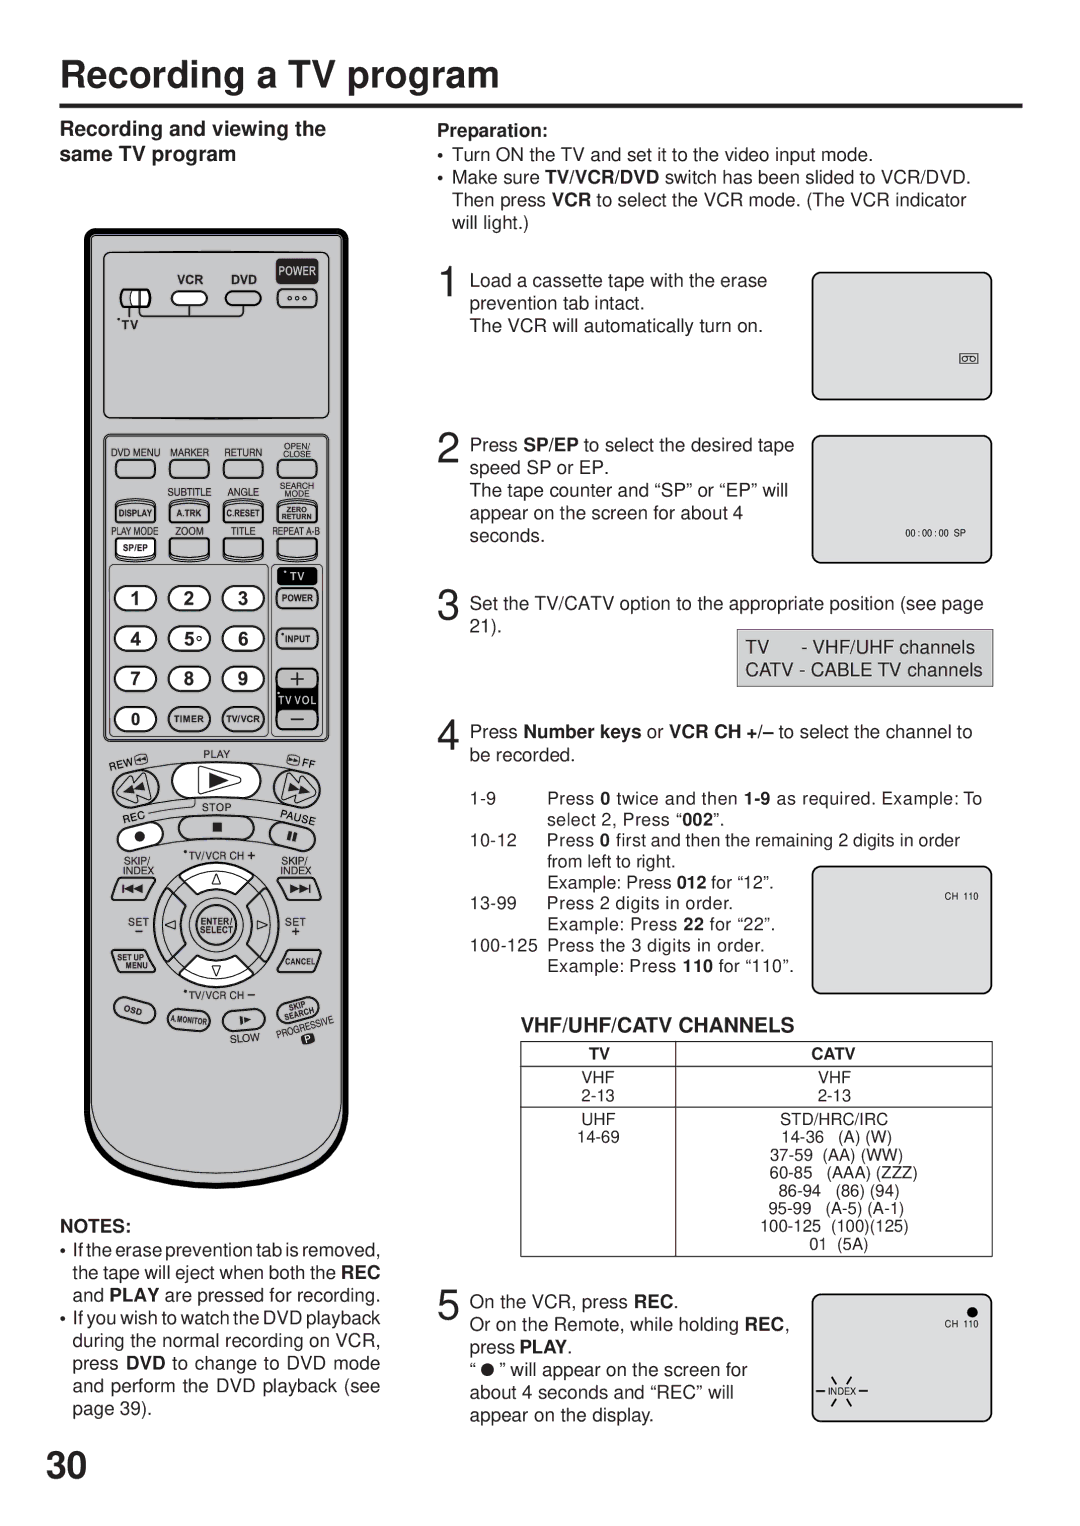
Recording a TV program
Recording and viewing the same TV program
Appear on the display
Recording a TV program
Instant Timer Recording ITR
To cancel ITR
Press Number keys or VCR CH +/-to
Timer recording
If the clock symbol blinks when
Set the start time, end time, channel
Confirmation / Cancellation of the timer recording
Timer-recording
Timer recording special case
Case timer programs-overlap
Output selection
Stereo Recording and Playback
Separate Audio Program SAP
Listening to SAP
Connection with second VCR
Duplicating a video tape
Duplicating a disc material onto a video tape
Connection with Camcorder
Disc
Setting setup language
Setup language can be selected Preparation
Playback procedure
Press OPEN/CLOSE
Still Playback
Fast Forward Playback
Review Playback
Frame Advance
Zooming/Locating desired scene
Zooming
Locating desired scene
Press Play Mode during playback or stop mode
Repeat playback
Repeat playback of Title, Chapter and Track
Random playback
Program playback/Random playback CD
Program playback
You can arrange the order of tracks on the disc
MP3/WMA/JPEG playback
MP3/WMA/JPEG CD information
MP3/WMA CD playback
Jpeg CD playback
Press OPEN/CLOSE. The disc tray will open
About file menu
Off
Setting the Jpeg Interval
Setting the Jpeg Interval
Seconds
Music Only
Setting the Select Files
All
Pictures Only
This unit will allow you to zoom in on the Jpeg image
Zooming/Changing angles Jpeg CD
Changing angles
Zoom mode, press Zoom repeatedly to return to a 11 view Off
Marking the scenes
To cancel the mark
Marking desired scenes
Returning to the scenes
Karaoke playback
Changing soundtrack language/Karaoke playback
Changing soundtrack language
Case of Video CD playback
Title Selection
Subtitles/Changing angles/Title selection/DVD menu
Turning the Subtitles On and Off
DVD Menu
Cancel
Parental control setting
To unlock the Parental Control Setting
Parental control
Temporary disabling of rating level by DVD disc
Or Enter
Setting menu language
Press or Enter To select Then press Menu
Press To select your Desired Language, then press
Other
Setting subtitle language
Mode To select Press Language
Automatic
Power off
Setting audio soundtrack language
Setting surround sound
To cancel Surround mode
Letter box
Setting the aspect ratio of TV screen
You can select the aspect ratio for your TV Preparation
Pan scan
DVD
Setting on screen display/Status display of disc
Status display of disc
Video
Dynamic Range Control
Enter to
About Scanning Mode
Progressive scan
Language code list
Problems and troubleshooting
Symptoms Possible Solutions DVD/VCR
VCR
Auto Clock Setting
Problems and troubleshooting/Video head cleaning
Video head cleaning
Symptoms Possible Solutions
VCR section
Specifications
General
DVD section
For Servicing Only in U.S.A
New Maple Avenue Pine Brook, NJ
For customer use
What YOU Must do for Warranty Service
What is not Covered
What WE will do
Memo
J2C51201B U 03/05