PREPARATIONS AND MAIN FUNCTIONS
CAMERA CABLE LENGTH SETUP
Cable length setup is required when a camera is connected to the
1.
FULL AUTO | F1 | F3 | MENU/SHUTTER | GAIN | P |
|
| SHUTTER |
|
| STEP |
|
|
|
|
| HIGH |
![]() 2. CABLE
2. CABLE
|
|
|
| SHUTTER | VARIABLE | MID |
BARS | F2 | F4 | MENU | R | ||
| LOW | |||||
| GAIN |
|
|
|
|
|
M |
|
|
| DOWN UP | DOWN UP | 2. |
|
|
|
|
|
| |
|
|
|
|
| Control knob | |
| LCD display | MENU button |
|
| ||
| Cursor |
|
|
|
|
|
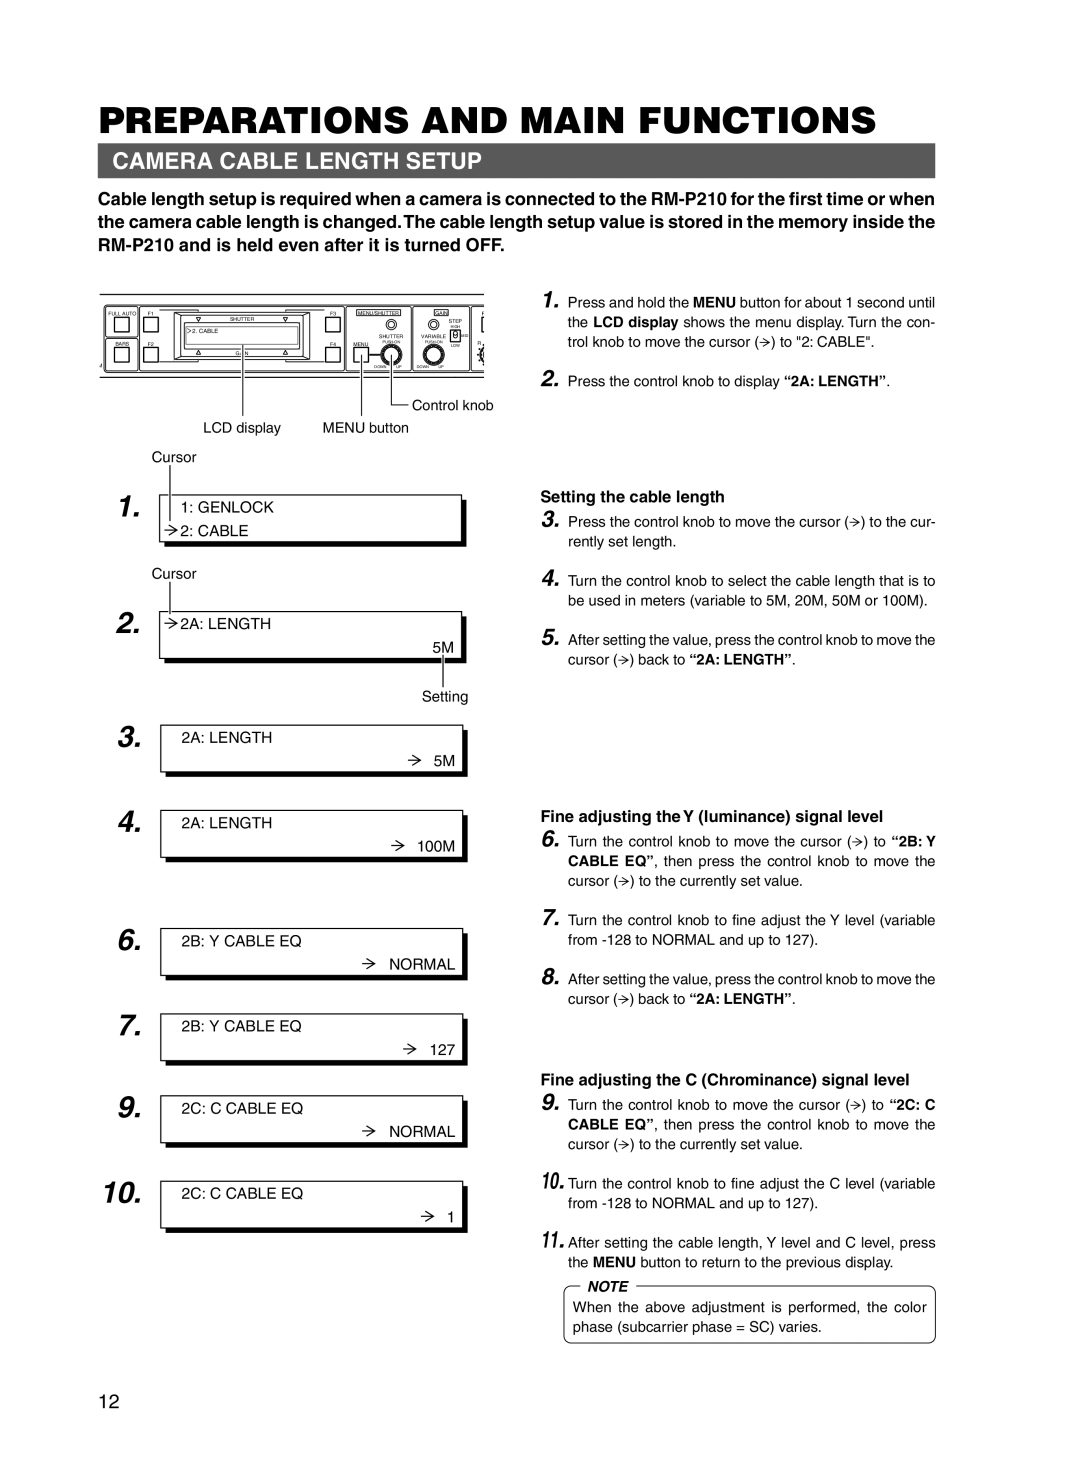
Press and hold the MENU button for about 1 second until the LCD display shows the menu display. Turn the con- trol knob to move the cursor (![]() ) to "2: CABLE".
) to "2: CABLE".
Press the control knob to display “2A: LENGTH”.
1.
2.
3.
4.
6.
7.
9.
10.
1:GENLOCK
![]() 2: CABLE
2: CABLE
Cursor
![]() 2A: LENGTH
2A: LENGTH
5M
Setting
2A: LENGTH
5M
2A: LENGTH
100M
2B: Y CABLE EQ
NORMAL
2B: Y CABLE EQ
127
2C: C CABLE EQ
NORMAL
2C: C CABLE EQ
1
Setting the cable length
3. Press the control knob to move the cursor (![]() ) to the cur- rently set length.
) to the cur- rently set length.
4. Turn the control knob to select the cable length that is to be used in meters (variable to 5M, 20M, 50M or 100M).
5. After setting the value, press the control knob to move the cursor (![]() ) back to “2A: LENGTH”.
) back to “2A: LENGTH”.
Fine adjusting the Y (luminance) signal level
6. Turn the control knob to move the cursor (![]() ) to “2B: Y CABLE EQ”, then press the control knob to move the cursor (
) to “2B: Y CABLE EQ”, then press the control knob to move the cursor (![]() ) to the currently set value.
) to the currently set value.
7. Turn the control knob to fine adjust the Y level (variable from
8. After setting the value, press the control knob to move the cursor (![]() ) back to “2A: LENGTH”.
) back to “2A: LENGTH”.
Fine adjusting the C (Chrominance) signal level
9. Turn the control knob to move the cursor (![]() ) to “2C: C CABLE EQ”, then press the control knob to move the cursor (
) to “2C: C CABLE EQ”, then press the control knob to move the cursor (![]() ) to the currently set value.
) to the currently set value.
10. Turn the control knob to fine adjust the C level (variable from
11. After setting the cable length, Y level and C level, press the MENU button to return to the previous display.
NOTE
When the above adjustment is performed, the color phase (subcarrier phase = SC) varies.
12
