Basic Operations

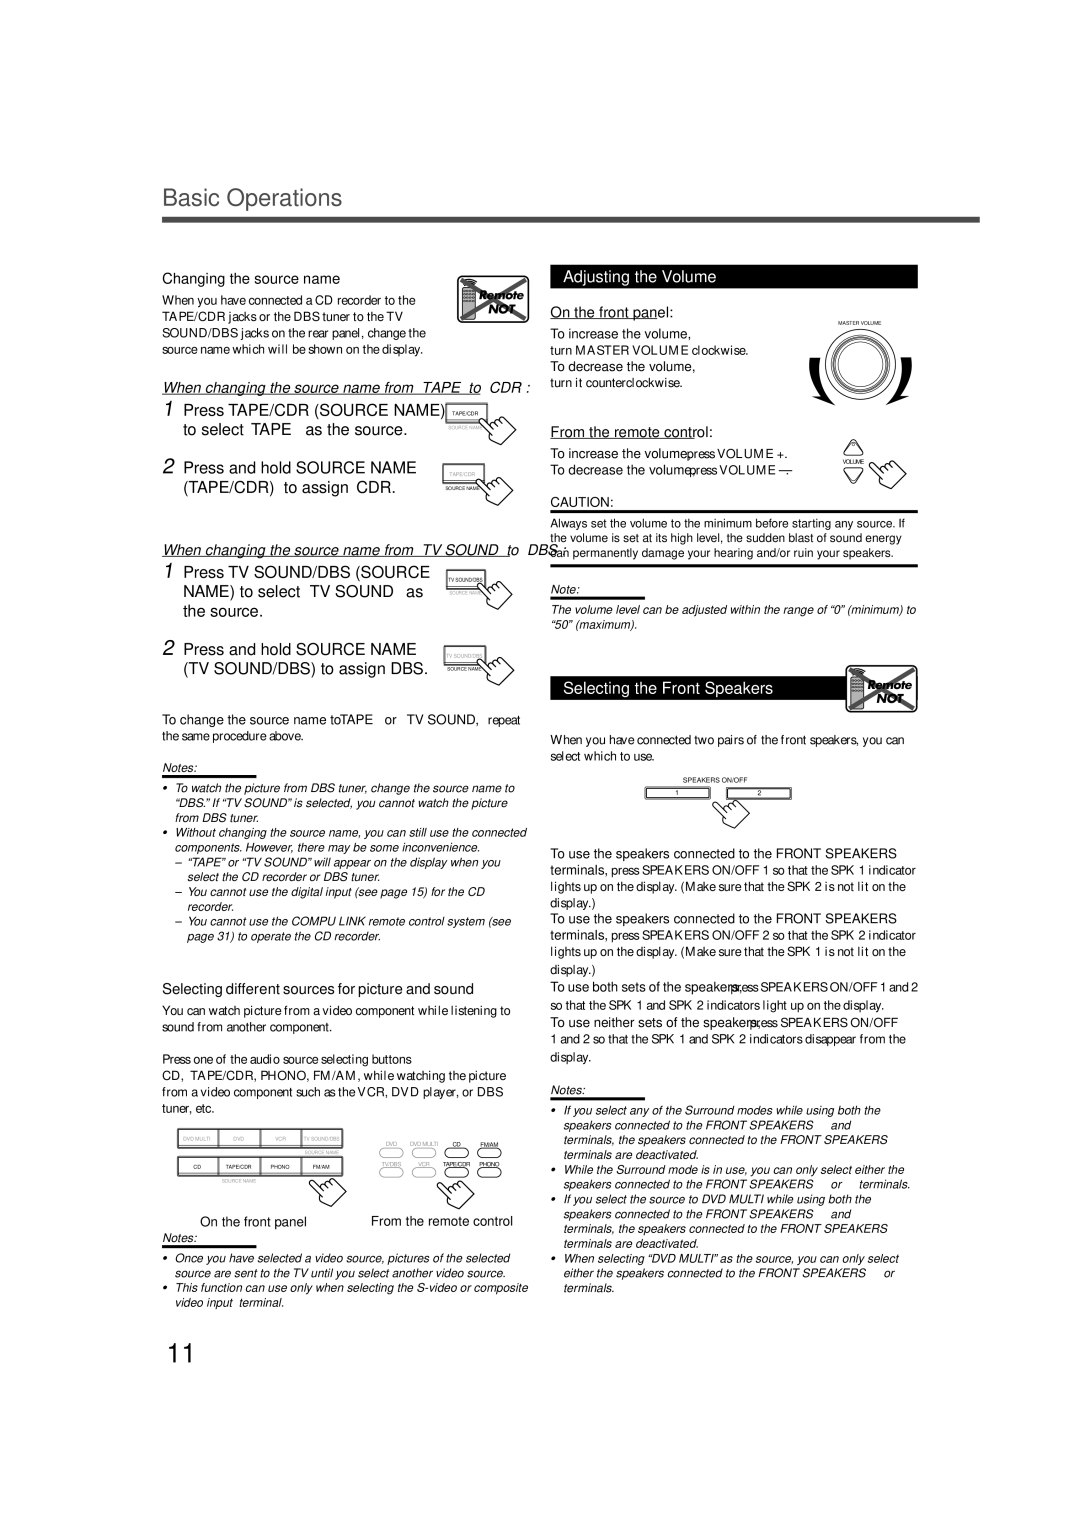
Changing the source name

Remote

When you have connected a CD recorder to the

NOT

TAPE/CDR jacks or the DBS tuner to the TV


SOUND/DBS jacks on the rear panel, change the source name which will be shown on the display.

When changing the source name from “TAPE” to “CDR”:

1Press TAPE/CDR (SOURCE NAME) TAPE/CDR

to select “TAPE” as the source.

SOURCE NAME

2 Press and hold SOURCE NAME


TAPE/CDR


(TAPE/CDR) to assign “CDR.”


SOURCE NAME

When changing the source name from “TV SOUND” to “DBS”:

1Press TV SOUND/DBS (SOURCE

NAME) to select “TV SOUND” as

TV SOUND/DBS

SOURCE NAME

the source.


2 Press and hold SOURCE NAME

TV SOUND/DBS

(TV SOUND/DBS) to assign “DBS.” SOURCE NAME

To change the source name to “TAPE” or “TV SOUND,” repeat

the same procedure above.

Notes:

To watch the picture from DBS tuner, change the source name to “DBS.” If “TV SOUND” is selected, you cannot watch the picture from DBS tuner.

Without changing the source name, you can still use the connected components. However, there may be some inconvenience.

“TAPE” or “TV SOUND” will appear on the display when you select the CD recorder or DBS tuner.

You cannot use the digital input (see page 15) for the CD recorder.

You cannot use the COMPU LINK remote control system (see page 31) to operate the CD recorder.

Selecting different sources for picture and sound

You can watch picture from a video component while listening to sound from another component.

Press one of the audio source selecting buttons —

CD, TAPE/CDR, PHONO, FM/AM, while watching the picture from a video component such as the VCR, DVD player, or DBS tuner, etc.

DVD MULTI

DVD

VCR

TV SOUND/DBS

DVD

DVD MULTI

CD

FM/AM


SOURCE NAME


CD

TAPE/CDR

PHONO

FM/AM

TV/DBS

VCR

TAPE/CDR

PHONO


SOURCE NAME

On the front panel

From the remote control

Notes:

Once you have selected a video source, pictures of the selected source are sent to the TV until you select another video source.

This function can use only when selecting the S-video or composite video input terminal.

Adjusting the Volume

On the front panel:

MASTER VOLUME

To increase the volume,

turn MASTER VOLUME clockwise.

To decrease the volume,

turn it counterclockwise.

From the remote control:

To increase the volume, press VOLUME +.

+

VOLUME

To decrease the volume, press VOLUME –.

CAUTION:

Always set the volume to the minimum before starting any source. If the volume is set at its high level, the sudden blast of sound energy can permanently damage your hearing and/or ruin your speakers.

Note:

The volume level can be adjusted within the range of “0” (minimum) to “50” (maximum).

Selecting the Front Speakers

Remote


NOT

When you have connected two pairs of the front speakers, you can select which to use.

SPEAKERS ON/OFF

1

2

To use the speakers connected to the FRONT SPEAKERS 1

terminals, press SPEAKERS ON/OFF 1 so that the SPK 1 indicator lights up on the display. (Make sure that the SPK 2 is not lit on the display.)

To use the speakers connected to the FRONT SPEAKERS 2

terminals, press SPEAKERS ON/OFF 2 so that the SPK 2 indicator lights up on the display. (Make sure that the SPK 1 is not lit on the display.)

To use both sets of the speakers, press SPEAKERS ON/OFF 1 and 2 so that the SPK 1 and SPK 2 indicators light up on the display.

To use neither sets of the speakers, press SPEAKERS ON/OFF

1 and 2 so that the SPK 1 and SPK 2 indicators disappear from the display.

Notes:

If you select any of the Surround modes while using both the speakers connected to the FRONT SPEAKERS 1 and 2 terminals, the speakers connected to the FRONT SPEAKERS 2 terminals are deactivated.

While the Surround mode is in use, you can only select either the speakers connected to the FRONT SPEAKERS 1 or 2 terminals.

If you select the source to DVD MULTI while using both the speakers connected to the FRONT SPEAKERS 1 and 2 terminals, the speakers connected to the FRONT SPEAKERS 2 terminals are deactivated.

When selecting “DVD MULTI” as the source, you can only select either the speakers connected to the FRONT SPEAKERS 1 or 2 terminals.

11

Page 14
Image 14
JVC RX-7022VSL manual Basic Operations, Adjusting the Volume

RX-7022VSL specifications

The JVC RX-7022VSL is a versatile and powerful receiver designed to enhance the audio experience in your home entertainment system. This model combines advanced technologies and user-friendly features, making it a popular choice among audio enthusiasts.

One of the standout features of the RX-7022VSL is its robust power output. The receiver provides 100 watts per channel, delivering a clear and dynamic sound across various audio formats. This power output is particularly beneficial for driving larger speakers, ensuring that even the most demanding audio tracks are rendered with precision and clarity.

The RX-7022VSL is equipped with multiple audio inputs, including HDMI, coaxial, and optical connections. This extensive range of inputs allows easy connectivity with various source devices, such as Blu-ray players, gaming consoles, and streaming devices. The receiver also supports multiple audio formats, including Dolby Digital, DTS, and PCM, ensuring optimal compatibility with your existing audio equipment.

One of the key technologies featured in the RX-7022VSL is JVC’s proprietary Digital Signal Processing (DSP). This technology enhances the sound quality by providing advanced audio filtering and sound field options, allowing you to tailor the listening experience to your preferences. The receiver also includes a built-in equalizer, enabling users to adjust the sound profile to suit their audio tastes and room acoustics.

In addition to its audio capabilities, the RX-7022VSL includes a user-friendly remote control, allowing for easy adjustment of settings from across the room. The on-screen display simplifies navigation through various audio modes and settings, making it accessible for users of all skill levels.

The design of the RX-7022VSL is both sleek and functional, with a modern aesthetic that fits well in any home theater setup. The front panel features a clear LED display, rotary knobs for volume and input selection, and dedicated buttons for quick access to commonly used features.

In summary, the JVC RX-7022VSL receiver stands out for its powerful audio performance, versatile connectivity options, and user-friendly interface. With its combination of cutting-edge technology and thoughtful design, it is well-suited for both casual listeners and audiophiles seeking to elevate their home sound experience. Whether you're watching movies, listening to music, or enjoying gaming, the RX-7022VSL delivers a captivating audio experience that enhances any entertainment setup.