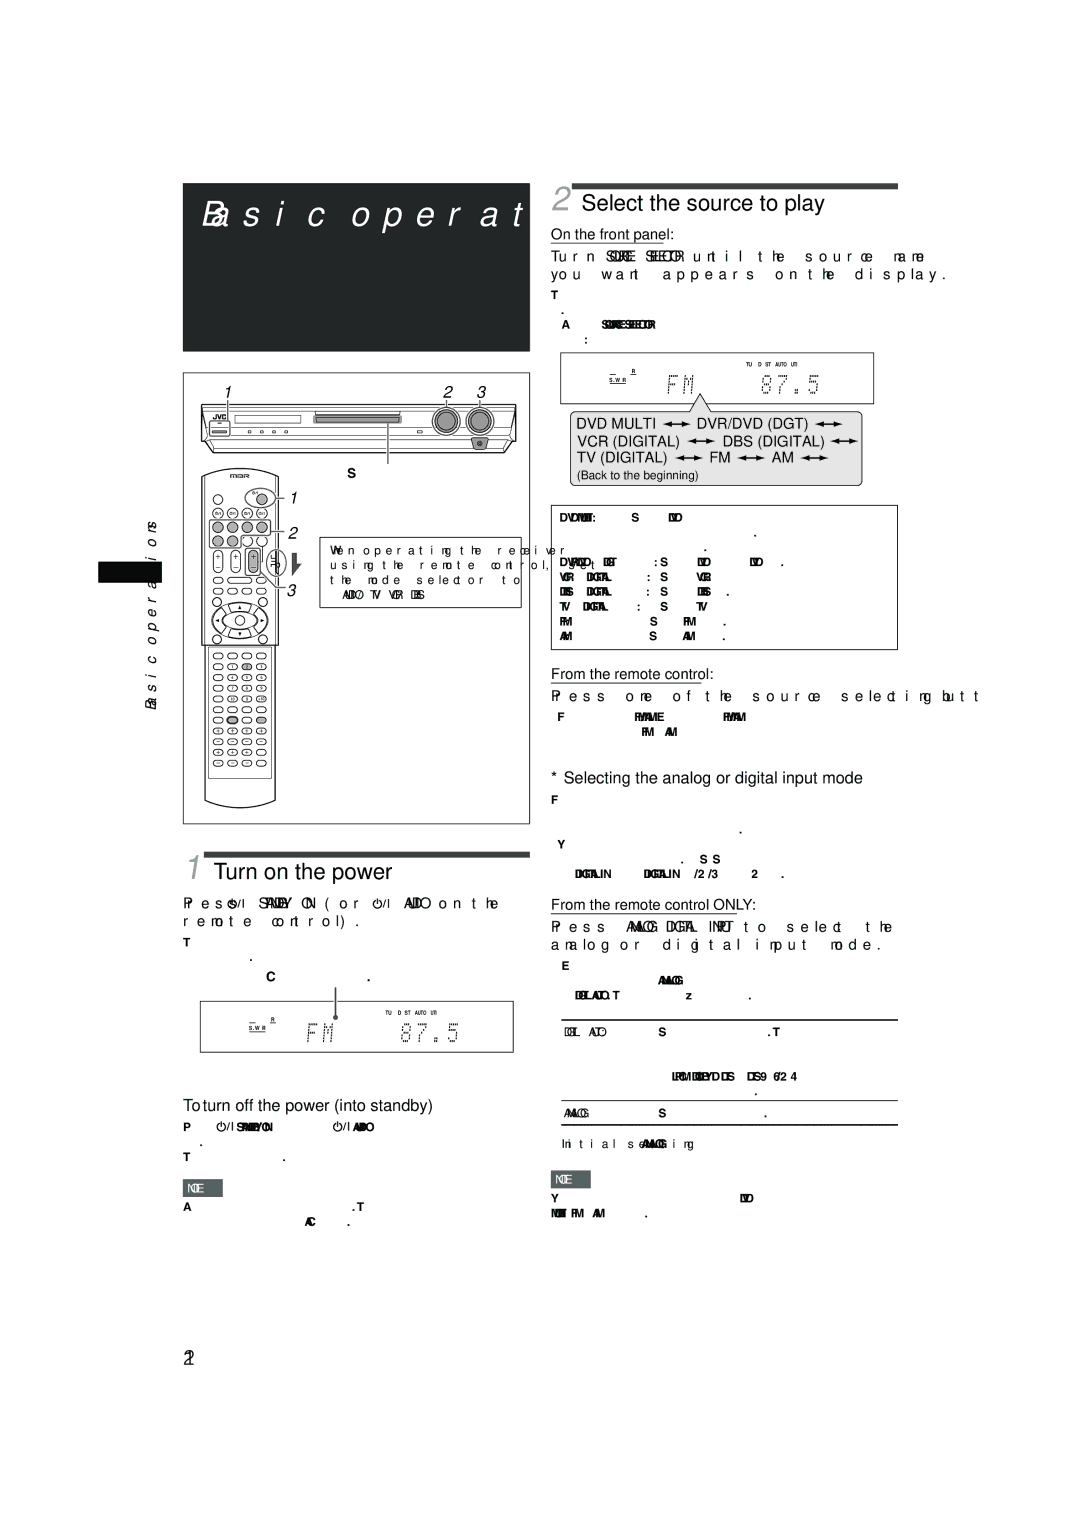
Basic operations


1

2

3


Source lamps


1


2


When operating the receiver


using the remote control, set


3

the mode selector to


Basicoperations

“AUDIO/TV/VCR/DBS.”


1 Turn on the power

Press STANDBY/ON (or AUDIO on the remote control).

The standby lamp goes off and the source lamp of the current source lights in red.

Current source name appears.

EQ C.TONE

VIRTUAL SB

AUDIO P. BASS

TA

NEWS

INFO

RDS

TUNED

ST

AUTO MUTING SLEEP AUTO MODE

LPCM

L

C

R


PL


ATT

DOLBY D

S . WFR LFE

NEO : 6


HP

DTS AAC


DSP 3D

MHz

LS SB RS

96 / 24

AUTO SR

kHz

To turn off the power (into standby)

Press STANDBY/ON (or AUDIO on the remote control) again.

The standby lamp lights in red.

NOTE

A small amount of power is consumed in standby mode. To turn the power off completely, unplug the AC power cord.

2 Select the source to play

On the front panel:

Turn SOURCE SELECTOR until the source name you want appears on the display.

The source lamp corresponding to the selected source lights in red.

As you turn SOURCE SELECTOR, the source changes as follows:

EQ C.TONE

VIRTUAL SB AUDIO P. BASS

TA NEWS INFO RDS TUNED ST AUTO MUTING SLEEP AUTO MODE

LPCM

L

C

R


PL

ATT

DOLBY D

S . WFR LFE

NEO : 6

HP

DTS AAC


DSP 3D

MHz

LS

SB

RS

96 / 24

AUTO SR

kHz


DVD MULTI DVR/DVD (DGT)

VCR (DIGITAL) DBS (DIGITAL)

TV (DIGITAL) FM AM

(Back to the beginning)

DVD MULTI:

Select the DVD player using the analog


discrete output mode (5.1-channel


reproduction).

DVR/DVD (DGT)*: Select the DVD recorder or DVD player.

VCR (DIGITAL)*:

Select the VCR.

DBS (DIGITAL)*: Select the DBS tuner.

TV (DIGITAL)*:

Select the TV.

FM:

Select an FM broadcast.

AM:

Select an AM broadcast.

From the remote control:

Press one of the source selecting buttons.

For the tuner, press FM/AM. Each time you press FM/AM, the band alternates between FM and AM.

* Selecting the analog or digital input mode

For a component you have connected using both the analog connection and the digital connection methods (see pages 7 to 11), you need to select the correct input mode.

You can select the digital input only for sources which you have selected digital input terminals for. (See “Setting the digital input (DIGITAL IN) terminals—DIGITAL IN1/2/3” on page 21.)

From the remote control ONLY:

Press ANALOG/DIGITAL INPUT to select the analog or digital input mode.

Each time you press the button, the input mode alternates between the analog input (“ANALOG”) and the digital input (“DGTL AUTO”). This setting is memorized for each source.

DGTL AUTO: Select for the digital input mode. The receiver automatically detects the incoming signal format, then the digital signal format indicator (LPCM, DOLBY D, DTS, or DTS 96/24) for the detected signal lights up.

ANALOG: Select for the analog input mode.

Initial setting: ANALOG

NOTE

You cannot select the digital input mode when selecting “DVD MULTI,” “FM,” or “AM” as the source.

12

Page 14
Image 14
JVC RX-F10S manual Basic operations, Turn on the power, Select the source to play, To turn off the power into standby

RX-F10S specifications

The JVC RX-F10S is an impressive home theater receiver that embodies a blend of power, versatility, and advanced technology. Designed to enhance the audio-visual experience, this receiver offers a suite of features that cater to both casual listeners and audiophiles alike.

At the heart of the RX-F10S is its robust amplification system, delivering a powerful output that ensures high-quality sound reproduction across a wide range of frequencies. With multiple channels for surround sound support, it allows users to create an immersive audio environment, perfect for movie-watching or music enjoyment. The receiver supports various surround sound formats, such as Dolby Digital and DTS, enabling a cinematic experience right in the comfort of one's living room.

One of the standout features of the RX-F10S is its connectivity options. It is equipped with multiple HDMI inputs that support the latest 4K Ultra HD and HDR pass-through. This ensures compatibility with the latest gaming consoles, Blu-ray players, and streaming devices, providing future-proofing for your entertainment setup. In addition to HDMI, the receiver also includes optical and coaxial digital inputs, along with several analog inputs, providing flexibility in connecting various audio sources.

The RX-F10S is designed with user convenience in mind. Its intuitive on-screen interface simplifies the setup process and allows users to easily navigate through settings and options. The inclusion of a remote control further enhances usability, making it easy to switch between audio sources and adjust sound settings without getting up.

Another notable aspect of the JVC RX-F10S is its compatibility with wireless technologies. It features built-in Bluetooth that allows for seamless streaming from smartphones, tablets, and other compatible devices. This adds an extra layer of convenience, enabling users to enjoy their favorite music without the hassle of physical connections.

In terms of sound customization, the RX-F10S includes an equalizer that allows listeners to adjust their audio preferences according to their taste or the acoustics of their room. This level of personalization is crucial for those who seek a tailored listening experience.

Overall, the JVC RX-F10S is a versatile home theater receiver that combines powerful performance with a wide array of connectivity options and advanced features. Its ability to deliver high-quality sound while being user-friendly makes it an excellent choice for anyone looking to upgrade their home entertainment setup. Whether you are watching movies, playing games, or listening to music, the RX-F10S is poised to elevate your audio experience to new heights.